Tuesday, February 28, 2006

Response from Whole Foods

About a week ago I wrote a letter to Whole Foods, asking them why they stopped scaling fish fillets. And guess what... I heard back from them. I was really surprised at how quickly they wrote back and expected a canned "Thanks for your feedback" response. Instead, the recycled paper I was holding in my hands was actually addressing the subject of my complaint. Here is what the seafood manager of my local Whole Foods said:
We strive for excellent customer service and in the future we ask that you let us scale your selected fillet of fish and have you inspect the product prior to wrapping. Unfortunately, as the fish industry moves higher amounts of fish everyday and most of the preparation is made at the processing plants, it gets difficult for us to add extra processing procedures to the large amounts of fish at the store level, but we are more than willing to do so on a one-to-one basis.

In other words, if you want your fish scaled you have to ask. But obviously they are hoping that not many people will ask. I do appreciate the honesty in the letter, but I don't appreciate the dishonesty in the store. They quietly stopped scaling fish without telling their customers. There was no sign or indication from the seafood staff that anything changed.

What he says about preparation being done at the processing plants has been true for a long time. Whole Foods does not fillet their own fish. But I learned something interesting in yesterday's talk FISHY BUSINESS: THE FISHING INDUSTRY IN NEW ENGLAND by Max Harvey, a fish buyer for many New England restaurants. Whole Foods can specify exactly how they want their fish prepared (filleted, scaled, boned, etc). Of course, they do have to pay more for scaled fillets. Max also mentioned that fish prices went up recently. So I wonder whether selling fillets with scales is Whole Foods' way to save costs. I have no idea if that's really the case -- it's just my guess.

I find it strange that small fish markets can get fish already scaled, while a big fish (no pun intended ;) like Whole Foods is "stuck" with whatever their suppliers give them. I have a feeling that Whole Foods is getting exactly what they want. If their customers haven't given them hell about this issue yet, I guess everyone's happy.

So thanks dear Whole Foods for offering to scale my piece of fish, but I'll go to a real fish market for salmon, striped bass, red snapper, or any other fish I plan to eat with the skin.

Monday, February 27, 2006

To rinse or not to rinse: that is the question

Alanna Kellogg from Kitchen Parade just asked me a great question about rinsing fish.
Hi Helen,

Do you know why do recipes sometimes (but not always) suggest rinsing filets?

Seems so basic -- I'm guessing it's for health/bacteria reasons but if that's the case, yuck, who wants to eat fish in the first place (is the reaction I have and I'm guessing others as well)?

And if it IS for health/bacteria reasons, then why don't recipes
suggest the same thing for chicken, pork, etc???

Many thanks --

Alanna
Thanks for a great question, Alanna!

You don't need to rinse fish, chicken, pork, or any other meat before cooking. Not only does it not get rid of bacteria, it spreads bacteria (if water splashes from the sink in the process of rinsing). What kills bacteria much more effectively is cooking.

So why do so many cooks rinse their fish and chickens? Because their mothers used to ;)

Here is a quote from Cook's Illustrated on the subject:
Not only is there no scientific evidence to support your mother's practice, science is actually against you on this one. The U.S. Department of Agriculture, as well as food agencies in the United Kingdom and elsewhere, advises against washing poultry. Rinsing chicken will not remove or kill much bacteria, and the splashing of water around the sink can spread the bacteria found in raw chicken. (Cooking poultry to 165 degrees Fahrenheit effectively destroys the most common culprits behind food-borne illness.)
Fish is not fundamentally different from chicken, so you don't have to rinse it.

Cheers,
-Helen

Sunday, February 26, 2006

Tomato Onion Tart

If you like savory tarts, you probably have your favorite. Is it Quiche Lorraine? Spinach and Mushroom, or maybe Potato and Leek? Well, whatever it is – it’s not really your favorite. Oh sure, you might think it is. But that’s just because you haven’t tried my Tomato Onion Tart. Trust me – it has no equals.
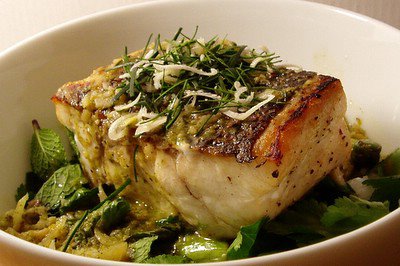
If there was ever a dish without a secret ingredient, this is it. It’s just Pâte Brisée (pie dough), filled with a layer of caramelized onions, a layer of grated gruyère, and a layer of halved cherry tomatoes arranged in snug circles. The cherry tomatoes burst with each bite like little balloons, their tartness balanced by jammy onions, and rounded with the richness of the cheese. No combination can be simpler or more sublime.

Even when tomatoes are not in season, this tart seems to bring out the best in them; I find it to be a perfect antidote to February grayness when comfort food is starting to get to me, yet summer is nowhere in site. Besides, it’s Jason’s favorite dish, on par with seared tuna and Boeuf Bourguignon, so making it only during the tomato season is not really an option (at least not for me ;)

Pâte Brisée (tart dough) for one 10-inch tart
3 Tbsp olive oil
1 Tbsp butter
1 and 1/2 Lb yellow onions, sliced
1 and 1/2 tsp salt
1 tsp balsamic vinegar (optional)
6 oz gruyère, grated
1 Lb cherry tomatoes, halved
  1. Roll out the dough 1/8 inch thick. Fit into tart pan, trim, and chill 30 minutes while preparing the onions and preheating the oven.
  2. Preheat the oven to 425F with racks in the bottom third and upper third of the oven. If you have a pizza stone, place it on the bottom rack.
  3. Set a large, heavy pot oven medium heat. Add oil and butter. When butter is melted, add onions and salt. Cook stirring occasionally until onions are tender, about 12 minutes. Turn down the heat to medium-low and cook stirring occasionally until onions are medium brown, about 45 minutes. Add balsamic vinegar (optional), and cook stirring occasionally until onions are dark nutty brown, about 15 minutes. Take off heat and set aside.
  4. Place the tart pan on a cookie sheet. Line the tart shell with parchment paper or foil and dry beans (or some other weigh) and bake in the bottom third of the oven for 18 minutes. Remove parchment paper with beans, lightly poke dough with a fork at 1/4 inch intervals to prevent it from puffing up, and return to the bottom third of the oven for 5 more minutes.
  5. Turn down the oven to 375F.
  6. Fill the tart shell with caramelized onions. Sprinkle with a layer of gruyère. Arrange cherry tomatoes cut side down in concentric circles starting with the outer circle and working your way in towards the center of the tart. Bake tart on the bottom rack for 15 minutes. Move tart to the top rack and bake until tomatoes are just starting to brown, 15 more minutes. Cool 10 minutes before serving.

Wednesday, February 22, 2006

Would you like some scales with your fish?

I don't send stuff back in restaurants, I rarely return anything I buy, and in general I hate to complain about bad service. If something's not to my liking, I go elsewhere next time. So why am I writing this letter to Whole Foods? Because I think it's wrong for them to sell unscaled fish. Sure I can go somewhere else (hey, let's face it -- I usually do), but I know lots of people who only buy fish at Whole Foods and don't know how to scale fish. With any other store, I would just let it go, but I have hope that Whole Foods will not ignore my feedback and will try to fix the problem. Am I overly optimistic? Maybe. I'll let you know if I ever hear back from them.

* * *

Dear Whole Foods,

I have been a loyal customer of the fish departments in several of your Boston area stores for over 5 years. Although the quality of the fish is consistently high, I find that the care in preparation of the fish for cooking has declined in the last few years. I can’t count the number of times I unwrapped my fillet and found it unscaled.

This happened again last week when I bought a beautiful fillet of striped bass. As I rubbed it with salt and pepper, I realized that the scales were still on. I turned off the heat under my pan, rolled up my sleeves, and attempted to scale this poor fillet the best I could. I was frustrated not only because my dinner got delayed, but also because scaling fish after it is filleted is not particularly easy (since there is no tail to grab onto).

Unscaled fillets are not the only problem I’ve encountered. Asking for help from the fish department in scaling and gutting a whole fish is also a gamble. Several times, I brought a whole fish home that was poorly scaled, or had pieces of guts and gills still left in.

While this is a nuisance for me, it is a real turn off for cooks who are less experienced with fish. Many people don’t cook fish on regular basis. If they try to cook salmon or striped bass with the skin as their recipe suggests, they will end up with a plate full of scales and are likely to never try this fish again, or conclude that they should discard its skin (not only the most delicious, but most nutritional part of many fish).

I hope you can address this problem. Many cooks count on you not only to sell high quality products, but also introduce them to new foods, and educate them about cooking techniques. Providing properly cleaned fish can encourage people to cook it more often and to try new fish without worrying about what obstacles they might encounter before putting it in the pan.

Sincerely yours,

Helen M. Rennie

Tuesday, February 21, 2006

Seared Striped Bass with Green Curry

Making my own green curry paste did required a shopping trip to get a dozen ingredients that go into it. But my immersion blender did all the hard work, and now that I have a jar or green curry in my fridge, I've been whipping up cool sauces in minutes. Here is my favorite green curry dish from last week. Of course, you can use store bought curry paste, but beware that it might be more spicy, so you might want to start with 2 teaspoons and add more to taste.

Tips: Kaffir lime leaves are not always available, so if you see some at your store, get a bunch and freeze them in a ziplock bag. Defrost for 5 minutes before using. And if you can't find kaffir lime leaves at all, just skip them. I won't tell if you won't tell.

Fish substitutions: Red Snapper, Salmon, Black bass, Halibut (without skin), Sable (without skin)

Serves 4

For the fish:
4 striped bass fillets with skin, 6-8 oz each
1 Tbsp canola oil
Salt and pepper

For the curry:
4 kaffir lime leaves
1 lemongrass stalk, white part only, outer leaves removed
1 Tbsp canola oil
1 shallot, finely sliced
3 garlic cloves, minced
3 inches of ginger, peeled and minced
1/2 tsp ground coriander
2-3 Tbsp green curry paste (if using store bought paste, adjust amount to taste)
1 1/4 cup water
Zest and juice of 1 lime
1 Tbsp soy sauce
2 tsp fish sauce (nam pla)

Garnishes and sides (optional):
Cooked rice
1 cup whole cilantro leaves
1 cup whole mint leaves
2 kaffir lime leaves, stemmed and sliced as thinly as possible
2 inches lemongrass stalk, white parts only, sliced as thinly as possible
  1. Preheat the oven to 400F.
  2. Prep all the curry and garnish ingredients so that you are ready to make the sauce while fish is cooking.
  3. Dry fish fillets well with paper towels and season with salt and pepper on both sides.
    Set a large non-stick or well seasoned cast-iron skillet over medium-high heat. When hot, add 1 Tbsp oil and wait for it to get hot. Add fish fillets skin side down and sear without disturbing until browned, 3-4 minutes.
  4. Flip the fish, and place the skillet in the oven. If your skillet is not oven safe, move the fish skin side up to a shallow baking dish before moving to the oven. The total cooking time (searing + baking) should equal 8 minutes per inch of thickness. To test for doneness, bend the fillet with a fork as if to fold it in half. If the fillet breaks, it's done (don't worry -- the skin will keep it together so it will still look good). Since the fish will continue to cook once it's off the heat, it should be almost opaque in the center, but not quite.
  5. While fish is cooking, prepare the curry. Set a large skillet over high heat. When hot, add the oil, shallots, garlic, and ginger. Cook stirring constantly just until starting to brown, about 1 minute. Add coriander and curry paste and cook stirring constantly until fragrant, about 1 minute.
  6. Reduce heat to low. Slowly add the water, lime zest and juice, soy sauce, fish cause, 3 whole kaffir lime leaves, and whole lemongrass stalk. Bring to a boil and simmer on low for 5 minutes. Discard lime leaves and lemongrass and add salt and pepper to taste.
  7. Divide rice among 4 plates, top with whole cilantro and mint leaves. Place fish on top of each plate skin side up. Spoon curry on top of fish. Garnish with sliced kaffir lime leaves and lemongrass.

Monday, February 20, 2006

Technique of the Week: How to make sushi rice

Since the "How to section an orange" post got such a warm reception, I thought I'll start a Technique of the Week column :) Based on the picture, you might think that I will tell you how to make sushi. Well, not yet. That's a technique that I still need to work on myself. But I can tell you how to make great sushi rice since it's something that I finally mastered.

Although I am an avid fish cook, sushi is one of those dishes I preferred to leave to professionals. At least that was the case until this weekend. Memories of make-your-own-sushi parties, that were so popular with my college friends, still make me shudder. If you ever ate one of those dilapidated cucumber rolls made with mushy rice while pretending to have a good time, you know what I mean. What made me consider making my own sushi after all those years of bad memories was watching Japanese cooks select pieces of fish to serve raw at the New Deal Fish Market. I've been watching them with curiosity for months, and the nosy person that I am, I could never resist asking them questions about what fish to use and how to prepare it.

It wasn't the fear of eating raw fish that was stopping me. Parasites in some of the salt water species are so rare, that it is safe to eat these fish raw as long as they are as fresh as New Deal sells them. What I was worried about was not knowing how to properly cut the fish, make the rice, and put them together. But I guess there is the first time for everything, and I decided to give it a shot.

Believe it or not, rice scared me more than the fish. I don't own a rice cooker and making a small quantity of rice in a pot always leaves me with a burnt bottom. My plan was to use Cook's Illustrated baking method. It simulates a rice cooker by surrounding the rice vessel with even indirect heat and works wonders on brown rice. My hope was that it would work for sushi rice too.

While looking through at least 5 recipes for sushi rice on-line and in my cookbooks, I found out why the rice we made for sushi in college was so awful. First of all, we skipped the rinsing step. You have to rinse rice thoroughly before cooking it to get rid of extra starch. Second, we didn't let it rest after cooking. Third, we used seasoning from a package instead of making our own. And fourth, we didn't cover it with a damp towel to prevent it from drying out after it was done.

By following Cook's Illustrated baking method and Ming Tsai's recipe for seasoning I got really fantastic rice -- glossy, toothsome, and just barely sweet. Finally, I had rice that was worthy of New Deal's fish.

It made all the difference! I decided to keep it simple and served most of the fish as sashimi (just sliced) or nigiri (sliced over a ball of rice). The most complicated thing that I attempted was spicy tuna rolls with crispy tempura bits. The verdict by Jason, the sushi snob, was that sushi is definitely worth making at home!


How to make sushi rice

Makes enough rice for 8 rolls

2 cups short-grain Japanese sushi rice
2 cups water
1/2 cup rice wine vinegar
2 Tbsp mirin (Japanese sweet sake)
1/4 cup sugar
2 tsp salt

Rice cooker method

  1. Place rice in a fine sieve and place the sieve in a bowl of water. Rinse thoroughly changing the water in the bowl at least 3 times until the water runs completely clean when you remove the sieve from the bowl. Drain well.
  2. Place rice and water into the rice cooker, turn it on, and wait for rice to cook. Proceed to the Finishing Rice section.

Oven method

  1. Preheat the oven to 375F.
  2. Place rice in a fine sieve and place the sieve in a bowl of water. Rinse thoroughly changing the water in the bowl at least 3 times until the water runs completely clean when you remove the sieve from the bowl. Drain well and put into an 8x8 Pyrex dish.
  3. Bring 2 cups water to a boil.
  4. Pour boiling water over rice and cover the Pyrex dish tightly with foil. Place in the middle of the oven for 20 minutes. Proceed to the Finishing Rice section.

Finishing rice

  1. Allow rice to rest covered for 20 minutes.
  2. Combine the vinegar, mirin, sugar, and salt in a small non-reactive saucepan and set over medium heat until the mixture is hot and sugar dissolves. Do not allow it to boil.
  3. Invert rice into a large wooden bowl. If you don't have one, you can use a glass or stainless steel one, but wood works best.
  4. Fold half of the vinegar mixture into rice with a rubber spatula or a wooden spoon. Use a cutting and folding motion when stirring rice to avoid squashing the rice grains and releasing their starch. Taste the rice. It should have a pleasantly sweet-acidic edge. If necessary, fold in more vinegar mixture.
  5. Wet a dish towel (or 2 layers of paper towel) and cover the rice. Let it rest for 20 minutes to develop flavor. Keep rice covered while shaping your rolls.

Friday, February 17, 2006

Seminars in Boston University

Culinary Historians of Boston newsletter mentioned some interesting seminars at BU (Boston University) . Here are two that looked particularly enticing:

FISHY BUSINESS: THE FISHING INDUSTRY IN NEW ENGLAND
Max Harvey, avid fisherman and seafood buyer for Jasper White’s Summer Shack, will educate us on the fishing industry of New England. He will discuss the politics of current trends, including sustainable fisheries, regulations, seasonality and aquafarming. After this lively lecture, you will never look at fish the same way.
$10
Monday, February 27, 6–7:30 p.m.

MODERN STILL LIFE: WHAT MAKES A GOOD FOOD-THEMED PHOTOGRAPH
For more than 20 years, Jim Scherer has been photographing food. His worksinclude the recently published Moosewood Simple Suppers as well as three Julia Child cookbooks and regular appearances in the Boston Globe Magazine. Come see his portfolio, and hear from Jim what makes a good food image. He will also give a demonstration of a food-centered photo-shoot, and answer your questions.
$10
Monday, March 20, 6–7:30 p.m.

To register, call BU at 617-353-9852. If any of you Boston folks want to go, give me heads up.

Have a great 3 day weekend!

Thursday, February 16, 2006

Mortar and Pestle the Way God Intended

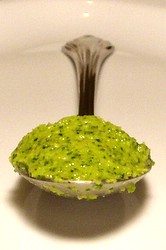
I seldom look for shortcuts or high tech equipment to help me with prep tasks. Herb choppers or garlic presses always seemed irrelevant to me because I can chop herbs and mash garlic just as fast with my Wusthof knife. Beside my knife is easier to wash than all those gadgets. But there is one old fashioned tool that I hate with a vengeance – mortar and pestle. Attempting to make aioli in it just once has totally rid me of desire to pound any food related item ever again. In spite of many cooks’ conviction that nothing can rival the taste of hand pounded pesto, I think I do quite well with a food processor – thank you very much. And the blender does an amazing job with herb oils. Dump a bunch of parsley and couple of cups of oil into a blender, bzzz, and voila – parsley oil is ready.

There is just one little problem – food processors and blenders only works for large quantities. When you want less than 1/2 cup of some sauce, you are in trouble. No matter how much I scrape the sides, and try to get stuff to stay close to the blade, it flies all over and never really gets pureed. Couple of times, I was really close to buying a decent mortar and pestle solely for that purpose. But I am glad that I didn’t because a supped up version of mortar and pestle surreptitiously made its way into my kitchen.

After reading Clotilde’s (from Chocolate & Zucchini) rhapsody on her immersion blender, I gave it to myself for Christmas, and it has revolutionized my life in the kitchen. “Revolutionized” is a strong word usually used in vain by dot-coms and pharmaceutical companies to sell you something you don’t need. But I am not kidding – immersion blender has changed how I cook. Sure, it has all those nice features that people tell you about, like puréeing a soup right in its pot and the ease of cleaning. But the thing that made the most difference to me is being able to purée small amounts of stuff. I’ve made 1/4 cup portions of herb cream, walnut cream, asparagus cream, anchovy vinaigrette (without having to mash garlic and anchovies first), and today I even made my own green curry paste.

Why would I make my own curry paste when I could buy it at Whole Foods? Because I don’t really like Whole Foods “Thai” brand all that much. I am definitely not critiquing its authenticity. Asian cooking is not my area of expertise. But I find their pastes to have very little flavor besides heat, and I was hoping to come up with my own version that relies on aromatics more than on chilies. It’s definitely a layman’s interpretation of green curry paste, but it was tasty and made a wonderful sauce for striped bass tonight.

Green Curry Paste

Note: You can make this paste in a good processor, but you’ll have to double or triple the recipe depending on the size of your processor.

Makes 1/2 cup

1 serrano chiles, seeded and coarsely chopped (this will make a mild paste. If you like heat, by all means use more chiles)
2 inches ginger, peeled and coarsely chopped
2 Tbsp coarsely chopped shallots
4 garlic cloves, coarsely chopped
1 lemongrass stalk, white part only, thinly sliced
2 tsp ground coriander
1 tsp ground cumin
1/4 cup packed cilantro leaves
1/4 cup packed mint leaves
2 kaffir lime leaves, chopped
2 tsp fresh lime juice
1 Tbsp fish sauce
2 Tbsp canola oil
Salt and pepper to taste

Combine all ingredients in a 2 cup Pyrex measuring cup (or another tall container that can fit immersion blender snuggly) and blend until smooth. Use immediately or refrigerate in an airtight container.


For the striped bass, I sautéed some garlic, ginger, shallots, and ground coriander. Added a cup of water, kaffir lime leaves, a lemon grass stalk, juice of 1 lime, a little fish sauce and soy sauce. Brought to a boil, seasoned and served over seared striped bass with rice, mint, and cilantro leaves. It tasted as good as it looks :) I’ll post a detailed recipe soon.

Tuesday, February 14, 2006

Poached Halibut with Cilantro Cream and Oranges

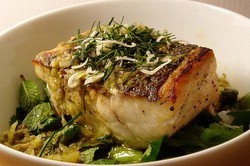
My brother and his girlfriend are some of the youngest foodies I know. At the ripe age of 21 and 20, they love hanging out in the kitchen with me (Megan mostly helping, and Leo mostly sneaking food), cooking on their own, and even reading food blogs. So when they came to visit this weekend, it was a perfect opportunity to make something special. Not that I need an excuse to make a special dinner, but I do need an excuse to make chocolate bread pudding. That stuff is just too dangerous to make for 2 people.

The question was what to serve before that "Death by chocolate." I was thinking of something light and doable in 30 minutes after coming home from work, but special enough for my dear brother whom I only see a few times a year. Poached halibut with sorrel cream sauce seemed perfect for the occasion. The only problem was that Whole Foods didn't have sorrel. But when did a missing herb stop me from making a dish? This cream sauce is all about variations. Not only can you use other herbs, you can even skip them all together and add some Dijon mustard or lemon zest. This time, I combined some chervil and cilantro, topped the whole thing with blood oranges and served it over asparagus. I am not sure what got more oohs and aahs -- death by chocolate or poached halibut.

Fish substitutions: sole, flounder, cod, haddock, hake or any other mild white fish. If using thin fillets (like sole or flounder), fold them in half.

Serves 4

4 halibut fillets without skin (6-8 oz each)
1 cup fish stock or water (plus more as needed)
1/2 cup dry white wine (plus more as needed)
1 Tbsp butter at room temperature (plus more for buttering parchment paper)
1 Tbsp flour
1/4 cup heavy cream
2 Tbsp finely chopped cilantro
2 blood or navel oranges, sectioned (tip: see how to section an orange)
Salt and pepper
  1. Preheat the oven to 375F.
  2. Set an oven-proof skillet that is just large enough to hold fillets in one layer over high heat. Add enough fish stock and wine so that the liquid is 3/4 inch deep (use the ratio of 2 parts stock to 1 part wine). When the liquid comes to a boil, turn down the heat so that it simmers gently.
  3. Cut out a circle of parchment paper the size of your skillet and heavily butter one side.
  4. Season halibut with salt and pepper on both sides and add to the simmering liquid. Cover with buttered parchment paper, and tuck the paper inside the skillet so that it touches the liquid and forms a bubble around the fish. This will keep the fish moist, but will let enough steam to escape so that the liquid stays at a bare simmer.
  5. Place the skillet in the oven and cook fish for 8 minutes per inch of thickness. To check for doneness, separate the flakes with a fork. Fish is done if the flakes separate without much resistance even if some parts still look translucent. Remove the fish to warm serving plates with a spatula and a spoon. Cover with foil to keep warm while finishing the sauce.
  6. Pour the poaching liquid into a measuring cup. Discard all but 1 cup of liquid. Pour it back into the skillet and set it over high heat. Reduce the liquid for 3-5 minutes to roughly 2/3 of a cup.
  7. While the liquid is reducing, mash 1 Tbsp butter with 1 Tbsp flour in a small bowl using a fork until they form a smooth paste.
  8. Turn down the heat under the poaching liquid to medium and whisk in the flour-butter paste. Whisk vigorously until no lumps remain and the sauce thickens slightly. Whisk in cream and herbs. As soon as the sauce comes to a simmer, take it off heat. Taste and correct seasoning.
  9. Pour the sauce over fish. Top with oranges and serve with good bread for dipping.

How to section an orange

I can't help but reach for citrus every time I am in a store these days. Why bother with styrofoam tomatoes or limp zucchini when I can get the juiciest blood oranges, meyer lemons, and tangerines. Citrus fruit are extremely versatile and pair well with everything from fish to desserts. Since many of my fish recipes call for "sectioned oranges" or other citrus fruit, I thought it's about time I explain what I mean by this.

Sectioning an orange means removing all unwanted elements -- skin, white pith, and membranes -- and leaving only the juicy parts. Why would you bother with this fussy technique that yield less fruit than peeling, and separating into segments? Because sectioned oranges taste much better on top of fish, salads, and desserts, and they brown better under the broiler. Have you noticed how the oranges and tangerines that come from cans have no membranes? Believe it or not, it's not hard to do that at home. The reason you wouldn't just use canned oranges is that the fresh ones taste so much better. All you need to produce those glistening nuggets is a knife with a narrow blade and a little patience.

Step 1: Cut off the top and bottom of an orange.


Step 2: Set the orange on a cutting board flat side down, and cut off the skin and all of the white pith in curvy strips. You'll have to cut off a little of the juicy part too to make sure no white pith remains.


Step 3: Continue working your way around the orange until no skin remains.


Step 4: Hold the orange in the palm of one hand and the knife in the other hand. Choose a section that you are going to free. Run a knife on the right side of the section next to the right membrane, and then on the left side of the section next to the left membrane.


Step 5: Loosen the section and remove it from the orange.


Step 6: Continue removing the rest of the sections folding empty membranes to one side like pages of a book.


Ta-da -- you have a sectioned orange!

Monday, February 13, 2006

Smoked Trout and Fennel Chowder

When my parents used to bring home a whole smoked fish, I just couldn’t help sneaking the buttery flakes right from the newspaper where my Mom was taking it apart. The smell of daily news soaked with smoky fat (smoked fish in Russia was always sold in newspapers) made the air heavy with anticipation. Yeah, I know, not exactly an appetizing description by American standards, but that unmistakable smell makes me drool to this day. Maybe that's why I have a soft spot for smoked fish. It reminds me of weekend lunches in our home in Moscow -- smoked mackerel with boiled potatoes, and buttered pumpernickel bread.

Of course, smoked fish is wonderful as is – eaten right from the newspaper it was sold in -- but I have discovered other uses for it that are a bit more up to date. I don’t remember ever seeing a soup made out of smoked fish, but I tried it once and it became the official hearty fast food of my household. No need to make the fish stock -- smoked fish has enough flavor for the whole pot and then some. Potatoes make this a comforting and hearty dish, and fennel gives it a subtle mineral note. Make sure to have plenty of good crusty bread for dipping.

Fish substitutions: this recipe works with most hot-smoked fish (salmon, bluefish, mackerel, etc.)

Serves 4 as the main course

3 Tbsp olive oil
2 fennel bulbs, trimmed and thinly sliced (reserve fronds for garnish)
2 garlic cloves, sliced paper thin
1 Lb red skinned potatoes, peeled and cut into 3/4” dice
2 tsp chopped thyme and/or rosemary
2 hot-smoked trout fillets, skin and bones removed
1/2 cup dry white wine
8 cups water
1 bay leaf
1/4 cup heavy cream
Salt and pepper

  1. Set a large heavy pot over high heat. Add the oil. When oil is hot, add fennel and cook stirring occasionally until nicely browned, about 7 minutes. Don’t stir too much so that fennel has a chance to brown and develop flavor.
  2. Turn down the heat to medium. Add garlic, potatoes and thyme (or rosemary), season generously with salt and pepper and cook stirring occasionally until garlic is aromatic and tender, about 2 minutes.
  3. Break up trout into chunks and add to the pot. Add wine, water, and bay leaf. Cover and bring to a boil. Taste and correct seasoning. Liquid should be well salted since potatoes will absorb a lot of salt. Reduce heat to low and simmer covered until potatoes are very tender, 30-40 minutes.
  4. Stir in cream and serve sprinkled with chopped fennel fronds.

    Note: This soup reheats beautifully and usually tastes better on the second day.

Saturday, February 11, 2006

Mercury in Fish

For some strange reason, American women feel that they need to bring sacrifices to the Goddess of fertility by banning wine, good cheese, smoked meats, rare steaks, and sushi from their diet. The reason I am writing this post, is that cooked fish has recently joined this echelon of forbidden foods due to the threat of mercury harming the fetus.

After Andrea from Rookie Cookery asked me to comment on the subject, I set out on a research project to separate fact from media hype. I even got my husband, a research scientist well-versed in statistical methods, to aid in the investigation.

The event that made mercury into a “hot button” issue was the Minamata Disaster in Japan. From 1932 to 1968, Chisso Corporation dumped an estimated 27 tons of mercury compounds into Minamata Bay [1]. By eating the fish from the local waters, many inhabitants of that area (including many unborn babies) got severe mercury poisoning resulting in brain damage and sometimes even death. There is no dispute that high amounts of mercury are dangerous to human health. The question is how much is too much?

To find the answer, we dug through a good number of articles. Most just made big scary statements like 1 in 6 American women puts her baby at risk, and 630,000 infants are born every year with unsafe mercury levels [2]. But it wasn’t until we got to the FDA’s site that we started getting some real facts.

Here is a diagram showing the level of mercury in mother's blood in 3 recent studies [3].


You see the first two large bars. That’s the average amount of mercury in mother’s blood in parts per million (ppm) of two large-scale studies. That’s a lot of mercury compared to the study done in US. But even at those high levels of mercury, the results from the two island studies were inconclusive. Faroe Island study found that this level of mercury had a negative effect on infant cognition; the Seychelles Island study found no effect.

The study in US was done by Harvard Medical School on 135 mothers and their babies in Boston area. The average level of mercury in this group was only 0.55ppm. Did those women eat fish? Yes they did! The average fish consumption during pregnancy was 1.2 servings per week. Since I eat way more than 1.2 servings of fish per week, my next question was “How much does each weekly serving raise my mercury level?” According to the HMS study, each additional weekly serving of fish increases your mercury level by 0.17ppm. So even if you were to eat fish every day, it would be practically impossible for you to reach the mercury levels of the two island studies.

The Boston study found that mother’s fish intake was positively correlated with infant cognition. While fish contains mercury, which is negatively correlated with infant cognition, it also contains “nutrients like iron, vitamin E, selenium, and long-chain n-3 polyunsaturated fatty acids that may benefit brain development.” Here is an excerpt from the study that explains risk benefit trade-off.
Mercury levels vary among different fish species. In general, white meat fish such as cod and haddock tend to have lower mercury levels but also lower levels of long-chain n-3 fatty acid, whereas dark meat fish such as swordfish, mackerel, and other large long-lived predatory fish, tend to contain both more mercury and more n-3 fatty acids. Because mercury and n-3 fatty acids often travel together, it may be difficult to isolate the opposing influences of the two on child cognition.
Small fatty fish, such as sardines contain relatively more fatty acids with less mercury. But since no data is currently available on how different fish effect infant cognition, the study suggests that women eat a variety of fish to maximize the benefits and minimize the risks.

Keep in mind that I am not a doctor or a scientist, but here are my 2 cents on this polarizing debate. Fish does not make a good sacrifice to the goddess of fertility. In fact, avoiding fish may be detrimental to unborn children. If you are really looking to ban something, consider fast food. Meanwhile, if you want to do something good for your health and your palate, go to your local fish market and start exploring beyond salmon.

Further reading:

Mercury Levels in Commercial Fish and Shellfish


References:

[1] Minamata Disaster

[2] Siera Club -- Overview of Mercury

[3] Maternal Fish Consumption, Hair Mercury, and Infant Cognition in a U.S. Cohort

Note: this post was updated on Feb. 12, 06.

Monday, February 6, 2006

Does my blog look good in this? I guess so!

Andy from Spittoon Extra hosted this month’s “Does my blog look good in this?” food photography event. If you want to see some gorgeous shots, check out the winners:

1st place - Mahanandi
2nd place - Fred Kitchen
3rd place - Nika’s Culinaria

I particularly love Fred’s photo of winter fruit compote. What was surprising is that my photo of caviar got a joint Aesthetics award. Wow – I am blushing as I type, and am honored to be in such great company of Belly Timber and Lucullian Delights.

By the way, I promised you guys the menus from my Russian and Provencal classes.


From Russia with Love
Caviar Canapés (the ones that turned out to be so photogenic :)
Pickled mushroom salad
Pickled cherry tomatoes
Sauerkraut with Cranberries
Potato Pirozhki (baked rolls stuffed with mashed potatoes)
Chicken Stuffed with Prunes Roasted in a Paper Bag
Plov (Uzbek rice dish)

Passion for Provence
Bouillabaisse with garlic toasts and rouille
Rosemary and Garlic Rack of Lamb
Ratatouille
Blood Orange Mousse

Sunday, February 5, 2006

Fish Salad with Forbidden Rice

I thought that come Sunday, I'll be relieved. Here is what last week was like: make shopping guides, test recipes, make handouts, run to Whole Foods, run to the Russian store, run to the fish market, run to the bakery, run to the kitchen, cook, rinse, and repeat. Scheduling 3 cooking classes in one week, while working full-time, seemed like a recipe for a nervous breakdown. But I am delighted to report that all classes went really well, and I am actually sad that they are over.

What classes did I teach last week? Who’s afraid of cooking fish? on Tuesday, From Russia with Love on Friday, and Passion for Provence on Saturday. You probably want to know what we cooked. I promise that that will be the very next post. But today is a day for clean up and organizing – starting with my kitchen and finishing with the blog.

As I was going through last week’s pictures, I realized that the Fish Salad with Forbidden Rice keeps patiently waiting to be written about. This salad came to life purely out of necessity. I was so busy last week that my own dinners were low key and mostly made out of leftovers from the previous weekend. The striped bass leftovers from a whole roasted fish were begging for a salad. The problem was I didn’t have any greens. But who says all salads have to have lettuce? After I added asparagus, red onion, and avocado, I had a good looking salad for one person. The problem was how to double it in size without going shopping. Don’t you just love little challenges like that?

Starch – that’s what this salad needed to be a well rounded meal. After digging through the pantry, I found just the thing – Forbidden Rice (also known as black or purple rice). What so forbidden about it? According to the legend on the Lotus Foods package, it was once eaten exclusively by the emperors due to its magical powers to promote longevity. Well, longevity or not, it’s a tasty rice. It resembles wild rice in texture, but has a deep, almost sweet flavor, and can be found in any Whole Foods.

I added the rice, a healthy portion of lime vinaigrette, and voila – I had dinner for two. To my great surprise, this everything-but-the-kitchen-sink salad turned out to be a keeper. Slight bite of asparagus and rice were perfect compliments to the delicate fish, and avocado that melted into the dressing created a buttery coating that bound all ingredients together into one harmonious whole.

Fish substitutions: any fin fish or shell fish leftovers. Hey, this can even work with chicken!

Serves 4

For the salad:
1 cup your favorite interesting rice (purple, wild, or brown)
2 tsp olive oil
1/2 Lb asparagus, trimmed, cut into 1 inch lengths
1 Lb leftover fish fillets, skin removed and flaked
1/4 cup thinly sliced red onion
2 avocados, peeled and sliced
1/4 cup chopped parsley, cilantro, mint, or basil

For the dressing:
2 Tbsp lemon or lime juice
2 anchovy fillets, mashed to a paste (optional)
3 Tbsp olive oil
Salt and pepper to taste

  1. Cook rice according to package instructions. Cool completely.
  2. Set a large skillet over high heat. When preheated add oil and asparagus and cook stirring occasionally until tender, but not mushy, about 5 minutes. Take off heat and cool.
  3. In a large bowl combine rice, asparagus, fish, onions, avocados, and herbs. The salad can be prepared up to this stage a day in advance, covered, and stored in the fridge.
  4. Whisk all the dressing ingredients together and pour over salad. Season to taste with salt and pepper and mix well.

Wednesday, February 1, 2006

Who's afraid of cooking fish?

As I was scrambling to find pots, pans, and cooking spoons during my first class at the Newton Continuing Education, I wondered what I got myself into. After 4 years, I got used to the little quirks of the Cambridge Center for Adult Education – no sharp knives (so I bring my own), be prepared to rewash all equipment before using it, and don’t expect all the burners on the stovetop to work. But this was my first time teaching at Newton, and I didn’t know what to expect.

Newton cooking classes are done in a high school kitchen, which comes with its own set of quirks. If I wanted get through my first class, I had to learn fast. All the cabinets and drawers were locked, so if you wanted a cooking spoon, you’d better find the right key first (at least there were only 2 keys). There was no dish rack, and we weren’t allowed to use a dishwasher – this meant drying every piece of equipment we used during class. And it was 80 degrees in that kitchen! Apparently the thermostat controled a whole wing of the school and couldn’t be adjusted. Note to self: wear short sleeves under work clothes and change before class.

Luckily, NCE’s staff was absolutely wonderful and determined to get me over whatever bumps I encountered. Kate was so worried that my olive oil went bad after someone put it in the fridge that she ran out to Whole Foods and got me another bottle (actually, it was fine, just solidified, but another bottle of EVOO never hurts). Carmella was able to replace whatever mysteriously disappeared from the kitchen: sponges, paper towels, and even dish towels. And Pattie was always ready to get me the wine I was hiding in the office fridge – you can’t trust those high school kids with anything, particularly wine :)

Best of all were the students: Anne, Tama, Lisa, Judy, and Tom. They chopped veggies, sectioned oranges, seared, poached, steamed, roasted, and broiled fish, and shared wonderful stories of their cooking adventures at home. Tom quickly learned that white pepper is not to be trifled with, and although his fish came out a tad on the spicy side, it was a good learning experience. He just needs to do a little PR work to convince his wife of that. Judy’s 5-year-old daughter ate haddock for the first time. Tama’s husband liked salmon teriyaki. And Anne was determined to master tuna steaks. Although Lisa was too busy to cook at home, she jumped at every opportunity to help in class and made our cleaning much easier by bringing extra towels to class. We shared our cooking successes, learned from our failures, and had our share of laughs.

Since yesterday was the last class of this 4 week series, we made a feast of whole fish: bass steamed with ginger and scallions and bream broiled with fennel and oranges. And for a sweet ending, Judy made us the most decadent molten chocolate cake with raspberry center. She promised me a recipe, so stay tuned.