Tuesday, April 25, 2006

Fiddleheads


It’s hard to describe fiddleheads without using the word “cute.” Every time I see these little green ferns rolled up in tight little spirals, I think of our cat Brandy curled up in her chair. They feel both green and cozy at the same time, which is just the way nature intended spring to feel.

Eating these miniature spirals is great fun because you get a little crunch from the stem and tenderness from the leafy part. Although they look unlike any other vegetable you might pick up in the store, you cook them the same way as asparagus, green beans, or any other green vegetable.
  1. Start by snapping the ends of the stems. They get brown very quickly after being snapped, so do this shortly before cooking your fiddleheads.
  2. Put fiddleheads in a large bowl with cold water and rub gently with your hands. This will separate the dried up brown leaves. Scoop fiddleheads out with a slotted spoon.
  3. Bring a pot of salted water to a boil and prepare a bowl with ice water.
  4. Add fiddleheads and a squirt of lemon juice to boiling water and cook for 2-3 minutes (just until fiddleheads lose the grassy taste, but still remain crunchy). This is called blanching.
  5. Using a slotted spoon, remove fiddleheads to a bowl of ice-water and let them cool completely, about 2 minutes.
  6. Drain fiddleheads and dry on paper towels.
You can also steam fiddleheads for 5 minutes instead of blanching.

At this point, you can add them to soups and salads, or sauté them in a pan with butter and garlic for an awesome side dish. If you are willing to plan ahead, you can marinade them in some lemon vinaigrette for a few hours or overnight. This makes them taste almost pickled.

Today, my little fiddleheads ended up in a bowl with tuna, cranberry beans, celery, cilantro, shallots, arugula, and anchovy vinaigrette.

Monday, April 24, 2006

Meme around the world

The lovely Bea from La Tartine Gourmande tagged me for a Meme around the World several weeks ago. What a great way to learn about all those food blogs that are out there!

Please list 3 recipes you have recently bookmarked from foodblogs to try:

Molten chocolate cake from La Tartine Gourmande -- I once had this incredible chocolate cake in a little bistro in Beaune, Burgundy that had a liquid black currant center. Since I am not much of a cake baker, I never tried to reproduce it, but Bea's wonderful recipe inspired me to try.

Baccala on crostini of fried polenta from Lucullian Delights -- I am always looking for new ways to use baccala since I like it much more than regular cod. Shh, don't tell anyone, but I find regular cod to be kind of boring. But baccala (salted cod) is an entirely different story. It might be stincky, but it's oh so good.

Roquefort and Leek Quiche from Sweet Napa -- now that I've discovered that my husband will eat quiche (as long as it's the proper quiche with lots and lots of heavy cream, and not an omelette baked in a crust), I have been looking for a really great quiche recipe to try. This one looks like the queen of all quiches.

A foodblog in your vicinity

I just discovered Mini-me's wonderful blog about eating out in Boston, called Boston Chomps. She is one of my fellow Chowhounds and this girl knows how to eat out!

A foodblog located far from you

KUIDAORE in Singapore. J's photography is amazing and I just love how she'll stop at nothing and take no shortcuts when it comes to great food. You should see her recent post about foie gras!

A foodblog (or several) you have discovered recently (where did you find it?)

Nordljus and Station Gourmande. I found both by following links from other blogs. Nordljus is a feast for the eyes. And I need to brush up on my french so that I can read Station Gourmande's recipes -- they look spectacular.

Any people or bloggers you want to tag with this meme?
But of course!
Kalyn from Kalyn's Kitchen, Ilva from Lucullian Delights, Nina from Sweet Napa, mzn from Haverchuk, and Alanna from Veggie venture

Saturday, April 22, 2006

Technique of the Week: FAQ about Herbs

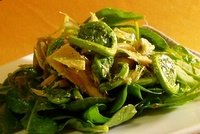
If I had to choose my second favorite ingredient (you can guess what the first one is from the name of this blog), it would have to be herbs. I am much more of an herb person than a spice person. I guess it comes with the territory when you grow up in Eastern Europe and learn how to cook in the Mediterranean. I don't toast and grind my own spices, and I probably couldn't tell you the difference between two types of chilies. But when it comes to herbs, I am fanatical. I never met an herb I didn't like, and at any given moment I am likely to have 3-4 varieties of fresh herbs in my fridge. If I don’t have an herb the recipe calls for, I substitute, but under no circumstances do I use dried herbs. It’s like using garlic powder instead of real garlic – it’s just not the same thing. When I teach classes, I get all kinds of interesting questions about herbs and I thought I'll finally sit down and organize my thoughts on the topic of herbs.
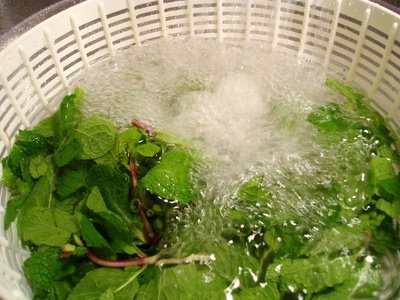
Q: How do you wash herbs?
A: I use a salad spinner. Believe it or not I bought it just for that purpose. I mean, who washes salads these days when you can buy pre-washed mixed greens?

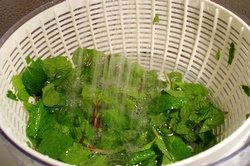
Before I bought a salad spinner, I filled a large bowl with cold water and let the herbs soak for 5 minutes allowing the sand to settle on the bottom. Then I would scoop them out (being careful not to disturb the sand) and lay them out on paper towels to dry.

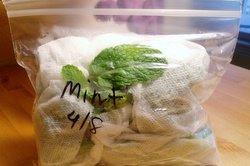
Q: How do you keep herbs fresh?
A: After washing herbs, and drying most of the water off them (that’s when the spinner comes in handy), I wrap them in a dry paper towel and stuff them in zip lock bags. Since I have several such bags in my fridge at one time, I write the herb and date on the bag to help me figure out which is which. Wrapped this way, the herbs stay fresh at least 1 week.


Q: What’s the best time to add herbs to your dish?
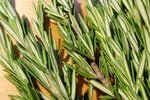
A: All herbs are split into two categories: hard herbs and soft herbs. I never heard those terms used in culinary literature, so I am not sure if those are technical definitions or if I just made them up, but it’s distinctions that I find useful.

Hard herbs, like rosemary, sage and thyme are sturdy and I add them to my dishes in the beginning of cooking.
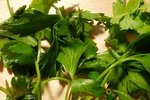

Soft herbs, like parsley, cilantro, mint, dill, and chives are delicate and turn brown and yucky when cooked. I add them in the last minute of cooking time, or after taking the dish of the heat.


Q: Most dishes call for just a few sprigs of a particular herb. What do you do with the rest of the bunch?
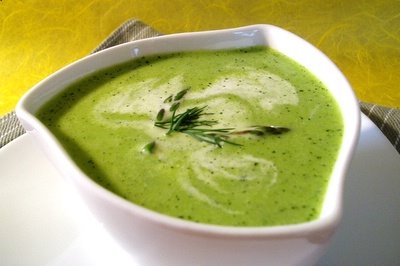
A: If I have soft herb leftovers, I often make a pesto type dip for bread. These little sauces take 5 minutes to make in a food processor and are excellent on top of fish, chicken, and lamb. They also are perfect for mixing into pasta or serving as a spread for sandwiches. The possibilities are endless if you use your imagination.

Here are some ideas to get you started:

Basil Pesto:
Basil, Pine nuts, parmesan, garlic, olive oil, butter (recipe)

Mint-Pistachio Pesto:
Mint, Pistachios, garlic, olive oil

Maidanosalata (Greek parsley spread):
Parsley, garlic, lemon juice, 1 piece of bread without crust, olive oil

Salsa Verde:
Parsley and some other herb of your choice, lemon zest and juice, capers, anchovy, olive oil (recipe)

Cilantro-Lime Sauce:
Cilantro, lime zest and juice, garlic, olive oil

You don’t really need measurements for these sauces. Just be conservative with the garlic. One or even half a clove is all you need. Start by processing the herbs with the other ingredients, except for olive oil. When everything is well chopped, keep the food processor running, and drizzle in enough olive oil to form a paste that is as thick or thin as you’d like.

You can also make chive, parsley, or mint oil by combining the appropriate herb with some olive oil in a blender instead of a food processor and pureeing until completely smooth. Drizzle some of this great stuff over your plate and you can turn any weekday dinner into a restaurant quality meal.

When I have hard herbs leftover, I often throw a bunch on the grill when cooking fish or meat. The smell is intoxicating and in makes whatever you are cooking extremely aromatic. You can also cook hard herbs like rosemary or oregano in olive oil on very low heat to infuse it with that herb’s flavor. Sage leaves are awesome pan-fried in a few tablespoons of butter until crispy and then stirred into pasta or gnocchi (along with all that deliciously infused butter, of course).

So, what are you waiting for? I am sure you have some herbs in your fridge that can be turned into something yummy instead of languishing in anonymity until they wilt. Have fun!

Wednesday, April 19, 2006

Tuna with Green Bean Salad and Deviled Eggs


I like rare tuna appetizers more than main dishes. I don’t have a good explanation for this, expect that when tuna is as rare as I like it, it’s still cool inside, and cool dishes usually make better appetizers than mains. Of course, there is nothing to prevent you from making a really large appetizer and having that for dinner, which is what I did last night. Some appetizers are too good to only have a few bites.

I adopted this dish from Casablanca restaurant in Cambridge, where I used to work. It’s really 3 separate little dishes:
  • the tuna
  • green bean salad dressed with olive tapenade
  • and deviled eggs
They are all great individually, but when all three come together, they make one of my absolutely favorite tuna appetizers. Now that I think about it, it makes sense – these are re-interpreted components of one of the greatest salads of all times, Salad Niçoise.

You’ll have plenty of tapenade leftover, which is not the worst problem to have. Serve it on bread along with your tuna and keep leftovers in the fridge for up to 3 days.

Serves 4 as a first course

For Deviled Eggs
4 large eggs
1 Tbsp mayo (Hellmann’s works great)
2 tsp heavy cream
2 tsp Dijon mustard
1 Tbsp chopped herbs (chives, parsley, dill, or cilantro)

For Green Beans and Tapenade
2/3 Lb haricot verts (baby green beans), snapped
1 cup kalamata olives, pitted
2 tsp drained capers (optional)
1 anchovy fillet (optional)
2 Tbsp olive oil
A squirt of lemon (about 1/2 tsp)

For Tuna
1 Lb tuna steak (first grade)
2 tsp butter
Salt and pepper

To make Deviled Eggs
  1. Put eggs in a small saucepan, cover with cold water and bring to a boil. Reduce heat, and simmer for 3 minutes. Take off heat and let sit 20 minutes before draining and peeling.
  2. Peel the eggs and half them lengthwise. Remove the yolks into a small bowl and mix them with mayo, cream, mustard, and herbs. Season to taste with salt and pepper, and stuff the mixture back into egg whites. Cover with plastic and keep in the fridge until ready to serve.
To make Green Beans
  1. Bring a large pot of salted water to a boil.
  2. Prepare a medium bowl with ice-water.
  3. Add the beans to the boiling water, and cook just until they lose the grassy taste, but remain crunchy, 2-3 minutes. It's better to undercook than overcook. Remove them with a slotted spoon to a bowl with ice-water and cool completely, about 5 minutes. Drain the beans and dry well on paper towels.
  4. To make tapenade, combine olives, capers, anchovy, and olive oil in a bowl of a food processor, and purée until they form a paste. If the mixture is too dry, add more olive oil.
  5. Mix green beans with 2 Tbsp of olive tapenade, a squirt of lemon, salt and pepper to taste.
To make Tuna
  1. Dry tuna well on paper towels and season generously with salt and coarsely ground black pepper.
  2. Set a medium skillet over high heat. When hot, add the butter and wait for it to melt. Place the tuna in the skillet and cook 1 and 1/2 minutes. Flip and cook 1 and 1/2 minutes longer. No need to check for doneness. Tuna will be nice and rare – I promise.
  3. Remove tuna from heat and slice against the grain.
  4. Divide the beans among 4 plates, top with tuna and drizzle with a little olive oil. Add 2 egg halves to each plate and serve with good bread and extra tapenade on the side.

Tuesday, April 18, 2006

Panettone

There are 3 types of people in this world (at least among the inhabitants of the kitchen): the cooks, the bakers, and the bread bakers.

The cooks are the improv guys. They have a hard time with exact measurements and “follow” recipes only in the loosest sense of the term.

The bakers are the chemists. They mix a bunch of stuff together (measuring all the ingredients carefully according to the recipe), put it in the oven, and wait for some magic to happen. Their idea of improvisation is adding cranberries to their oatmeal cookies instead of raisins.

And then there are bread bakers. Not the bread machine guys. I mean the serious bread bakers who obsess about a perfect baguette or ciabatta. They are the biologists, in my mind. They are dealing with a living creature – growing, changing, and completely unpredictable. Making a good loaf of bread is like raising a child (only faster and without as much gray hair). It takes the precision of a chemist with the intuitive understanding of a cook.

As you, no doubt, have guessed by now – I am a cook. I like understanding my ingredients and improvising to bring out the best in them. For instance, I believe that fish have personalities (delicate, fleshy, assertive, etc), as do the veggies (starchy, crunchy, green, leafy, etc). I know how they work, and I am perfectly confident even when I come across one that I haven’t tried before.

The chemistry type baking is not my thing. I love making tarts (mostly because I get to mess with the filling) and couple of other things, but overall I don’t get much satisfaction out of the process. No matter how well it comes out, I don’t really feel like it’s my creation. All I did was follow the instructions.

But watching Jason’s bread baking journey got me intrigued. First you have to measure everything perfectly, but then you might have to add more flour based on how the dough feels. You might have it rise longer or shorter depending on the room temperature and the whims of the bread gods. Although you start with a recipe, you have to actually understand how ingredients react to each other to make it work.

It’s really not my comfort zone, but about a year ago, I set out on a quest to master pirozhki (Russian stuffed buns), which require a brioche type dough. After a few tries they were actually good. This gave me the idea to attempt a panettone this weekend to bring to our friend’s house for Easter. Panettone is an Italian holiday bread like a brioche, but packed with dried or candied fruit. No filling or other embelishments for me to lean on. The dough has to be good on its own.

Since I had the most luck with Julia Child’s brioche in the past, I decided to try her leaner version that called for only 1 stick of butter per pound of flour instead of a recipe with 3 sticks that I tried from her book in the past. But since Mastering the Art of French Cooking, Volume 2 didn’t give instructions for using a mixer, I took that part from Baking with Julia book. I also added raisins, dried cherries, candied orange and lemon peel (all soaked in whisky).

Since I wanted to end up with a round panettone shape, I followed Reinhart’s instructions for shaping and baking from The Bread Baker's Apprentice. All that, plus lots of supervision from Jason. I made little rolls in the muffin cups and also a large round loaf. The little rolls were done first and I couldn’t help breaking into one. After all this work, it was a complete disappointment – the crust was too hard and the inside was dry. I was ready to blame the dough – did I knead too much or not enough? Did I add too much flour? But Jason had a feeling that I might have over-baked them. He stuck an instant read thermometer into the large loaf and it reached 185F (the done temp) in only 50 minutes rather than 1 1/2 hours the recipe suggested. So 25 minutes for the little rolls must have been way too long.

I didn’t expect the shorter baking time to solve all my problems, but I was hoping it would at least help some. I was eyeing the loaf suspiciously when it came out of the oven. We couldn’t cut it since we were bringing it to our friends' house, and I couldn’t help wishing there was an X-ray machine for breads.

When we finally got to taste the larger loaf, it was fantastic (to my great surprise) -- buttery crust with perfect silky crumb. The whole thing was gone in 10 minutes after we cut it. When only 2 pieces were left, I finally remembered to take a picture.

Here is what I learned from this experiment:
  1. Measure the flour by weighing it (cups are not reliable enough)
  2. You can always stop the rise by putting the dough in the fridge and restart it again by pulling it out. This allowed me to spread the process over 2 days to make it more convenient.
  3. Don’t expect the dough to stop rising as soon as it goes into the fridge. It will take a few hours for it to cool down.
  4. Shaping brioche is much easier when the dough it chilled.
  5. Don’t rely on the recipe to tell you how long to bake. Use a thermometer.
  6. When in doubt, ask Jason – he is always right.
  7. Even if something goes wrong, you can always let your brioche go stale and make bread pudding.

Sunday, April 16, 2006

Individual Sole Terrines

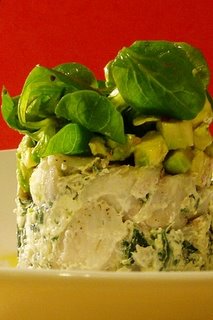
Happy Passover and Easter to all my dear blog readers!

This weekend, I finally get to relax and to blog, after helping launch a beta of our Distributed Computing product last week, and teaching a Passion for Provence cooking class yesterday night. Oh, and I also get a chance to make brioche. It’s currently in the oven, getting all puffy and golden. I’ll let you know how it comes out once it’s done. Man – it smells so good here. Calvin Klein should come out with a brioche perfume.

Let me rewind the food tape a little, and tell you about a delicious little discovery from last week. Remember the sole rolls stuffed with spinach and crab. Quite often, when you try to make something speedy and practical, good things happen. I had enough sole for two days, but instead of rolling it up and cooking it each day, I decided to cook it all the first day and serve leftovers chilled on the second day to save time. I layered half of the sole with the filling in my shaping rings starting and ending with sole and folding fillets over filling as necessary to fit in the ring. I ended up with 3 layers of sole and 2 layers of filling. Then I dotted the whole thing with butter, covered with parchment and baked in the same pan as the rolls. The rings took longer than the rolls (about 15 minutes instead of 10) since they are bigger. To check them for doneness, I just poked them with a knife and when it went all the way through with no resistance, I figured the fish was flaky enough.

I chilled my cute little terrines overnight. I had an avocado sitting around, getting ripe, and since it was time to use it, I thought why not sole with avocado. I diced it and tossed with a squirt of lemon and a pinch of salt. Piled it on top of terrines and added lightly dressed baby greens. Then I pulled the shaping rings off and voila – pretty chic for a leftover dinner :)

To my great surprise, the sole tasted better chilled than it did hot. As it sat overnight, it got more flavor and body (if there is such a thing for fish). Since the sole got pretty firm after chilling, a little creamy touch of avocado was perfect.

About the ring molds… What can I say, they are fun to play with and make your heart skip a beat when you pull them off and think “Wow, did I really make this?” But empty tuna cans with top, bottom, and label removed can always be used in lieu of “professional” ring molds and produce the same “wow” effect.

Wednesday, April 12, 2006

Sole with Crab and Spinach Stuffing

I had to be at work at 7am this morning, and I am not a morning person. We are in the process of releasing a beta of our product at my day job, so this is shaping to be a week of never ending meetings, last minute testing, and one stop shopping at Whole Foods (no time to go to my favorite fishmonger and veggie market). Since I have a gripe about Whole Foods not scaling their fish, I decided to go for something that is best skinless. As I was staring at the fish counter, it occurred to me that I haven't made stuffed sole in a long time, so that's what I got. This is a super easy weekday meal, but interesting enough to give me the satisfaction of sautéing, mixing, stuffing, and baking (in other words some real cooking) in the end of the day.
Fish substitutions: flounder is cheaper and in my opinion tastier option, but WF didn’t have it today.

Serves 4

For Crab and Spinach Filling
1 Tbsp olive oil
8 oz spinach
1 garlic clove, finely minced
4 oz package cooked crabmeat
6 oz whipped cream cheese

For the Sole
1.5 Lb sole fillets (2-3 per person)
1 Tbsp butter
1/3 cup dry white wine
1/3 cup water
Salt and pepper
Chopped dill or parsley for garnish

Crab and Spinach Filling
  1. Preheat the oven to 400F.
  2. Pull out the spinach stems and discard (no need to do this if using baby spinach).
  3. Heat a large pot over high heat. When hot, add the oil and spinach and cook stirring often until completely wilted, 2-3 minutes. Stir in the garlic and cook just until fragrant, about 30 seconds. Remove the spinach to a plate and put in the fridge until cool, about 10 minutes.
  4. In a medium bowl, combine spinach, crab, and cream cheese. Season to taste with salt and pepper and mix well.

Stuffing the Sole
  1. Season sole fillets with salt and pepper on both sides and lay them out on the work surface skin side down (the skin side is the smoother of the two).
  2. Put a dollop of filling (about 2 Tbsp) onto the thick part of each fillet and roll it up towards the thin end encasing the filling. Place fillets seam side down in a 13x9x2 baking dish (or some other dish that can hold them comfortably). Dot each fillet with a sliver of butter.
  3. Bring the wine and water to a boil in a small sauce pan, and pour into the baking dish with sole. Cover sole with parchment paper and bake in the middle of the oven just until you can plunge a fork all the way through the thickest roll of sole with no resistance, 10-12 minutes. The cream cheese will melt into the wine making a very flavorful sauce.
  4. Garnish with herbs and serve with plenty of crusty bread.

Monday, April 10, 2006

Asparagus Soup, Hot or Chilled

I've been in an asparagus mood lately. Not that I am ever not in a mood for asparagus -- it's one of my favorite veggies. But since it's spring, I just can't get enough of it. I've been experimenting with asparagus soups for years. I've tried it with leeks one year, with potato another, until I finally stripped it down to its bare essentials. This year, I am going for the minimalist approach. This is the fastest and simplest soup I've ever seen. It's perfect chilled, but if the spring weather is not cooperating, you can always warm it up.
Serves 8 as the first course

2 Lb asparagus
4 cups water
1 Tbsp salt
1 tsp lime juice (or lemon juice)
1/4 cup cream, plus more for serving
  1. Trim asparagus by breaking the tough ends of the stems (1-2 inches). They'll naturally snap in the spot where they become tender. Cut asparagus into 1/2 inch pieces crosswise.
  2. Bring 4 cups of water to a boil in a large stock pot. Add 1 Tbsp salt and 1/2 tsp of the lime juice (reserving another 1/2 tsp for later).
  3. When the water boils, add asparagus, cover and bring to a boil, about 2 minutes. Cook until almost tender, 1-2 minutes. Take off heat immediately. Cool for 10 minutes.
  4. Add 1/4 cup cream and puree the soup in a blender until completely smooth.
  5. Stir in the remaining 1/2 tsp lime juice and more salt if needed.
  6. Chill for 2 hours or up to 2 days.
  7. To serve, pour hot or chilled soup into bowls. Pour a little cream into a soup spoon and gently pour it in a circle over soup holding the spoon very close to soup's surface. Make decorative swirls with a fork and serve.
Variations: Add a handful of mint or cilantro to the soup before pureeing.

Sunday, April 9, 2006

Cookbook Meme

Couple of weeks go, my fellow food blogger, Ivonne from Cream Puffs in Venice, tagged me for a cookbook meme. The topic sounded so delicious that I saved it for a relaxing sunday morning when I don't feel like agonizing over which picture of a dish to use for a post or how exactly to explain a particular cooking technique.

How many cookbooks do you own?
Believe it or not, not that many. 26. Why so few? Well, I have a strange relationship with cookbooks. I didn't grow up with them. My Mom is an intuitive cook and that's how I learned to cook. In fact, I would probably fail the cooking literacy test about 7 years ago. It's only when I started writing down my own recipes that I learned how many tablespoons are in a cup and how many cups in a quart. I didn't acquire my first cookbook until my last semester of college.

Which book did you buy most recently?
How to cook meat by Chris Schlesinger. Since I mostly cook fish and veggies, meat still posses some challenges for me. I can make great braises and steaks, but roasts are tricky. It's rare that I cook such large pieces of meat, and without practice, it's hard to get better. I got this book to learn some guiding principles for cooking meat roasts, like what's the difference between roasting at a low temperature vs. high temperature, when to sear before roasting, when to remove connective tissue and when to keep it, etc. I haven't actually followed any recipe from this book yet, but from just reading it, I didn't pick up any insights yet. Chris seems to be more into exotic sounding ingredients than into technique.

Which book did you read most recently?
My dear Julia. I was learning to make cream puffs and there is nothing like having Julia Child in the kitchen with you. That's why I love that book so much. It's not a bunch of ingredients with some basic instructions. It's just like having a teacher at your side helping you through every step, warning you about pitfalls, and helping you avoid them.

List 5 cookbooks that mean a lot to you?

Mastering the Art of French Cooking by Julia Child– this was my first cookbook and a gift from my husband, then fiancé.

Essentials of Classic Italian Cooking by Marcella Hazan – wonderful and extremely detailed instructions. After our trip to Italy, 2 years ago, I couldn’t wait to recreate all those dishes at home. Jamie Olive with all his pizzazz turned out to be completely useless. “Throw some flour and eggs together, knead a little, and roll it out.” What kind of pasta making instructions are those?! That’s when I got Marcella’s book and was hooked on it ever since. I rarely follow specific recipes, but use it more for learning techniques like how to make pasta, gnocchi, risotto, etc.

Fish and Shellfish by James Peterson – I got Peterson’s book when I was doing research for the “Competition” section of a fish cookbook proposal. The fish cookbook got put on hold since I started Beyond Salmon blog and realized that I can get this content out much faster and easier than trying to publish a book. But I learned an awful lot in the process of doing research for it. After reading through 20 or so fish cookbooks, I found only 2 good ones: Peterson’s and Bittman’s. While Bittman is all about recipes, Peterson is all about the technique. It’s amazing how much I learned from him without following a single recipe! That’s my kind of cookbook. Not that his recipes are not inspiring. It’s just that once you read his explanation and really understand how to work with your ingredients, you don’t need to look at the recipe while you are cooking.

Entertaining for a Veggie Planet by Didi Emmons– I got this book at the vegetarian food and wine pairing class I took from Didi Emmons and Eden Stone a few years ago. Didi is just fun to read. Her food is interesting and yummy and her recipes are clear but concise (very few people can pull that off).

A gift to young housewives by Elena Molohovetz – my parents gave me this pre-revolutionary Russian cookbook for my birthday this year. It’s more of a culinary history book than a cookbook, but I found it very inspirational.

It's now my turn to tag. How about Kuidaore, Off the Bone, Erin Eats, Boston Chef, and Bribe me with a Muffin.

Wednesday, April 5, 2006

Red snapper with veggie ribbons

I have recently discovered the most wonderful blog -- La tartine gourmande by Bea. Bea's photography is so seductive that it completely ruined my productivity at work one afternoon. Her cooking style defies description -- it's rustic one day and contemporary another, but one theme that runs through all her recipes is that they all look like fun. Looking through her blog over the past couple of weeks, I must have thought a dozen times "Wouldn't this be fun to make!"

Since Bea's first language is French, and New Zealand pops up a lot in her writing, I expected her to be somewhere far, far away. So imagine my surprise when she turned out to live 10 minutes away from me. Of course reading blogs from far and exotic places is cool and all, but I still can't help but get excited when I learn about a new food blogger in Boston. Hey, we must be cooking with the same veggies, going to the same bakeries, and fishmongers! I wonder if Bea likes Russo's, New Deal, Formaggio's, Iggy's and Clear Flour?

Yesterday, I actually got to try one of Bea's recipes. Excited by the lovely weather we had over the weekend I got some veggies for the grill, but by the time I got around to cooking them, it was cold enough to snow (that's the spring weather for you in Boston). Since grilling was not going to happen, I was trying to think of a more homey dish to make out of red snapper and zucchini, and Bea's dish of trout with veggie ribbons immediately popped into my head.

I didn't have the recipe on hand, and was not in the mood to follow instructions, but I remembered that it involved paper thin veggie ribbons made with a peeler, a fish, and a cast iron pan. Since I had all 3 essential ingredients, I set to work.

I seared the fish, then piled on zucchini and carrot ribbons, dotted with butter and baked in the oven until the fish was done. The snapper soaked up the veggie juices and came out wonderfully moist, and the veggies were delicate and sweet. I liked the dish so much, I tried it again tonight with halibut and yellow squash. This veggie ribbon idea has great potential -- I'll have to experiment with it more. Thanks for a great meal, Bea!

Fish substitutions: striped bass, halibut, cod, haddock, hake, sable, steelhead trout, or salmon. In other word any thick fish (1 inch or thicker) that is not too dense (so avoid swordfish, tuna, and mahi)

Serves 4


2 zucchini or yellow squash
2 carrots, peeled
4 red snapper fillets with skin, 6-8 oz each
2 Tbsp butter
1/2 Tbsp olive oil
2 Tbsp chopped dill for garnish
Salt and pepper
  1. Preheat the oven to 400F.
  2. Cut zucchini in half lengthwise and shave zucchini and carrots into ribbons with a peeler. Put in a bowl and set aside.
  3. Dry fish well on paper towels and generously season with salt and pepper on both sides.
  4. Set a large oven-proof non-stick or cast iron skillet over high heat. Add 1 Tbsp of butter. When butter is melted, add the fish skin side down and cook without disturbing until browned, 2-3 minutes. If using fish without skin, flip it over. If using fish with skin, don't flip it so that the veggies don't make the skin soggy.
  5. Drizzle veggie ribbons with 1/2 Tbsp olive oil, sprinkle with salt and pepper and pile on top of the fish. Place the pan in the middle of the oven for 8 minutes per inch of thickness of the fish. 2 minutes before the estimated cooking time, top each fillet with 1/4 Tbsp butter. To check for doneness, separate the flakes with a fork. Fish is done if the flakes separate without much resistance even if some parts still look translucent.
  6. Spinkle with dill and serve.

Tuesday, April 4, 2006

Turnip and Leek Soup

I've never met a root vegetable I didn't like. Of course, I like potatoes -- who doesn't? But I am simply fascinated by more unusual root veggies. I have written in the past about celery root and rutabaga, and now it's turnip's turn. It's less starchy than potato thus more appropriate to lighter spring faire. And its sweet disposition pairs well with maple syrup in this creamy soup.
Serves 8

2 leeks, chopped (white and pale green parts only)
2 Tbsp butter
2 Lb turnips, peeled and cut into 1/2 inch dice
8 cups chicken stock or water
1 bay leaf
1/4 cup heavy cream
1 Tbsp maple syrup
Salt and pepper
  1. Wash chopped leeks in a large bowl of cold water. Let the sand settle for couple of minutes and then scoop leeks out with a slotted spoon being careful not to disturb the sand on the bottom. If leeks still feel sandy, repeat this process until they are clean.
  2. Melt butter in a large heavy stock pot over medium-low heat. Add leeks, season with salt, and cook until leeks are tender stirring occasionally, 10-12 minutes.
  3. Add turnips and season with salt and pepper. Turn up the heat to medium-high and cook stirring occasionally just until turnips are starting to turn golden, about 5 minutes.
  4. Add the stock or water and bay leaf. Season with salt and bring to a boil. Turn down the heat to low, cover, and cook until turnips are spoon tender, about 45 minutes.
  5. Take off heat, uncover, and let cool 10 minutes. Puree in a blender until completely smooth.
  6. In a small bowl, combine cream, maple syrup and a pinch of salt. Pour soup into bowls, drizzle with maple cream and make pretty swirls with a fork.

Monday, April 3, 2006

Snap pea, radish, asparagus salad

I recently took a food photography seminar at BU. "Oh really?" you say. What? You mean it doesn't show? Didn't you notice my cool new background? Ok, I admit, I have a long way to go, but compared to the early pictures from my blog, this is quite an improvement.

This 2 hour session was taught by Jim Scherer, the food photographer for Boston Globe, in the BU kitchen where the gastronomy students take their cooking classes. The best part of the class was a demo of a photoshoot of the food the students have prepared earlier that afternoon. Those must have been the most educational snow peas stuffed with lobster. First they gave gastronomy students some practice with hors d'oeuvres, then they gave us an opportunity to witness a professional food photography session, and finally they provided us with a much needed snack since food photography has a tendency to make people hungry.

Here are some highlights of what I learned from that seminar:
  1. It's easy to create cool backgrounds with colored paper. The textured paper in the picture above is from Paper Source in Porter Sq., Cambridge.
  2. Natural lighting works best. Now that the days are getting longer, there is hope of catching some of that precious light when we get home from work.
  3. Lighting from behind gives the picture more depth.
  4. Although food is usually served on large plates, the pictures are taken on little plates. For some reason the plates look much bigger in the picture than they do in real life.
But as much as I like looking at pretty pictures of food, I don't think that's what inspires me to cook. Or sure, once in a while a picture looks so edible I want to make that dish. But most of the time, I want to recreate the dishes from my travels, memorable restaurant meals, or childhood experiences. My cooking is inspired by my uncontrollable desire to recreate a taste memory or to experience a new taste sensation. I mostly use cookbooks as references to look up techniques for the dishes I want to make.

What food photography does inspire me to do is to write. Like today -- I was going to be good and go to bed early, but then I downloaded the food pictures I took this weekend and here I am blogging at 11pm.

Sorry guys -- no measurements for this salad. But it is the simplest thing ever and you can use absolutely any crunchy spring veggies. I started by trimming sugar snap peas and cutting them on the diagonal. Added some thinly sliced radishes (Japanese adjustable slicer does a superb job with those), some blanched asparagus (I used white asparagus, but green works just as well), and radish sprouts (I found these in a Japanese store). I then added a good handful of mint and dill (but you can use whatever herbs you have on hand). A good squirt of lemon, a little olive oil, salt and pepper -- done! Mix it all together and admire your healthy spring creation. Hey, while you are at it, you can even take a picture.