Wednesday, June 28, 2006

A Tale of Two Tunas

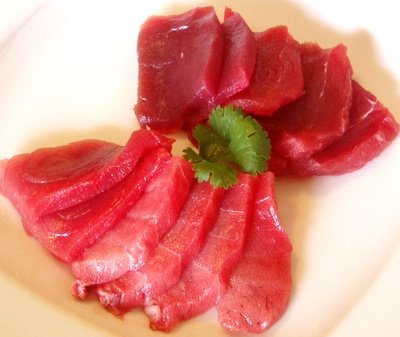
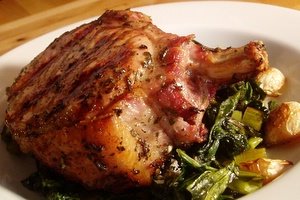
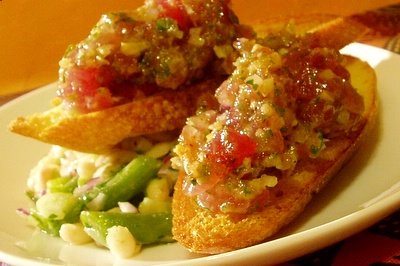
Can you guess which types of tuna are on this plate?

I’ll tell you in a minute, but first let’s talk about tuna’s success story.

In the matter of a decade, this Rockefeller of fish, rose from rags to riches (or cans to sushi as we say in the fish world), drawing the looks of contempt, admiration, and envy from other fish. While salmon became the middle class of a fish – affordable, reliably available in any supermarket, and the token fish on restaurant menus – tuna has been making it big. It has grades, it has types, and it has that sexy rare center daring you to eat raw fish outside of a sushi restaurant.

“It’s sushi grade, right?” we ask our waiter as if to make sure it was blessed by the local sushi board similar to a rabbi declaring meat to be kosher. “Absolutely,” he replies nodding his head so confidently, you’d think he saw the sushi board stop by just a few hours ago to inspect the fish.

I still remember the first time I ordered a tuna steak, and the waitress asked me how I wanted it cooked. No restaurant has ever asked me to make that important decision about fish before and I was at a loss. After a few moments of hard thinking, I chickened out and ordered it medium-well. I felt as if one of my college friends offered me a joint and I turned it down trying to be the good kid. I'd eaten raw fish for years in sushi restaurants, but that was a totally different story. That was like drugs with prescription from a doctor. Raw fish in a regular restaurant, or God forbid in my house, seemed every bit as scary and illegal as recreational drugs.

Curiosity, of course, won over the fear of “unsupervised” raw tuna and I’ve been happily consuming it for the past 5 years with no adverse side effects besides temporary euphoria and random bursts of giggles. But besides gobbling up tuna tartare, sashimi, and steaks, I’ve also been reading a lot about this fascinating fish and bothering fishmongers with my never-ending questions.

Have you ever wondered what sushi grade really means? And what about all those other words like bluefin, yellowfin, big-eye, ahi, Number 1, Grade 1, etc. When I have a question that all my fish books fail to answer, I pick up the phone and call Carl Fantasia at the New Deal Fish Market. It’s amazing how much light a 10 minute conversation with Carl can shed on pretty much any seafood topic. Here is what I learned about tuna:

When it comes to top tier tuna (the steak kind you pay big bucks for vs. the stuff in a can), there are 3 species you are most likely to see in fish markets and restaurants:
  • Yellowfin (also sold as Ahi)
  • Big-eye
  • Bluefin
Yellowfin is fairly lean, least flavorful, and thus the cheapest, retailing for about $16/Lb.

Big-eye
is much fattier and more flavorful than yellowfin. It retails for low $20s/Lb and at its prime can rival bluefin.

Bluefin is the Rolls-Royce of all tuna, prized for its bright red color, fattiness, and flavor. At its prime (the end of summer and early fall) when it swims north and fattens up, it can retail for close to $30/Lb. Not even the sushi restaurants can market this tuna effectively to the US consumers, and 99% of this lovely bluefin that we catch in the North Atlantic waters gets whisked off to Japan.

Correction about Ahi posted on August 7, 2006: I have written incorrectly in the original version of this post that Ahi is another name for Big-eye. That's what happens when you use Internet sources -- they aren't always right (except for Beyond Salmon of course ;) Thanks to Carl for finding this mistake. Ahi is a marketing term used for Yellowfin, not Big-eye tuna.

Of course, how good your tuna tastes depends not only on the species, but also on the season and even on each particular fish. That’s where the “grade” comes into the picture. When each tuna is caught, it gets pierced with a long probe and evaluated for color and fat content. The greasier the probe comes back, the higher the grade. Of course, it’s not a very scientific process, and what one distributor calls #1, the other might call 2+. The grades range from 1 (the best) to 3 (the worst). #1, 2+, and 2 all taste good enough to eat raw and can be sold for use in rare steaks, and sushi. This has nothing to do with the freshness of the fish, only with its taste. Since “#2+ Grade Tuna” sounds like they are serving you second grade fish, the restaurant menus will never use that terminology. They’ll either say “#1 Tuna”, or use the species name to describe it, like “Ahi Tuna.” Of course all these words don’t mean much, and you don’t really know how good that tuna is until you taste it. If this wasn’t complicated enough already, another variable in this tuna equation is the cut. The mid-section near the belly is the fattiest and most expensive, and the tail is the cheapest.

But what about the sushi grade? “Sushi grade” or “sushi quality” simply means the fish is fresh and has been properly kept on ice. A good fish market will take such care of all their fish and will be able to advice you on which fish are the freshest and good enough to eat raw. So “sushi grade” is more of a marketing term than a grade really. No authority gives this ephemeral “grade” out. Think about it this way. If you buy sushi carry out at a sushi restaurant, then take it home in a hot car on a summer day, and store it in your 42 degree fridge for a few hours, is that fish still “sushi grade”? So don’t worry about the grade. Worry about freshness. A really fresh tuna is easy to spot since it has no pearly rainbow discolorations, no smell, and no sleazy discharge. Buy it from a reputable fish market. Bring it home in a cooler with ice-packs, store it in the fridge (yes, still between ice-packs), and eat it that day. If you’d like a “sushi grade” certification, just give me a call. I’d be happy to issue one, after a thorough tasting of your tuna.

Keep in mind that the above advice only applies to tuna and a few other salt water fish. Most fresh water fish and some salt water fish are prone to parasites and are not safe to eat raw. So if you go fishing in the river, don’t serve that fish for sushi no matter how fresh it is.

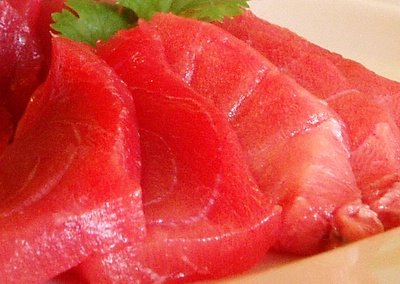
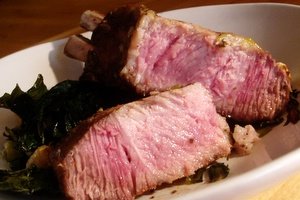
Now that I’ve tortured you long enough, here is the answer to the tuna mystery…
The one on the top that is darker is bluefin ($18/Lb) from Court House Seafood and the one on the bottom that is lighter is big-eye ($22/Lb) from the New Deal Fish Market. How come the Rolls-Royce of tuna is cheaper than the big-eye? Bluefin is on the lean side right now and not at its best, though still better than tuna at most of Boston’s sushi restaurants. The big-eye, on another hand, is just spectacular. You see how pink it is? If you looked really closely, you’d see a spider web of fatty marbling running through its flesh making it melt in the mouth like sweet butter. This is as good as big-eye gets, or at least as good as I’ve ever tasted.


Mmmm -- fatty tuna...
Priceless.
For everything else, there is MasterCard®.

Sunday, June 25, 2006

Pigepiphany

Pigepiphany -- noun -- 1. Tasting real pork for the first time. 2. A realization that 99% of pork sold in the US is complete crap.

American pork is bred for leanness to meet consumers’ unquenchable thirst for all meats to look and taste like chicken. Nothing against chicken, but people’s obsession with it is absurd. If American food industry could breed chicken in fish, pork, beef, and lamb flavors, they would. Since food science hasn’t reached such heights yet, we settle for “chicken of the sea” tuna and the “other white meat” pork.

I’ve been experimenting with pork chops from Whole Foods for the past month with terrible results. Brining, marinating, high heat, low heat… nothing worked. They came out dense, with a taste of salt and sugar, not pig. Just as I was about to swear to never cook another pork chop in my life, helpful readers of this blog and my fellow chowhounds from the home cooking board came to my rescue. The opinion was unanimous: “It’s not you; it’s pork!”

“What you need is Berkshire or Kurobuta pork,” the chowhounds told me. Big foreign words to describe something as simple as a pork chop make me nervous. But curiosity got the best of me and I Googled for Savenor’s phone number. Surely, a butcher where Julia Child used to shop had to carry it.

“No, we don’t have it,” the Savenor’s butcher told me, “but our pork is excellent.”
“It is fatty?” I asked.
“Oh no – it’s beautifully lean!”

Ok guys. The words “beautifully lean” would be a compliment for a model, not for a pig.

Try number two -- John Dewar’s. By now I felt like a desperate drug addict calling a dealer.

“Do you have Kurobuta pork?”
“Yes.”
“How much?”
“$20”
“Fine. I’ll be there on Wednesday.”

“You’ll love it!” said the butcher at John Dewar’s as he cut me 2 ribs of a pork roast, “It doesn’t even taste like pork.” Hmm, doesn’t taste like pork? That was the whole reason I was in this crème de la crème (and price de la price) of Boston butcher shops, paying $20/pound for a pork chop. I could be eating bluefin sashimi or foie gras for this price, but no, I had to go on this ridiculous pork chop quest. What I was hoping he meant was that it didn’t taste like the “other white meat.”

For comparison, I decided to get their regular pork chop for $6/Lb.


Regular pork chop ($6/Lb)


Kurobuta pork chop ($20/Lb)

“Are they from different places?” I asked.
“No. Both from Iowa, but different breeds.”
“Should I brine or marinade them?”
“No, our pork doesn’t need any of that.”
“Even the regular chop?”
“Oh yeah! With supermarket pork, I’d recommend it, but with ours…”

I don’t know why I always ask them for advice. I guess I need that extra reassurance with meat. They’ve told me stuff before that backfired, and different butchers at Dewar’s have given me conflicting advice.

I agree with the Dewar’s guy on brining. It’s really a cheap and dirty trick to enhance otherwise mediocre meats. I love how consumers are all up in arms about “enhanced pork,” so they buy Whole Foods’ untreated pork only to bring it home and brine it. How do you think pork gets “enhanced”? Marinade is a whole other thing though – it doesn’t make the pork spongy and can impart flavors other than just salt and sugar. Not to mask the flavor of the meat, I settled on a simple marinade of rosemary, garlic, lemon juice, olive oil, salt and pepper.

After a couple of hours, I fired up the grill, dried off my chops, and grilled them – first on the bone side to melt the fat and crisp it, and then on the flat sides. As soon as they browned, I turned down the heat to low until the chops reached 125F in the center. It’s not as undercooked as you’d think since the temperature went up another 10-15 degrees while they were resting. The only thing I did differently this time was keep the grill uncovered. This allowed the chops to brown nicely, while keeping the ambient temperature of the grill lower. The higher the temperature, the more the meat toughens, but the lower the temperature, the less the meat browns and less flavor develops. Man, and people say cooking fish is hard!


Regular chop grilled


Kurobuta chop grilled

After a 5-7 minute rest for the chops, during which they posed for pictures, we finally got to take our first ever bite of Kurobuta pork. Oh my! This is the part where words escape me. You didn’t need a knife. You didn’t even need a fork. The only reason you needed teeth was to get the pieces into your mouth. From then on, they just melted away. If this was a wine, I’d say it had a nice long finish of a Burgundy Grand Cru, but instead of truffles and violets, it tasted like a platonic ideal of a pig -- more flavorful than ribs, more tender than a tenderloin, more tasty than any pork I’ve ever had.


Inside of a regular chop


Inside of a Kurobuta chop

Eating a regular pork chop after this revelation was like drinking Two Buck Chuck. Ok, maybe not that bad. Whole Foods chops are like Two Buck Chuck. Dewar’s are like a $10 Australian Shiraz -- slightly better than the supermarket chops, but still of the “other white meat” garden variety. We took a few bites for the sake of science and left it at that.

I must confess that the reason I undertook this experiment was to prove to myself once and for all that pork chops are not worth cooking and that paying $20 for pork is complete insanity. In that respect I failed miserably. That pork chop was worth a bowl of bluefin tuna; it was worth a slice of foie gras terrine; it was even worth an hour in the gym.

Sunday, June 18, 2006

Technique of the week: How To Season Food

Why do “gourmet” home cooks crave a Big Mac on occasion? Could it be the texture of the overcooked meat squashed with the spatula until all the juices run out? Or aroma of the processed buns and styrofoam tomatoes? What could be missing from our organic, from-scratch home cooking that is found in the pit of despair known as McDonald’s?

The answer is simple.

Salt.

“I barely use any salt,” most home cooks proudly tell me as if their food is so good it doesn’t need it. When my students see me grabbing salts by the handfuls (no salt shakers, thank you very much) and generously sprinkle it over fish, roasts, and even salads, their eyes get wide with shock. But the real surprise comes when they taste the food. “Wow, I expected it to be too salty, but it tastes so good.” That’s right. Salt makes food taste good. Without salt, you are eating everything in black and white. With salt you are eating it in color. And even though we don’t like to admit it, a big Mac in color is better than all-natural grass-fed beef burger in black and white.

Being a salt activist is not likely to score me any popularity points. We all know how bad salt is for you. Or is it? Sure, salt might raise your blood pressure, but so does lack of exercise and caffeine. So I suggest, we stop guzzling coke, walk at least 3 miles each day, and stop eating junk food -- there is nothing worse than wasting your salt intake on Doritos. I bet that will help with blood pressure much more than bland food.

The trouble with learning to season properly is that cookbooks, magazines, and food TV programs leave you in the dark about how much salt to use. Since most home cooks started their cooking careers with Campbell’s soup and fajita seasoning mix (this includes me by the way), they never developed intuition for the right amount of salt to use when cooking from scratch. In an effort to help people with the seasoning dilemma, I tried measuring salt when testing my recipes, but 20 million types of salt that hit our market lately sabotaged my efforts. Even saying “1 tsp kosher salt” is not specific enough. Is it Diamond Crystal or Morton’s Kosher salt? Believe it or not, there is a significant difference. And what if someone doesn’t have kosher salt, should I give the conversion to table salt? Eventually I threw in the towel and reverted to using vague, but universal “Salt and pepper to taste.” My conscious always bothered me about quitting like this. How could I sleep at night knowing that all those people might be out there eating less that optimal food even when following my recipes? Since my mission in life is to promote deliciousness, I finally decided to do something about it – I decided to write this post about salt.

Learning to season perfectly (in other words, coaxing the most flavor out of your ingredients without leaving a salty aftertaste) is a sensual process that is akin to learning to have an orgasm. Once you have one, you’ll know what it feels like and will be able to do it again. Until then, it all seems like smoke and mirrors. The porn (sex and food kind), and voluptuous prose of romance novels and food literature are great at turning you on or making your mouth water. But descriptions of how he unbuttoned her dress and how the first bite of shrimp exploded like fireworks in her mouth will not make you a better lover or cook. What will make you better is experimentation.

I wish I could take credit for this brilliant exercise, but I didn’t come up with it. It’s something I found on The Experimental Kitchen by Rebecca Faill, who teaches baking at King Arthur's education center in Vermont.

Here is what you’ll need:

1 cup UNSALTED home-made chicken stock – the reason you can’t use store bough stock is that it already has salt, and even the low-salt varieties have additives that can complicate matters. If you don’t have home-made chicken stock on hand, combine 4 cups cold water, 1 skinless chicken breast, 1 carrot, 1 celery stick, and 1 onion in a small saucepan. Bring to a boil on the stove top, then immediately reduce heat to low. Simmer uncovered for 1 hour, occasionally removing impurities that rise to the top. It’s not really a chicken stock, but it will do just fine for this exercise.

Diamond Crystal Kosher salt – Diamond Crystal is cheap, available in any supermarket, dissolves quickly, and doesn’t have additives. That’s the salt used in the restaurant industry and cooking schools. If you can’t find it, you can use Morton’s kosher salt, though it is coarser and doesn’t dissolve as quickly. What’s wrong with regular table salt? Even though it looks very fine, it doesn’t dissolve as quickly as kosher salt and has additives that give it a metallic aftertaste. What about sea salt? Pink salt? Black salt? Polka dot salt? Just kidding, there is no polka dot salt, but the gourmet world has been going a little crazy with salt lately (I didn’t make up the thing about pink and black salts). Sure, if you want to spend big bucks on salt and buy a salt grinder, be my guest. But for most uses, it’s a waste of money and effort.


Here is how you can practice seasoning:

1) Warm up your stock to the temperature at which you like to eat soups. When seasoning foods to taste, make sure they are at the temperature you will be serving them. As a general rule of thumb, hot foods will need slightly less seasoning than cold foods since we perceive flavors more intensely at higher temperatures.

2) Pour 1/2 cup of the stock into a bowl and taste it. It should taste kind of “blah” – flat and uninteresting.

3) Now try adding salt a tiny pinch at a time, stirring well to dissolve it, and tasting the stock after each addition. The flavors should start to come into focus with each addition of salt. Concentrate and try to remember what the stock tasted like after each addition.

4) Keep adding salt a little at a time until the stock tastes “salty” – the taste of salt overshadows other flavors.

5) Remember what the stock tasted like right before you added that last pinch of salt and made it too salty? That was the perfect seasoning stage. Try to use your memory to recreate that taste using the second 1/2 cup of stock. Pour it into a clean bowl, and start adding salt a little at a time, constantly tasting. But this time, stop adding salt when the stock tastes just right, before it gets too salty.

Perfectly seasoned food should be vivid and intense, like the last few moments before an orgasm. It should fill your whole being with pleasure and leave you wanting more.

Other tips on seasoning:

Throw away your salt shaker – salt shakers don’t work for kosher salt and don’t give you the fine control you can get with your hands. Keep a small bowl of salt on the counter and use your hands to pinch salt and sprinkle it on your food when cooking. Large pots of soup or water for pasta will take way too many pinches, so use a spoon.

Be generous when seasoning thick cuts of meat, like 1-2 inch steaks. Remember that the seasoning is only on the outside and it has to be intense enough to compensate for unseasoned inside. Be even more generous when seasoning large roasts like a prime rib or a whole chicken.

Solid foods (fish, chicken, meats) are generally seasoned before cooking to intensify the flavor.

Liquid foods, like soups, sauces, and even risotto, are generally seasoned after cooking because the evaporation of water can make them more salty than you intended, particularly if you are reducing a sauce.

Since you can’t taste meats and fish in their raw state, seasoning them is a bit tricky. Try 1/2 tsp Diamond Crystal Kosher (DCK) salt per pound of seafood, and 1 tsp DCK salt per pound of chicken, beef, pork, and lamb. This will give you a starting point, and next time you’ll be able to fine tune your seasoning. Use the measuring spoons to measure out the salt, but use your hands to sprinkle it on food. This will help you develop an intuition for how much salt to sprinkle on raw foods when you can’t taste them.
May 20, 2008 correction:
***
I think my original estimate was a tad low. After using measuring spoons to test the above suggestion, I found that it's not seasoned enough to my taste. What I actually use seems to be closer to 1+1/4 tsp DCK salt per pound of seafood and 1+1/2 tsp DCK salt per pound of chicken, beef, pork, and lamb. I use a little less if there is a sauce that goes along with the protein since the sauce is usually seasoned with salt too. If the sauce contains soy sauce, fish sauce, or some other very salty ingredient, I drop the amount of salt that I sprinkle on the protein appropriately.

Keep in mind that all salts are different! 2 tsp DCK = 1 tsp table salt = 1.5 tsp Morton's Kosher (roughly). For all other salt, you have to experiment to find the right amount.
***

Leafy vegetables like spinach and Swiss chard are seasoned after cooking since they are mostly made of water that evaporates during cooking leaving the dish more salty than you intended if you seasoned it up front.

Don’t forget to season your salads. Since many home cooks are used to salty store-bought dressings they don’t realize that they need to add salt to their salads if using a home made dressing. You’ll have much finer control if you salt your greens, than if you salt your dressing. Even with store-bought dressings, you might have to add salt if you like your salads lightly dressed.

And most importantly -- Taste, Taste, Taste!

Saturday, June 17, 2006

Potato Fennel Soup with Apples (inspired by my Dad)

My first encounter with innovative cuisine happened at the ripe age of 7. If you were picturing a little girl tasting asparagus mousse with black caviar in a 3 star restaurant, you’ll have to scrap that image and replace it with that of a little girl with sandy feet, and a man with a dark beard and kind brown eyes sitting at a picnic table under an apricot tree with two bowls of soup in front of them. The little girl was me. The man with a beard was my Dad. The soup was supposed to be a cream of vegetables, but looked suspiciously like a cream of something brown and icky. The place was Novopetrovka, a small village on the coast of Azov Sea in Ukraine. Not only were there no restaurants in Novopetrovka, there were no cafes, cafeterias, or even fast food joints. American fathers don’t know how easy they have it. If they are stuck with a hungry 7 year old, they can always count on McDonald’s to save their ass, while Russian fathers can only count on their ingenuity.

The reason my Dad and I had to learn to feed ourselves was that my Mom just gave birth to my brother in January and he was too little to come to Novopetrovka where my family rented a cottage for the summer. Rather than letting me spend the whole summer in the city smog, my brave parents decided that my Mom will stay with my brother in Moscow and my Dad will take me to Novopetrovka for a month. I still think that this whole set up was my Mom’s way to ensure that we appreciate every one of her wonderful meals for as long as we both shall live. But at the time my Dad and I were oblivious to the hardships that awaited us and cheerfully packed a huge bag of cans and packets as our provisions for the month, and took the train to Azov Sea.

I must say, it was not all bad. The garlicky potato pancakes made from a mix were our pièce de résistance, and we survived on them until the supplies ran out. When our landlady cooked, we were in for a treat of a steaming bowl of borsh, or freshly made vareniki (Ukranian pierogies). Ah, those were the good days. But there were also the bad days when adding water to the mystery packet turned its contents wet, but not really edible, like the soup we were faced with that day.

Even our advanced culinary techniques of adding more water and stirring very hard didn’t help. “This soup surely needs something,” said my Dad. We wistfully looked at the door to our landlady’s house hoping that she’d come out any moment now with a big bowl of freshly cooked soup and rescue us. But this time we were on our own. It was us vs. the soup and we were not about to let the soup win. That’s when my Dad, in all his engineering wisdom, had a great idea. “How about an apple!” he suggested. In case you are wondering if soup with apples is a common Russian dish, I assure you it’s not. This was a true innovation on the part of my Dad. We chopped up an apple, sprinkled it on our soup and gave it another try – hmm, not bad. The crunch of the apple was a nice counterpoint to the brown blandness of the soup and I found it so interesting that I ate the whole bowl.

Dear Daddy, all I ever needed to know about culinary creativity I learned that day from you in Novopetrovka. In honor of Father’s Day this year, I recreated our soup with apples. Here is the “new and improved” version.

Potato and Fennel Soup with Apples

Since the spirit of this soup is experimentation, feel free to try the apple topping on the root vegetable soup of your choice, like Parsnip Soup, Turnip Soup, or Potato Fennel Soup given in this recipe. The apple topping can be made “salsa” style if you cut your apples into small dice or like a salad if you cut your apples into very thin ribbons using a mandolin.


Serve 4

For the soup:
3 Tbsp olive oil
2 fennel bulbs, trimmed, cored, and thinly sliced (reserve fronds for garnish)
2 garlic cloves, thinly sliced
1 1/3 Lb Yukon gold potatoes, peeled and cut into 3/4” dice
1/2 cup dry white wine
6 cups water
1 bay leaf
1/4 cup heavy cream
Salt and pepper
  1. Set a large heavy pot over high heat. Add the oil. When oil is hot, add fennel and cook stirring occasionally until nicely browned, about 7 minutes. Don’t stir too much so that fennel has a chance to brown and develop flavor.
  2. Turn down the heat to medium. Add garlic and potatoes. Season generously with salt and pepper and cook stirring occasionally until garlic is aromatic and tender, about 2 minutes.
  3. Add wine, water, and bay leaf. Cover and bring to a boil. Taste and correct seasoning. Liquid should be well salted since potatoes will absorb a lot of salt. Reduce heat to low and simmer covered until potatoes are very tender, 40-50 minutes.
  4. Stir in cream, cool slightly (about 5 minutes), and puree the soup in a blender. If soup is too thick to your liking, add a little water.
  5. Pour into into bowls, put a few spoons of apple topping in the middle of each bowl and serve.
For apple topping:
1 tart apple, like granny smith
1/4 medium red onion
1/4 cup finely chopped mint, cilantro, or fennel fronds reserved from the soup
2 tsp fresh lime juice
2 tsp olive oil
1 Tbsp grainy mustard
Salt and pepper
  1. Core the apple and cut it into 1/4 inch dice or slice it 1/16” thick with a mandolin.
  2. Cut the onion the same way as the apple (if you diced the apple, dice the onion; if you sliced the apple, slice the onion).
  3. In a small bowl, combine the apple, onion, herbs, lime juice, olive oil, and mustard. Season with salt and pepper and mix well.

Wednesday, June 14, 2006

Parsnip soup with smoked scallops and radishes


Museum cafés are the last place I’d expect to find great food. I always thought of these institutions as overpriced mediocre girly food: bland salads, rubbery chicken breasts, overcooked salmon, and anything with pesto. Girls, before you get offended, let me tell you that I hold mediocre guy food, like under-seasoned, overcooked burgers, in contempt just as much. But stereotypes can be deceiving and I have recently found out that one of the best sit down lunches in Boston is, to my great shock, in Isabella Stewart Gardner Museum. No, I didn’t go to the museum just for lunch. Shallow person that I am, I actually think it’s one of the most beautiful places in Boston. But until my fellow chowhounds have pointed me in the direction of the museum café, it never occurred to me to eat there.

All my stereotypes were blown away after my first meal at ISGM café. The whole meal was absolutely lovely -- no rubber chicken here -- but the dish that stood out the most was the parsnip soup with smoked scallops. Since the café menu changes quite often, you might not encounter this soup there for a while now, but recreating it at home couldn’t be easier. You can find smoked scallops in Whole Foods and in well-stocked fish markets. These smoky little nuggets go incredibly well with sweet and creamy parsnip soup. The surreptitious leftover of radishes that I had in my fridge provided a perfect garnish that gave the soup some crunch and gentle spice.

Parsnip Soup with Smoked Scallops and Radishes

Serves 4

1 recipe parsnip soup
6 oz jar of smoked scallops
6 medium radishes cut into fine julienne
1/4 tsp fresh lemon juice
1 Tbsp finely chopped chives
Salt and pepper
Olive oil for garnish

  1. After pureeing the soup, set it over low heat to keep warm.
  2. Cut each scallop in half and add scallops to the soup for 1 minute before serving.
  3. In a small bowl, combine radishes, lemon juice, half of chives, and salt and pepper to taste. Mix well.
  4. Pour the soup into 4 bowls, sprinkle with remaining chives, drizzle with olive oil (about 1/2 tsp per bowl), and top with radishes.

Wednesday, June 7, 2006

Tuna Tartare with Preserved Lemons

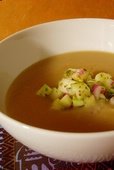
You might be wondering if I've been cooking anything interesting lately, or just writing about the meaning of life and food. Oh, come on -- you probably know the answer to that already. Of course, I've been cooking. The first thing I did since coming home from CIA boot camp was make chicken stock. It is now happily stored in my freezer in little zip lock bags and has even been thoroughly tested out on a mushroom risotto. While the weather was good, we've been eating lots of grilled fish and grilled pork chops. Since the dark secrets of meat cookery were not revealed to me at CIA, my plan B was to apply brute force starting with the pork chops. I tried every tip I've read in Cook's Illustrated: using rib chops vs. blade chops, brining, marinating, high heat followed by low heat. But even after yesterday’s pork chop palooza (trying 4 different recipes on 4 different chops for comparative tasting), I am still stuck in the same rut -- good juiciness and flavor, but still not as tender as I'd like them to be.

Jason's solution to the pork dilemma? It's elementary, my dear Watson -- eat fish! When Jason is right, he is right. Besides, it was a perfect chance to try Bea's tuna tartare. Wasabi ice-cream was not going to happen on a Wednesday night, and I improvised a bit with the ingredients, but the key part of Bea's recipe that caught my eye was mixing preserved lemons into the tuna. The reason all the raw fish eaters love tuna so much is it's satiny texture; the flavor is almost non-existent. That's why bright, pungent flavors are essential to a good tuna tartare. Preserved lemons with their salty/sweet brininess were just what my tuna needed.

Tips on buying tuna: Buy your tuna from a reputable source and store it at home in its wrapper on ice (in the fridge, not the freezer). Avoid buying tuna with pearly rainbows (a sign that it was cut a while ago and got oxidized) and eat your tuna the day you buy it, unless you are planning to cook it.

Tips on preserved lemons: You can buy preserved lemons in some Whole Foods markets and specialty stores. They are sometimes sold as Moroccan lemons. You can also make them yourself, or substitute them with lemon zest in this recipe.

Serves 8 as a first course

For toasts:
Thinly sliced baguette
Olive oil

For tuna:
1 Lb fresh tuna steak, finely minced
1/4 cup red onion, finely minced
2 tsp fresh ginger, finely minced
1/4 preserved lemon (skin only), finely minced
1 small garlic clove, mashed to a paste
1 Tbsp capers, coarsely chopped
2 Tbsp finely minced cilantro
2 tsp lime juice
1 tsp soy sauce
1 Tbsp olive oil
Salt, black pepper, and cayenne to taste

  1. Preheat the oven to 375F. Brush baguette slices with olive oil on both sides and spread on a baking sheet. Bake in the middle of the oven for 5 minutes. Flip, and bake another 5-7 minutes or until crisp.
  2. In a medium bowl, combine the tuna and the rest of ingredients. Mix well, taste and correct seasoning. Spread tuna on toasts, drizzle with a little olive oil and serve immediately.
Make ahead note: Mincing a pound of raw fish might not be the best way to spend time when you have company. If serving this dish for a dinner party, you can prepare all ingredients up to 2 hours before serving, but don’t combine tuna with the rest of the ingredients until ready to serve. Wrap tuna tightly in plastic wrap and store it between ice packs in the fridge until you are ready to serve it.

Sunday, June 4, 2006

Culinary Artistry

A flight from Boston to San-Francisco needs a good book – Angels and Demons or Harry Potter type page turner to numb my mind with cliff hanging excitement and help me get through 6 hours of sitting. But this time, I didn’t plan far enough in advance and wasn’t prepared with the properly addictive novel. Desperate to grab something that had a cover and enough pages to keep me occupied, I stuffed Culinary Artistry into my backpack before running out the door at 4:30am to catch my flight.

Culinary Artistry by Andrew Dornenburg and Karen Page is the book our chef at CIA recommended as a reference for combining ingredients. While most people buy this book for lists of ingredients that go well together, its true heart is the philosophical discussion on cooking. Is cooking a trade, a craft, or an art? That’s the question the authors are trying to answer by interviewing today’s leading chefs. Their premise is that food is a physical experience that has an ability to move us emotionally. Isn’t that what art is?

Of all the art forms, food is most similar to music. Before the recording technology was invented, music was a fleeting art form. It couldn’t be captured like a painting or sculpture. It required a composer to come up with the score, a performer to play it and an audience to appreciate it. One of the reasons we have stronger reactions to food and music is that we are a captive audience. If we don’t like a painting in a museum, we can move on, but if we are in the middle of a bad concert or dinner, leaving is a little tricky. Whether we like to or not, we are forced to go through the whole experience. If you ask a random person whether they prefer Picasso to Miro, they might not even have an opinion. But few people won’t be able to tell you what kind of music they like or what their favorite flavor of ice-cream is.

Remember the scene from “When Harry met Sally” when Jess says “Restaurants are for people in the 80’s are what theater used to be for people in the 60’s.” As mass market turned to restaurants for entertainment in the last 20 years, the restaurants jumped at the opportunity to meet this demand. But this restaurant craze is as much about the food as going to the symphony is about the music. Let’s be honest -- for 98% of the people it’s about dressing up, people watching, sitting in a pleasant atmosphere, and feeling pampered. We’d like to think that restaurants these days are so much better than they were 20 years ago. The food has definitely gotten taller, ingredients got more exotic, plates acquired interesting shapes, open kitchens became the new stage, and bathrooms got so artistic that no one knows how to flush the toilet anymore. But did the food actually get better?

I don’t believe most people can tell how often they are eating mediocrity in pretty wrapper. I don’t say it with rebuke, but with sympathy. How many people do you think notice that adagio of Beethoven’s 9th symphony was a tad rushed? Most people in the symphony hall probably weren’t even thinking about the adagio that was unfolding in front of them. They were making shopping lists in their head or thinking about that annoying co-worker. It’s really quite understandable. The difference between an ordinary performance and a great performance is ridiculously subtle. It takes years of listening to appreciate. Not surprisingly, the people who play an instrument themselves (even as amateurs) have a higher sensitivity to other people’s performance.

Reading Culinary Artistry felt like discussing these topics over tea with Daniel Boulud, Joyce Goldstein, Alice Waters, and other great chefs. The usual questions came back to me. What am I trying to do with food? Why am I doing it? I never expected that the answer will come to me in midair between Boston and San Francisco. I always thought it would happen in the kitchen with the sweet smell of caramelizing onions or a whisper of a gently simmering soup. But instead it happened on a United flight 6307. Life is funny that way.

I view cooking as a performing art. Glen Gould and Vladimir Horowitz, did not compose what they performed, but if they were not artists, who is? Cooking, like music performance, is both a craft and an art. It is a craft because it takes great physical skill and dexterity – what we call a technique. And it is an art because it takes soul. True culinary art lies not in invention of new ingredient combinations or cooking methods, but in interpreting those ingredients. Our job is to wake up that captive audience, to move them, and to make them see an ingredient or music in a whole new light. The goal is not to shock them. The goal is to help them understand.

Food media (from food network to food blogs) has done so much to generate excitement and interest in the world of food. I’ve been trying to find my place in this world of beautiful photographs and finger-licking stories for some time. It just didn’t seem to fit. Visual esthetics is not what inspires me about food and I can only produce a decent story once in a blue moon. What suits me more is teaching people how to cook. I didn’t invent roasted bluefish with crispy potatoes or seared striped bass. But it’s in those moments when I see the look on my students faces and they say “So this is what bluefish should really taste like!” that I know what I am doing with food.

Friday, June 2, 2006

CIA boot camp (part 3)

This is Part 3 of CIA (Culinary Institute of America) boot camp program series.

In case you haven’t read part 1 and part 2 of the culinary boot camp series, here is a summary:
  • Complain about too much focus on presentation and not enough on the taste
  • Complain about lack of seasonal ingredients
  • Complain about the program being too basic
  • Complain about having to cook fried chicken and turkey breast
Oh, and did I mention that I got a really bad cold on the second day? As you can see I had a great time.

But there were lots of wonderful parts to this program too. I was just saving all the good stuff for the end.

Wine tasting class:
The wine tasting class was similar to others that I’ve taken. We got to taste 6 wines and talk about their smell, taste, acid, sweetness, body, and tannin (the last one only for reds). Here are some tips that I’ve learned:
  • A good analogy to “body” for a wine is “skim milk vs. cream.” Skim milk being low body and cream being high body.
  • Vineyards in cool places produce light bodied wines and in hot places produce high bodied wines.
  • You can tell how acidic a wine is based on how wet you feel under your tongue. For white wines acidity is really easy to tell, but for reds, it’s sometimes masked by tannin, so this tip comes in handy.
  • Covering a glass with your hand when you swirl the wine can intensify aroma.
  • Wine should always be at least as sweet as the food and at least as acidy as the food.
  • Good soil does not produce good vines. In fact, the worse the conditions, the better the wine. Many great vineyards have very rocky soil, which makes vine roots grow deeper to find water. This makes them pass through more types of soil and absorb all kind of minerals that give the wine its complexity. In the vineyards that don’t have the benefit of terrible soil, vines have to be stressed in other ways, like planted extremely close to each other. I tell you, being a vine is a hard job.
Food and wine pairing class:
The food and wine pairing class was even more interesting. The wine classes I’ve taken before only talked about food and wine pairing, but haven’t actually demonstrated it. Most of this talk seemed like black magic and it was always hard to figure out how to translate it to practice. After some experimentation, Jason and I learned that Rieslings go with pretty much everything and everything else is a gamble. So we drink a lot of Rieslings. The food and wine pairing class did not produce any surprises and the big take away was “Drink Rieslings with your food.” But now I actually understand why. We were given different foods that represent the basic tastes:
  • Wedge of Lemon for sour
  • Chocolate for bittersweet
  • Grape for fruity
  • Prosciutto for meaty and salty
  • Goat cheese for creamy
  • Blue cheese for bold and fatty
We were instructed to taste these foods with different wines. The goat cheese went particularly well with Sancerre. It made the wine taste more round and buttery even though it was very light bodies and dry on its own. Prosciutto was perfect with Chianti. Both were on the loud side and could really stand up to each other. Blue cheese made the gi-nourmous cabernet actually drinkable. Absolutely nothing paired well with oaky chardonnay. But everything, even chocolate, went well with Riesling. Only Riesling had enough fruit to match the grape and enough acidity to match the lemon. With blue cheese or prosciutto it was playing the balancing role. You know how those two foods are perfect with figs, peaches, and other fruit. Well, Riesling was playing that role admirably. Did I mention how much I love Riesling yet?

Here are some other food/wine pairing tips that I’ve learned:
  • The wine should be at least as sweet as the food
  • The wine should be at least as acidic as the food
  • Cheese and wine pairing is overrated. It’s tricky to match wine with cheeses and contrary to common belief, sweet white wines, not reds, go best with cheeses.
  • Hard cheeses (gouda, manchego, parmesan, etc.) are easy going and pair well with most wines
  • Goat cheese need young acidic wines
  • Soft cheeses like brie and camembert are best eaten alone
Restaurants:
After spending afternoons eating and drinking in our wine tasting classes, we had a few hours to shower, change, and get ready to eat and drink s.

The campus restaurants, ran by students, were outstanding. From food to service to décor, they were some of the best meals I've had in US at that price range. During the last 12 weeks of the 2 year culinary arts degree, the students get to work in each of the 4 restaurants for 3 weeks in each. As they rotate through the restaurants, they take turns at different cooking stations (garde mange, grilling, sautéing, etc) and even learn how to perform the front of the house duties of greeting guests, waiting on tables, and bartending.

The first night we ate in Caterina de’ Medici (Italian), second night in St. Andrew’s café (Casual American and Fusion), third night in Escoffier (French), and last night in American Bounty (American).

St. Andrew’s café was the least formal restaurant, and in my opinion offered the best food, though I might have just gotten lucky with my dishes. I started with a mushroom and asparagus risotto with truffle oil – perfectly al dente and with beautiful mushroom flavor. The main dish left me absolutely speechless. It was melt in the mouth “Korean style” braised short-ribs. I don’t know how “Korean” this dish was, though there was soy sauce and ginger present in the sauce, but it was the most luscious texture of short-ribs I’ve ever tasted, and I’ve had my share. The tasting of desserts included a white chocolate cheesecake, a dark chocolate pudding cake, a rhubarb-strawberry crisp, and two sorbets (coconut and strawberry). They were all pretty good, but the coconut sorbet was a stand out.

Caterina and Escoffier were my next favorite. Seafood salad with parsley water and lemon oil, and zucchini-ricotta ravioli in parmesan broth were outstanding at Caterina, and Foie Gras Roulade Brulée with Pineapple Marmalade at Escoffier was to die for. The other dishes were good too, but I wouldn’t crave to have them again. The only restaurant that I didn't like was American Bounty. Both the service and the food were lackluster. This could be due to the fact that it was the first day after rotation and the students were still getting used to the new restaurant, or maybe we were just tired of eating out.

I only remembered by the third day to takes pictures of the dishes – silly me. So here are some from Escoffier.

Lobster salad


Foie Gras


Asparagus soup with scallops


Duck breast with sweet potatoes and pineapple

That's all my ramblings about the culinary boot camp. Next week back to normal blogging -- yay :)

Thursday, June 1, 2006

CIA boot camp (part 2)

This is Part 2 of CIA (Culinary Institute of America) boot camp program series. If you just stumbled on this post, you might want to read about how I ended up spending a week at CIA and Part 1 of this series.

What we cooked:
When the chef cringes as he reviews the dishes in our handouts, that’s not a good sign. Of course, it wasn’t his fault that the dishes we had to execute were cafeteria style food. He was assigned to teach this class last minute and was only following the class plan given to him. Why couldn’t he just tell us to cook something else, you might ask? Well, it’s not that easy. The ingredients for these dishes were already ordered from the store room, the recipes were already printed, and the wheels of the complex apparatus known as CIA were in motion. Each team got to make a different set of dishes each day that were supposed to familiarize us with the cooking techniques we were learning that day. Here is what our team got to cook.

Day 1: Everyone was practicing knife skills and we didn’t cook anything yet.

Day 2: Fried chicken, stir-fried mushrooms, split pea soup with bacon
Whoever thought of paring fried chicken with stir-fried mushrooms? And wouldn’t a fresh pea soup be better in the spring than heavy split pea loaded with bacon fat?


Day 3: Asian glazed ribs, corn bread, and warm coleslaw. When the chef saw warm coleslaw, he took pity on us and said we could do asparagus instead.

Day 4: Veal Blanquette (veal stew), fresh egg pasta, glazed beets, deep-fried parsnips. This was the best day actually. Once we changed the recipe, the veal came out really tasty, and making pasta was fun. I’ve made it before, but seeing the demo was much more helpful than reading books and I picked up some helpful tips. But why would you be dipping parsnips in egg wash and deep-frying them. They are plenty good without all that grease. And what do beets and parsnips have to do with veal blanquette? Theoretically, we were supposed to plate all those things together on one plate. But we just couldn’t bring ourselves to put beets together with creamy veal stew.


Day 5: The final project. In the end of the first day, the chef told us that we’ll have to come up with our own appetizer and entrée on the last day. The appetizer had to be warm and the entrée had to include a starch, 2 vegetables, sauce and garnish. And now for the main ingredients:

Team 1: ground veal and pork (appetizer) / black bass (entrée)
Team 2: shrimp (appetizer) / duck breast (entrée)
Team 3: scallops (appetizer) / beef tenderloin (entrée)
Team 4: quail (appetizers) / rack of lamb (entrée)

And finally,

Team 5 (that’s us): pork tenderloin (appetizer) / turkey breast (entrée)

After holding our breath through the interesting ingredients of the other teams, Mark, George and I couldn’t believe we ended up with the turkey breast. Have you ever wondered why the French don’t cook turkey breast? The only way we could prevent it from drying out was to brine, butterfly, and stuff with something fatty (we decided on boursin cheese and mushroom duxelle). It felt more like plastic surgery than cooking. I am not used to torturing my ingredients into submission and it was definitely a challenge. For our sides, we made a mashed celery root, asparagus, and wild mushrooms. You could nickname this dish “Thanksgiving in the spring”.

The pork tenderloin was much more fun to work with. It is a versatile meat that lends itself nicely to most cooking methods, so we skewered it and made pork sate with pear chutney.


What to cook vs. how to cook:
True to its description, this program was devoted to how to cook (how to sauté, how to braise, how to poach, etc.). I assumed that what to cook would be given as much attention, and hoped for an in-depth coverage of how to apply the cooking techniques to different ingredients. For example, how to roast a chicken vs. prime rib vs. a leg of lamb vs. a pork shoulder. What are the little tips and tricks to bring out the best in each meat? I have learned these details for fish, chicken and vegetables because I cook them on regular basis. But a leg of lamb is not something you get to cook all that often and I was hoping that this would be my opportunity to learns the details.

Unfortunately, very little of the class was devoted to understanding your ingredients and how to choose them. Of course, they can’t teach us everything in one week, but I was hoping for more information on different cuts of meat and how to prepare them for cooking. Sure, I know the basics like shortribs and chuck are good for a braise, and rib eye is good for a steak. But what about aged beef and should I know about different grades of beef? What’s the difference between new Zealand lamb and American lamb (that is twice as expensive)? How do I choose the right type of pork chops for the grill? What’s the best way to prepare a leg of lamb for roasting and is removing all connective tissue worth the time? I guess what I was hoping for was an in-depth meat class. Like the class I teach on fish, but for beef, pork, lamb, and veal. I don’t think I’ve ever seen such a class offered, which is a shame. If you know of one, particularly in the Boston area, please let me know.

The lack of seasonal vegetables and uninspiring recipes was my other pet peeve. Orange glazed salmon with spinach, bacon, pine nuts and sautéed mushrooms, anyone? Or how about poached chicken breast with hot and spicy vegetables, haricots verts, mashed turnips and potatoes? Do they have a random ingredient generator or something?

By now, I have probably convinced you that I am a spoiled brat who does nothing but criticize the holy of the holies of CIA. So let me put my complaining in perspective. Our instructor did an outstanding job teaching the cooking techniques. If you are new to cooking and want to learn to sauté, braise, roast, and poach, this class is perfect. But if you are comfortable in the kitchen and are looking to learn the subtleties that make the difference between a good dish and a fantastic dish, this class might not be the best choice.

Tomorrow I’ll write about the wine tasting classes and dining at CIA restaurants (no complaints about those, so stay tuned).