Tuesday, December 19, 2006

Monkfish Osso Buco

"What can I get for you, Helen?" asked Carl.

"I think I'll get monkfish," I said. I am not sure if it was my desire to try something new or my recent craving for anything that works with mashed potatoes.

"How are you cooking it?" he asked.

"I'll keep it on the bone and try a braising method with an osso buco type sauce," I told Carl. You see, monkfish is not on my regular list of fish. I don't care for that "pooh man's lobster" texture that people rave about. If I want lobster, I'll buy one. In my experience, all the traditional ways of cooking fish (pan searing, broiling, grilling, roasting, poaching, and steaming) results in a monkfish that's rubbery. But I had reasons to believe that there is hope. I had a fabulous dish of a whole braised monkfish tail in a restaurant once, and that's what I was thinking of recreating.

Carl surveyed the scene of whole monkfish tails and shook his head.

"These are no good," he said. "They'd be fine to fillet, but for a good on the bone braise... I know what you need."

He disappeared to the back room and came back a minute later with a whole monster of a fish. I've seen a whole monkfish before, but every time I come face to face with this creature, I shudder. Its mouth is bigger than its body and packed with sharp teeth. Its eyes always seem to be looking at me and saying "If only I was still alive, I'd make a nice meal out of you!"

Carl plopped the helpless beast on the counter and told his helper Isaiah to cut me a piece that is closest to the head. I've never seen this part of monk sold in stores. I thought I was lucky when I saw the original monk tails still attached to the bone. I don't understand why most stores fillet them. The monk tastes so much juicier when it's still on the bone and once it's cooking, filleting it is a breeze -- the one thick bone pops right now. But this gorgeous piece that Isaiah cut for me truly looked like a veal shank.

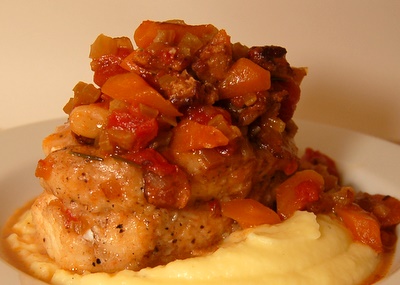
I brought it home and cooked it exactly like I cook osso buco with veal shanks, but reducing the cooking time from several hours to just 30 minutes. The results were amazing. It was the most delicate and moist monkfish we've ever had.

"Was it this good in the restaurant?" asked Jason.

"If they bought their monk from the New Deal, it would have been," I said.

Monkfish Osso Buco

Buying monkfish: To do this dish justice, you need bone-in monkfish. Unlike other fish, the only part of monk that is edible is its tail. If you are lucky enough to have your fishmonger cut a whole fish to order for you, ask him for the thickest part of the tail (closest to the head) and instruct him to cut it into 1.5 inch steaks. If you ended up with a thin part of the tail, just leave it whole.

Removing the membrane: Even if your fishmonger removes the skin off the monk, you still need to remove the membrane that covers the flesh of the monk. It looks like a translucent sack and usually has tiny black dots. Remove it with a boning knife like you would remove the silver skin off meat. You have to be thorough and remove absolutely all of it as it gets chewy when cooked.

Trussing the steaks: If you got nice thick steaks, you should truss them with kitchen twine (that's fancy word for tie it up). Depending on its thickness, you might need one or two strings. Remove the string before serving the dish. If you got a thinner end of the tail, don't worry about trussing it.

Fish substitutions: halibut steaks

Serves 4

2 Lb bone-in monkfish tail (prepared according to above instructions)
4 strips of bacon, cut into 1/2 inch pieces
1 large yellow onion, diced
3 medium carrots, peeled and diced
1 celery rib, peeled and diced
10 whole garlic cloves, unpeeled
2 tsp finely minced rosemary and/or thyme
14.5 oz can diced tomatoes, drained
1/2 cup dry white wine
All-purpose flour for dredging monkfish
1 Tbsp canola or olive oil
Salt and black pepper
  1. Preheat the oven to 250F.
  2. Set a large skillet over medium heat. Add the bacon in one layer and cook stirring occasionally until nicely browned and the fat is rendered, 5-8 minutes.
  3. Add onion, carrots, celery, whole garlic cloves, and a generous pinch of salt. Cook over medium heat, stirring occasionally, until the vegetables are tender and golden brown, 10-12 minutes.
  4. Add the herbs, tomatoes, and wine. Bring to a boil. Cover, reduce heat to low, and simmer for 15 minutes. While the sauce is cooking, prepare the monkfish.
  5. Dry monkfish well on paper towels. Season it all over with salt and pepper, and dredge in flour, shaking off access. Set a large non-stick or cast-iron skillet over high heat. When hot, add the oil and swirl the skillet to coat. Place the fish in the pan without crowding and cook on all sides until golden brown (1-2 minutes per side). Remove monkfish from the pan and set aside.
  6. Taste the sauce and correct seasoning. Place monkfish in the pan with the sauce and spoon the sauce on top of it. Cover the skillet and place in the oven for about 18 minutes per inch of thickness. Start testing for doneness 5 minutes before the estimated cooking time is up. Monkfish does not flake like other fish, so it's hard to separate the flakes and look inside. The most reliable way to test it, is to insert an instant read thermometer into the thickest part (but not next to the bone). The fish is done when it's at 140F. If you don't have an instant read thermometer handy, try to separate the flesh from the bone -- if you encounter no resistance, monkfish is done (this can be a little tricky if your steaks are tied up).
  7. Serve immediately with the sauce and some good crusty bread for dipping. Mashed potatoes are also quite heavenly with this dish.
Note: unlike meat braises, I don't recommend making this dish in advance and reheating. You can make the sauce as far in advance as you'd like, but don't cook the fish until you are ready to serve it.

Wednesday, December 13, 2006

Potato Vareniki (Pierogies)

Before I get to the dish in the picture, let me share the news that have been overflowing our family with joy since yesterday. Jason (my husband) has defended his Ph.D. thesis. It's hard to describe what this feels like. The goal towards which I saw him work for so many years is finally accomplished! Jason did a wonderful job with his defense talk yesterday, and after a few nerve racking minutes of closed-door committee meeting, it was official that we should break out the good champagne (In case anyone is curious, it was Dom Pérignon 1996 :)

I'll spare you the details of being a grad student wife. If you want to learn more about it, you'll get a kick out of Piled Higher and Deeper comics.

Now you know why I can't stop smiling :)

About the food...

After a whole week of healthy eating, I thought it was about time to satisfy my craving for potato vareniki (Russian and Ukrainian word for pierogies).
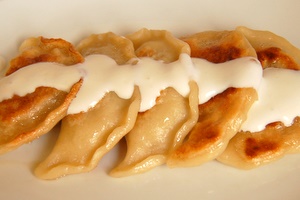
The passion I feel for this dish is not unlike the passion Americans (myself included) feel for burgers. What can be simpler? The whole thing has just a handful of ingredients -- pasta type dough wrapped around creamy potato and sautéed onion filling. Yet, there are so many subtle nuances that can elevate such dishes to cult-like standing. With burgers, it's all about perfecting the balance between charring the outside while keeping the inside rare enough to explode with juices that leak to your elbows as you take a bite. With pierogies, it's all about making the dough that's elastic and supple enough to provide a bare hint of resistance as you take a bite. Both have to be seasoned to perfection -- under-salted ground beef or potatoes taste like "blah" and are the first give away of inexperienced cook.

You can serve pierogies 2 ways: just boiled or boiled and then sautéed in butter to crisp up (that's the one in the picture). Both ways you'll need plenty of sour cream, but if I just have them boiled, I also add a little butter.

I normally provide recipes for dishes that I appear on this blog. But this time, I decided to skip the recipe and talk about the process of recipe writing instead. A Jamie Oliver type recipe would be easy to put together, but it would probably do you no good. A Julia Child/Marcella Hazan type recipe would take me several hours of writing and days of testing, and that work would probably never pay off because I doubt anyone would care. Seriously -- raise your hand if you are willing to spend 3 hours making pierogies. Well, that's what it takes, and unless you have some pasta making experience, you'll probably need several tries to get it just right.

I find recipe writing to be a very interesting (although sometimes painful) process -- probably because I used to be a Usability engineer in my previous life. The most important questions a recipe writer needs to answer are:
  • who will be using this recipe?
  • what goal are they trying to accomplish?
My answers to these questions are:
  • a home cook
  • to make an amazing version of a particular dish
I don't specify the experience level of the home cook because in today's world of global cuisine, it's hard to make any use of cook's experience. I might have a ton of experience with Mediterranean techniques, but not with Oriental ones. Some ingredients might be part of my daily life and some I've never even heard of. When French food writers write for French cooks or Italian writers for Italian cooks, there are some basics they can take for granted, but when writing for the US (or global) audience, there is very little the writer can take for granted.

Since "a home cook" is a category too vast, I have the second bullet to narrow it down, but not by the level of experience, but by the goal of the cook. My primary audience are obsessive cooks who won't settle for "quite edible" or even "good." They are perfectionists, whose goal is not just to put some food on the table. They are eager to master the art of cooking and to make a truly fabulous dish. This means I have a very small audience -- cooks who are willing to carefully follow 5 pages of instructions. It's almost unheard of these days in the world of cookbook publishing, but that's the audience Julia Child and Marcella Hazan served so remarkably well.

Don't all recipe writers want their audience to end up with a great dish? On the surface, it seems that they all want you to have something wonderful for dinner. The real result depends on which trade offs they are making. The world of chef pop stars has an image to protect -- no one wants to be the boring-10-pages-of-instructions guy. They want to be your pal. They want to be cool. They want to make you think like they are luring you into the kitchen when they are really luring you to the couch for some pleasant food day dreaming with their books and TV shows. They make it sound so easy. Hey, the recipe is only 5 lines -- even I can do that. Who needs all that nonsense about how to knead the pasta dough? According to Jamie Oliver, you just "work the dough hard for about 3 minutes or until smooth, silky and elastic." And if you don't have a pasta machine, he doesn't hesitate to recommend that you roll it out with a pin. I tried it as my first attempt to make pasta several years ago. There is only one word to describe the result -- CRAP!

What was Jamie thinking when he wrote this recipe (assuming *he* actually wrote it because at the rate celebrity chefs publish their books and produce their shows, I doubt they write it all themselves). First of all -- how many people will actually attempt making their own pasta? Most will buy wonton wrappers. Second of all -- how many will be able to tell the difference between great pasta and mediocre one? Most of them just want to play with some dough and have fun. Jamie knows extremely well what most people want, and that's why he makes the big bucks. He is selling the image of food that's rustic and beautiful. And the good sales man that he is, he knows that if he makes it sound like it requires real cooking skills, it won't sell very well.

Sorry Jamie, I don't mean to pick on you. There are plenty of cookbook writers whose recipes are as bad as yours. It's just that you make a perfect counter example to Marcella Hazan. Her goal was not to make incompetent cooks feel better with "You can do it!" cheer leading. Her goal was to teach anyone, regardless of their experience, how to cook great Italian food. Not some sad parody of it, but the real thing. Her pasta and gnocchi recipes are flawless. It's as if she is there in the kitchen with me, helping me avoid all the pitfalls (like rolling pasta with a pin the first time you do it is bound to be a disaster). What to do if your dough is too wet or too dry, how to test when it's just right, how to knead, how long to knead, etc. If you think you can make a great pasta without knowing all this, you are kidding yourself.

I don't believe in evangelical cooking, the idea of "let's make it look easier so that more people can join the fun." If you don't think cooking is fun, and if kitchen is not your favorite room in the house, I ain't the person to convert you. But if you love it already and don't want to settle for less than perfect deliciousness, you've come to the right place.

P.S. If you try one of the recipes on this blog, I'd love your feedback. There is no way to write great recipes without usability testing :)

Sunday, December 10, 2006

You don't have to hurt the penguines

I just got another question in e-mail about environmental concerns of eating fish.
Hi Helen,

As someone who enjoys fish and would prefer to eat them with impunity, I appreciated your posts on issues such as mercury ingestion and the effects of fish on pregnancy.

Yesterday I saw Happy Feet, an "appeal to [our] better nature" to stop over-fishing masked as a cute kids' film about singing and dancing penguins starving in Antarctica. Recently, I've also seen a rise in the number of news articles and editorials about the issue of over-fishing. To be honest, I've largely avoided reading them to avoid feeling compelled to add eating fish to my list of other environmental concerns.

I would appreciate learning your views on these issues to help me assess whether and how I can continue eating lots of great fish without hurting the penguins.

Thanks!
Corey
I thought that Corey is not the only one curious about these issues, so I am posting my reply here.
Dear Corey,

I haven't seen Happy Feet, so can't comment on that. But here are my views on environmental concerns.

If you eat a variety of fish instead of getting hooked on one or two species, it will be better for the environment and your health. I am pro fish farming. I just think we need to learn to do it better. It's a new concept and there have been some improvements in the fish farming technology already. At some point, humans started farming cows and chickens. Well, it's now time to farm fish, that is if we want to supply our population with 3 fish servings a week as FDA recommends.

What we can do as consumers is stop turning up our noses at farmed fish, as if it's inferior somehow and start asking intelligent questions -- like how was the fish raised, what was it fed, was coloring used, were antibiotics used, etc. We also have to be willing to pay for quality seafood. There is no such thing as free lunch with fish -- you get what you pay for. If we were willing to pay $12-15/Lb for high quality farm raised salmon, farmers wouldn't have to pack them into cages as tightly, and many environmental issues would be resolved.

There is also a ton of fish that is cheap, plentiful, and extremely good for you that we keep ignoring -- bluefish, sardines, mackerel, and mahi-mahi.

-Helen

Friday, December 8, 2006

Veggie Wraps

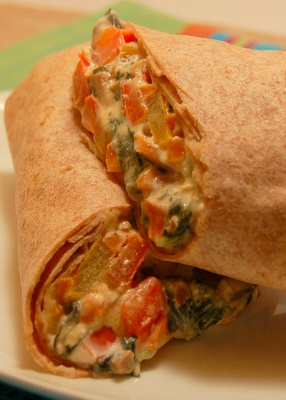
These are no ordinary veggie wraps. What makes them so special is the synergy between the ingredients. The veggie juices, with a strong hint of mushrooms and feta, melt into yogurt. The yogurt melts into hummus. And all this goodness fills a warm whole wheat wrap with savory deliciousness. Meat and fish have not been my best friends lately. It's very not like me, but pregnancy can do these things to people. I've been having terrible carb cravings and trying to find creative ways to satisfy them while eating healthy. Soups were great, but after 3 weeks, even I can get tired of them. That's when the veggie wraps came to the rescue. They have it all -- carbs from the wrap, protein from hummus, calcium from yogurt, feta, and spinach, and tons of fiber from all these veggies and legumes.

For Filling:

3 Tbsp olive oil
1 onion, sliced
1 large carrot, julienned
1/2 Lb mushrooms, chopped
1 red, orange, or yellow pepper, diced
5 cups packed fresh spinach, chopped
1/2 cup crumbled feta
Salt and pepper to taste

For wrapping:

4 large whole wheat wraps (about 12" in diameter)
1/2 cup hummus
1/2 cup yogurt
  1. Preheat the oven to 350F.
  2. In a large skillet set over med heat, cook onion and carrots in 2 Tbsp olive oil with a generous pinch of salt stirring occasionally, until slightly browned. Turn up heat to high and add mushrooms. Cook until all the vegetables are nicely brown about 5-8 minutes, stirring occasionally. Remove to a bowl and set aside.
  3. Add the remaining Tbsp oil to the same skillet and cook peppers with a pinch of salt on med-high heat, stirring occasionally until nicely browned.
  4. Add spinach to peppers and cook stirring until wilted. If all the spinach does not fit at once, add it in portions. As one portion wilts add the next portion until all the spinach is in the skillet. While the spinach is cooking, fold the wraps in half, wrap them in foil, and put in the oven for 5-7 minutes to warm up.
  5. Return onions, carrots, and mushrooms to the skillet and season all veggies to taste with salt and pepper.
  6. Turn down the heat to medium-low. Sprinkle feta over veggies (don't stir). Cover the skillet and cook until feta is mostly melted, about 3 minutes.
  7. Lay the wraps out on the clean surface. Spread 2 Tbsp of hummus on each wrap leaving about 3" border on all sides except for the one closest to you. Spread 2 Tbsp of yogurt on each wrap over hummus. Sprinkle with a pinch of salt. Divide the veggies equally among the wraps placing them on the part of wrap closest to you. Help yourself with a spoon to keep the veggies contained and fold the wrap away from you. Fold in the sides, and finish rolling the wrap away from you. Wrap a piece of foil around each veggie wrap, leaving one end exposed, so that only 3/4 of the veggie wrap is covered in foil. Put in the oven to warm up for 5 minutes (since wraps cool during the assembly process, they need this time to rewarm).

Wednesday, December 6, 2006

Greek shrimp with feta

I just finished reading Middlesex by Jeffrey Eugenides. It's a wonderful page-turner of a book about Calliope Stephanides, and three generations of the Greek-American Stephanides family in Detroit. The book has everything a good page turner needs -- great characters, sex, car races, drug dealing, narrow escapes, and some fabulous food. Ever since I started this book, I've been craving Greek food, and the other night I finally decided to do something about it. I made the Greek shrimp stew with feta. Fish and cheese? In most cuisines it's a no-no, but this particular combination works surprisingly well.

Note: When tomatoes are in season, this dish is best made with fresh ones (you'll need about 5 tomatoes for 4 servings). But in winter, I use canned.

Serves 4

1-1/2 Lb medium shrimp, peeled and tails removed
2 Tbsp olive oil
1 yellow onion, finely diced
2 garlic cloves, finely minced
1 Tbsp finely minced oregano
14.5 oz can diced tomatoes, drained
1/4 cup dry white wine
1/2 cup crumbled feta
Minced parsley for garnish
Salt and pepper to taste
  1. Place shrimp in a bowl of iced, salted water (1 Tbsp kosher salt per quart of water) and let brine while preparing the sauce.
  2. Set a large skillet over medium-low heat. Add olive oil, onions, and a generous pinch of salt. Cook stirring occasionally until onions are tender and golden, about 15 minutes.
  3. Add garlic and oregano and stir until fragrant, 1-2 minutes.
  4. Add tomatoes and wine, turn up the heat and bring to a simmer. When the sauce starts to bubble, return to medium-low heat and cook for 5 minutes. Season to taste with salt.
  5. Remove shrimp from the brine and dry on paper towels. Season with pepper and place on top of the sauce in one layer (don't mix). Sprinkle the feta on top. Cover, turn up the heat to medium-high, and cook just until shrimp turn pink, 2-3 minutes.
  6. Take off heat, sprinkle with parsley and serve with good crusty bread.

Monday, December 4, 2006

Eating Soup for Two

Please God, let me finish this post without getting nauseous.

I miss blogging. I miss cooking interesting things. I miss eating out. I miss a lot of things. I don't mean "miss" in a crave sort of way, but in a I-remember-doing-those-things-once sort of way. What do I crave? Oh, what I wouldn't give right now for a bowl of potato vereniki (what in Polish and now English are called pierogies) with that toothsome homemade dough, the creamy potatoes, and the sweet golden onions. Actually, pretty much anything potato is my new best friend. And meat, particularly really fatty ground meat -- yes, the stuff I normally eat about once a year.

No, I was not abducted by aliens and replaced with the meat and potato obsessed person. I am just pregnant :) It's all very exciting, but also very unfamiliar territory for me. It was reassuring to have Jen, another pregnant woman, in one of my classes this weekend. After a few weeks of "evening sickness" (my "morning sickness" happens right around dinner time), I was sadly starting to get used to the idea that this is how my life will be from now on. But Jen reassured me that it gets better after a few months. I found it interesting that she also craved all the foods she ate in her childhood. I've cooked more Russian food in the last 3 weeks than I've cooked in the whole last year. I took this chance to perfect my pirozhki dough, so at least I am learning something in the kitchen.

Teaching has been surprisingly therapeutic. It's my chance to make all the dishes I can't actually eat because I know someone else will be enjoying them. All my usually favorite winter veggies (butternut squash, delicata, celery root) make me sick. But cooking them with my students last friday gave me a virtual experience of tasting them.

Soups have been my one salvation. I can't seem to figure out how to make healthy meat and potatoes, so soups provide me with a comfort food fix and an easy way to sneak something good for me into my diet. Today I made a kale bean soup that was really satisfying and healthy. If I keep this up for a few days, I'll reward myself with potato vareniki.

Kale Bean Soup

Feel free to substitute any beans that you like for great northern (also known as cannellini) and cranberry beans. You can even use drained canned beans (about 1 jar for 1 cup dry beans). You'll just need to add water or stock to your soup instead of bean cooking liquid.

Serves 6-8

3 Tbsp olive oil
2 onions, diced
2 garlic cloves, minced
1 can diced tomatoes, drained
1 bunch kale, well-washed
1 cup dry great northern beans, cooked*
1 cup dry cranberry beans, cooked*
1 bay leaf
Salt to taste
  1. Set a large stock pot over medium-low heat. Add the olive oil, onions, and a generous pinch of salt. Cook stirring occasionally until onions are tender and golden, about 15 minutes.
  2. Remove stems from kale and discard. Coarsely chop kale leaves.
  3. Add garlic, tomatoes, and kale to the pot. Mix all ingredients up. Cover the pot and turn up the heat to high. Cook until kale is wilted, 4-5 minutes. Turn down the heat to medium. Add a generous pinch of salt and cook uncovered stirring occasionally until kale is tender, 2-3 minutes.
  4. Add the beans with their cooking liquid and enough water to make the consistency of the soup that you like. If using canned beans, use plain water or stock for liquid with 1/2 cup dry white wine.
  5. Season to taste with salt. Add bay leaf and simmer until the liquid absorbs the flavor of the other ingredients, about 15 minutes.
  6. Serve with good crusty bread.
*How to cook beans:
Since each type of beans has it's own cooking time (which is kind of unpredictable because it depends on the age of the beans) soak and cook each type of beans separately.
  1. Put the beans in a bowl, cover with cold water (at least 3 cups water per cup of beans) and let the beans sit overnight.
  2. Discard any floaters or strange looking beans. Drain the beans in a colander and rinse under cold running water.
  3. Place them in a pot and cover with 4 cups cold water.
  4. Do not cover with lid and don't add salt! Bring to a boil over high heat. As soon as the water just starts to boil, turn down the heat to low. The liquid should be less active than traditional "simmering." You shouldn't see any bubbles and should have to look at the pot for at least 5 seconds to detect any movement.
  5. Great northern and cranberry beans will take about an hour to cook +/- 20 minutes. After the first 40 minutes, taste them every 10 minutes to see how they are doing.
  6. When the beans are tender, generously season the cooking liquid with salt. Add 2 Tbsp dry white wine, and take the beans off heat.
Yay -- I finally got to write a whole post without being sick. Running to the bathroom between paragraphs does not inspire particularly good food writing ;)