Wednesday, February 28, 2007

Watermelon Radish

"What's this?" asked the cashier at Whole Foods.
"That's a watermelon radish," I replied.

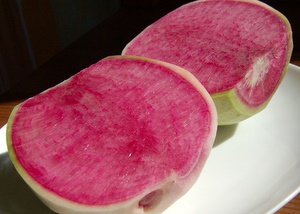
I couldn't believe my luck. I was in the produce section surrounded by beets, rutabagas, and turnips, when I noticed these little beauties. I've only had the watermelon radish once (this summer from our CSA), but I recognized its shy pink blush immediately. Could it be? I read the label and indeed -- these were watermelon radishes.

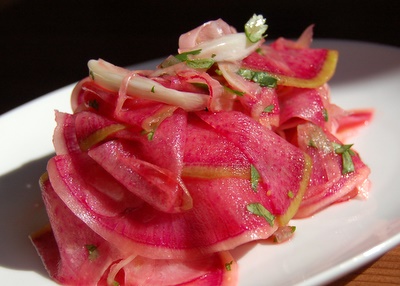
I grabbed the biggest one I could find and headed home to make a salad. Once you peel your radish and cut it in half, you'll understand the name.

I am sure there are tons of things you can do with this cute veggie. The only one I tried so far is slicing it paper thin on a mandolin for a salad. Sprinkled generously with salt and freshly squeezed lime juice, it's so good that it might take me a while to start exploring other ways. This one was really tame compared to the one we got this summer. I actually missed it's assertive bite, but it was still terribly yummy, particularly after all the months of winter food. If you find one with more bite than you are comfortable with, just let it sit in lime juice for 5-10 minutes. It will become much tamer.

There is no recipe here since this salad is so simple. Peel and slice a watermelon radish using a mandolin or adjustable blade slicer. You want VERY thin slices, so I don't recommend doing it by hand with a knife. Add whatever other veggies suit your fancy. This time I tried regular radishes and fennel. Add some chopped herbs. I used cilantro, but mint, parsley, and tarragon would all be great. Add a very generous squirt of fresh squeezed lime juice. For a good size radish, you'll need a whole lime. Sprinkle very generously with salt. If you don't add enough salt, the flavors won't pop. No, I didn't forget the oil. You can add some if you want, but it's not necessary. Toss and enjoy.

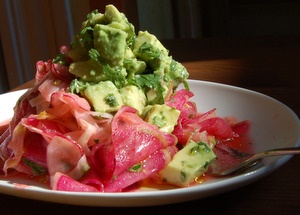
It's also good with avocado.

Tuesday, February 20, 2007

Uha -- Russian Fish Soup

I never thought it would take me a whole week to finally get to this post, but remodeling 3 rooms to make space for the baby seems to have put the rest of life on hold. Why can't decorating be as easy as cooking? Ok, let me rephrase it. Why can't it at least be as easy as baking (and I don't think baking is all that easy)? I hate shopping and decorating the way many women hate cooking. I am just lucky that decorating only has to happen every few years. I feel so terrible for all those poor souls who have to go through such suffering on daily basis for dinner.

The good news is that we painted the new study (what used to be a walk in closet). We even have colors and furniture chosen for our new bedroom (what used to be the old study) -- that only took like 10 samples from Benjamin Moore (currently painted in different parts of the room), and what seems like 20 trips to IKEA and West Elm. Seriously, I can't even imagine going through something this crazy for a dish. After we'll free up our old bedroom, we can finally get to decorating the baby's room. That's another thing that makes decorating so infuriating. Do you ever have to turn your dessert into your main dish and your main dish into your appetizer, so that your appetizer can become an amuse-bouche? Exactly! Cooking is an organized, orderly, relaxing process. Decorating is a pain in the butt.

But today I am taking a little brake from catalogs, painting, and measuring. I get to write about Uha -- one of the simplest and most satisfying winter fish soups.

Uha

Fish substitutions: the fish in the picture are arctic char and barramundi, but you can use any delicate or moderately firm fillet like branzino, sea bream, salmon, trout, cod, haddock, pollock, hake, halibut, sole, flounder, etc. The only types of fish to avoid are very dense (tuna, swordfish, mahi) and brown fleshed (bluefish, mackerel).

Serves 4-6

2 Tbsp butter
1 large yellow onion, finely diced
1/3 cup dry white wine
6 cups fish stock
2 red skinned potatoes, peeled and diced
1 Lb skinless fish fillets
Chopped dill and or parsley for garnish
Salt and pepper
  1. Set a large, heavy soup pot over medium-low heat. Add the butter, onions, and a generous pinch of salt. Cook stirring occasionally until the onions are translucent, but not browned, 10-15 minutes.
  2. Add the wine and fish stock. Bring to a boil and season to taste with salt. Remember this is a lot of liquid, so ditch your salt shaker in favor of few good handfuls of salt. Taste after each addition.
  3. Add potatoes and cook until tender when poked with a knife, 10-15 minutes.
  4. Take the soup off heat, add the fish, and wait until fish is opaque most of the way through (but not all the way), about 8 minutes per inch of thickness. To test for doneness, poke it with a fork or spoon. If it breaks into pieces in the thickest part, you are done. Pink fleshed fish (salmon, steelhead trout, and arctic char) are best served on the rare side. So don't wait for them to flake. I usually keep those in the soup for only 5 minutes per inch of thickness before serving.
  5. Garnish with dill and/or parsley and serve.
Ahead of time note: you can make the soup in advance up to the last step of adding the fish.

Monday, February 12, 2007

Technique of the Week: How to make fish stock

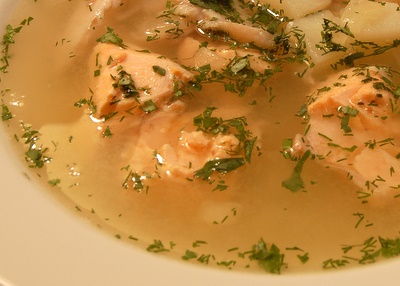
I have a confession to make -- I hate making stocks. When a recipe calls for chicken, beef, or veal stock, I open a can or a box. Unless of course, the stock is the star of the show and I am making chicken soup or tortellini in broth. Yes, yes -- I know that it's not hard. It's just boring and annoying. All that simmering, chilling, and degreasing, does not give me a sense of satisfaction. In fact, I usually feel bad afterwards because I have to throw away so much chicken. No matter how hard I try, I just can't like boiled chicken and can't find any creative uses for it.

There is, however, one exception to my stock apathy. I love to make fish stock. It's not just because I love fish soups, but because making fish stock is so fast and easy. It only has to simmer for 40 minutes and requires no degreasing because fish is so much leaner than chicken or beef. Most fishmongers will sell you fish heads and bones relatively cheaply. My favorite fish to use for stock are branzino, sea bream, red snapper, and any other small, white or beige-fleshed fish. I tend to avoid making stock out of pink or brown-fleshed fish because it comes out too strong. If you get frames from large fish like cod, ask your fishmonger to hack them up for you so that you can easily fit them into your pot. It's a pain in the butt to do that at home.

If I am in the mood for a fish soup, I ask Carl at the New Deal Fish Market to fillet a few little fish for me and to pack the fillets separately from heads and bones. This makes it really easy to plop the heads and bones into the pot to make stock and then throw in the fillets after the stock is done and strained. Fish stock is also a great thing to have in your freezer, so I often make more than I need and freeze some in large freezer bags.

Students often ask me if it stinks up the house. Not that I can tell. Unless you cook it for hours, it's really quite innocent.

Fish substitutions: branzino, sea bream, red snapper, stripped bass, cod, haddock, hake, sole, flounder, pollock, halibut, grouper, or pretty much any light colored fish (I mean the flesh color).

Fish prep: If you tell the fishmonger that you need bones and heads for stock, he should know what to do, but just in case tell him that you want the gills and guts removed.

For 6 cups of stock

1 Lb fish heads and bones, rinsed
1/2 cup dry white wine
8 cups water
1 carrot, peeled
1 onion, peeled
1 celery rib
6 parsley stems without leaves
6 thyme sprigs or 3 rosemary sprigs
1 tsp black peppercorns
1 bay leaf
  1. In a large stock pot, combine fish heads and bones, wine, water, carrot, onion and celery. Cover and bring to a boil.
  2. Turn down the heat to medium, uncover, and simmer 20 minutes skimming the foam that rises to the top.
  3. When the foam stops rising, add parsley stems and thyme sprigs, peppercorns, and bay leaf. Simmer gently uncovered 20 more minutes. Take off heat. Strain in a colander pressing hard on the solids. Let sit for 10 minutes so that any impurities settle on the bottom of the bowl. Don't stir the stock before using, and you'll have no trouble leaving the impurities in the bowl with the last 1/3 cup or so of the stock.
To freeze stock: Pour stock into containers, or set a large freezer bag in a clean bowl and pour in the stock. Seal the bag and put it in the freezer with the bowl until the stock is solid. After that you can remove the bowl. Stock will keep in the freezer for up to 4 months. When defrosting the stock in a freezer bag, put it in a bowl or saucepan just in case it leaks.

P.S. The picture above is of Uha (a Russian fish soup). That's about the easiest thing you can do with your fish stock. I'll write up a recipe for it soon.

Friday, February 9, 2007

When life gives you New York Times

A week after "Playing with Fire" went live on Culinate, I started getting comments that we beat NY Times on the broiler story. I went to NY Times, and indeed -- Mark Bittman had the same brilliant idea. Of course, I'd love to imagine that he was inspired by my story, but the reality is that he probably doesn't even know I exist, and it's much more likely to be a complete coincidence. Still, I couldn't help feeling a little proud that my story was published first. As if to put me in my place, NY Times beat me to the punch on the lemon story. Not only that, it was called exactly the same as mine: "When life give you lemons." Oh yikes! Good thing I saw that before my story went live on Culinate.

Finding original topics in the world of food writing is tough. After all, we are all dealing with the same season, the same produce, and even the same puns! How many English expressions with the word "lemon" are there? Probably fewer than the food writers who want to write about lemons. At least by the time I finished reading the NY Times article, I realized that the title is the only thing I'll have to change. We were attacking citrus from completely different perspectives. NY Times story concentrated on the concepts, like lemons go well with salads, pasta, and many other thing. My story concentrated on techniques, like juicing and sectioning citrus. I guess even when life gives you lemons, you can find room for a little originality.

P.S. The picture above is of a Meyer Lemon Mousse that appears in the end of the Sweet Tarts (our new title) story on Culinate.

Thursday, February 8, 2007

Korean-Style Short Ribs

Remember the times when people kept blogs like their diaries -- the times when the posts were written for the purpose of the person writing them, and not for hundreds of visitors? It seems so long ago that by the time Beyond Salmon was created, that's not what food blogs were all about. Don't get me wrong -- writing for myself is not my cup of tea, and if it wasn't for all you delightful readers, I don't think I could have the will power to maintain this blog. But sometimes I want to take some notes for no other purpose than to remind me how to make a particular dish the next time, and I don't have any better place to do that than here. So although this post is just for me and it has no pictures or much of a story, you are welcome to listen in.

My favorite meal at CIA was at St-Andrews cafe (the most casual of the student-run restaurants). And my favorite dish there was Korean-Style Short Ribs. Short Ribs are one of my favorite braising cuts due to their large grain and loads of fat. I've had my share of really awesome short ribs both in restaurants and at home, but the ones at CIA really knocked my socks off. Luckily, the chef was willing to give me the recipe and I finally got around to trying it. Couple of things made me worry about the outcome of the dish:
  • I had to scale the recipe down from 20 Lbs of ribs to a more reasonable size.
  • I had to figure out what to do in all the places that said "as demoed by the chef" -- this was a recipe written for student line-cooks, who were going to get a demo on what to actually do.
  • The use of onion and garlic powder and powdered ginger seemed strange to me. I don't actually have any of these things and didn't want to buy them just for this dish. So I threw in a bunch of fresh garlic and ginger.
  • I didn't have veal stock and substituted store bought beef stock and a little store bough chicken stock. As Julia Child used to say -- you are alone in the kitchen, so who is ever going to know!
  • The idea of a slurry (stock mixed with flour) to thicken the braising liquid before adding it to short ribs sounded strange to me.
  • Braising uncovered with just a parchment paper on top of the ribs sounded even stranger. I thought you always want to create a tight seal.
  • I wasn't sure how much salt to use since my stock was already seasoned and the liquid reduces so much during cooking.
  • The temperatures were given for convection oven and mine is a regular one.
Well, in spite of my worries. It all worked like a charm, and the ribs were simply fabulous -- spoon tender and succulent. The only things I'd change to make them a little closer to the version I had at CIA are to reduce amount of carrot and up the soy sauce.

Here is roughly what I did.

Serves 6-8

For the sauce:
10 cups stock (I used mostly beef and a little chicken)
Slurry -- 2/3 cup flour and 1 1/3 cup stock, whisked really well until no lumps remain

For the ribs:
6-8 Lb bone-in short ribs, trimmed
Flour for dredging
Salt and pepper

3 large onions, large dice
3 large carrots, large dice (next time use 1-2)
5 celery sticks, large dice
1/2 Lb brown sugar
2/3 cups rice wine vinegar
3/4 cup soy sauce (next time use 1 1/4 cup)
2/3 cup mirin
1/4 cup chopped ginger
6-8 chopped garlic cloves
  1. Preheat the oven to 475F.
  2. Bring stock to a boil, stir in the slurry, simmer for 1 hour, skimming as needed.
  3. Season ribs with lots of pepper and just a little salt. Dredge in flour and roast in a large pan in the middle of the oven turning every 10 minutes until brown on all sides.
  4. Add onions, carrots, and celery to ribs and continue to roast until veggies are brown, about 20 minutes.
  5. Add brown sugar and cook until sugar melts and caramelized with mirepoix, about 15 minutes.
  6. Turn down the oven to 275F.
  7. Deglaze the pan with vinegar, mirin, and soy. Add ginger and garlic. Add the thickened stock and cover the pan with a piece of parchment. Braise for 5 hours. Turn ribs after 3 hours to help cook more evenly.
  8. Cool ribs in sauce for at least 1 hour. Remove ribs and chill. Strain sauce, chill overnight and degrease. To serve, warm up ribs with sauce in a pan on low heat.