Tuesday, January 31, 2006

Farinata

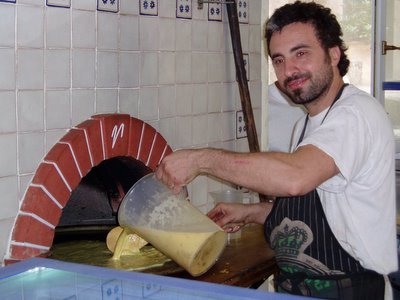
You see that guy… You know why he is smiling? Not only does he live on the gorgeous Italian Riviera, but he is about to create one of the most delicious street foods of all time.

Before my trip to Italy, I had strict instructions from my well-traveled friends to try Ligurian pesto, seafood, and focaccia. Why didn’t anyone mention farinata? I’ve never even heard of it before going to Liguria.

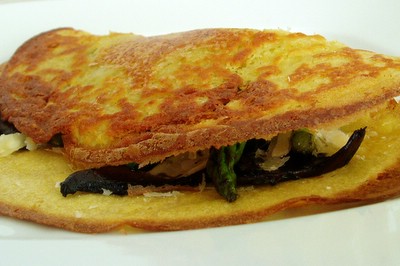
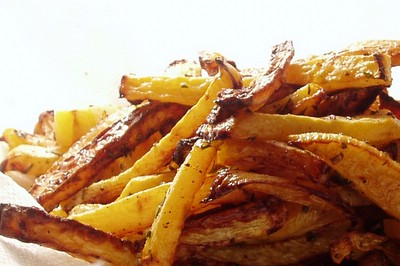
When we walked into the first pizza shop in Vernazza on our hike through Cinque-Terre, we were literally moonstruck by a huge yellow pancake! Its crispy edges were begging to be eaten, but I didn’t know if we can handle eating this whole moon – it was 2 feet in diameter! Lucky for us, another lady walked into a shop and asked for “farinata.” Swoosh! A half circle was cut off the moon’s edge and handed to her. Aha, we could just get a piece of the moon! I followed in her footsteps and asked for farinata too. Swoosh! And I got my piece.

It was crispy on one side and delicate on the other, thicker than a crepe, but thinner than a pancake, very simple, yet absolutely heavenly. As soon as I swallowed my first bite, my reverse engineering brain set to work. It was definitely not wheat. Maybe corn – it had that golden color, but the texture was much finer, not as gritty. I’ve never had anything quite like it. I don’t think astronomers get as excited about discovery of new stars, as I get excited about discovery of new pancakes.

I was not too worried about never tasting farinata again, until I got back to the US and couldn’t find it in Marcella Hazan cookbook. I count on Marcella for all my Italian cooking needs – fresh pasta, grilled whole fish, pork braised in milk. How could she omit such a delicious part of Ligurian cuisine! I searched all my reliable web recipe sources. Nothing. After googling for “farinata” I found out that it was made out of chickpea flour (not corn!), but still no recipe. “I guess I’ll have to go back to Liguria someday,” I thought.

Imagine my surprise when I was reading chowhound home cooking board more than a year after my trip, and saw a post from Nick with Mark Bittman’s recipe for farinata. After a quick stop at the Whole Foods for chickpea flour, I was on my way to recreating the dish I missed all year. It was just as good as in Liguria – crispy, delicate, and absolutely addictive. But even though I can now make farinata, I’ll still have to go back to Liguria someday.


Farinata
(adopted from Mark Bittman’s recipe in the New York Times)

I used Bittman’s recipe almost as is, but instead of pouring all the batter into the skillet at once, I baked it in batches to make several thinner pancakes rather than one thick one.

1 cup chickpea flour
1 3/4 cup lukewarm water
2 tsp kosher salt (or to taste)
2 Tbsp olive oil plus more for cooking
  1. Whisk chickpea flour, salt, and water until no lumps remain. Whisk in 2 Tbsp olive oil. Cover and set aside at room temperature overnight.
  2. Preheat oven to 450F.
  3. Put a well-seasoned cast iron (or non-stick) skillet in the oven to warm up for 5 minutes. Add a little olive oil to the skillet and return to the oven for 2 more minutes. I use about 2 tsp oil for a 10 inch skillet (adjust this amount if your skillet is of a different size).
  4. Whisk the batter well before using. Pour in enough batter to cover the bottom of the skillet and form 3mm thick layer (about 3 times the thickness of a crepe). The batter will sizzle. Place the pan in the oven, and cook until the pancake is dry on top and solid in the center when you nick it with a knife, about 12 minutes.
  5. Carefully remove farinata to a plate, add more oil to the pan and repeat with the rest of the batter. Serve as soon as farinata is out of the pan, or put on a cookie sheet in one layer and warm up in the oven after you finish the batter.
  6. Cut into wedges and serve as a snack. Or fill with all kinds of savory goodies like a crêpe. I don’t know if filling it with stuff is authentic, but it was certainly yummy.

Sunday, January 29, 2006

Rutabaga fries

I always get terribly excited about discovering a new vegetable, particularly a vegetable that I can roast. Roasted veggies are one of my food addictions. They are also the most reliable trick for converting picky eaters into lovers of turnips, cauliflower, beets, and other challenging veggies.

So, when Stephen introduced us to rutabaga (a larger version of turnip), I spent the whole afternoon at work day dreaming about rutabaga fries. These are “fries” only in the name, not in the taste. They are roasted, not deep fried, and much softer and sweeter than potato fries. You could really just cut rutabaga into large dice and roast it, but cutting it into French fry shapes exposes more surface area to the cookie sheet and makes more of those caramelized, mmm-so-good surfaces. This recipe also makes killer sweet potato fries. If using sweet potatoes, don’t peel them, just wash well and dry with a paper towel.

Serves 2

1 rutabaga, peeled and cut into French fry shapes
2 Tbsp olive oil
1 garlic clove, finely chopped
2 tsp chopped rosemary, sage, or thyme
Salt and pepper to taste
2 Tbsp canola oil
  1. Preheat the oven to 475F and set a rack to the lower third of the oven.
  2. Mix rutabaga with olive oil, garlic, herbs, salt, and pepper to taste.
  3. Put a large cookie sheet into the lower third of the oven for 5 minutes to preheat.
  4. Add 2 Tbsp canola oil to the cookie sheet and return it to the oven for 2 minutes.
  5. Put rutabaga fries onto the hot cookie sheet; they should sizzle. Spread them out with tongs in one layer.
  6. Roast 15 minutes. Stir, and roast until tender and browned, 10-15 minutes.
  7. Remove to a bowl lined with paper towel to absorb the oil. Sprinkle with salt and serve.

Thursday, January 26, 2006

Bluefish Pâté

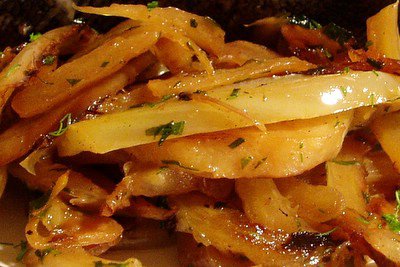
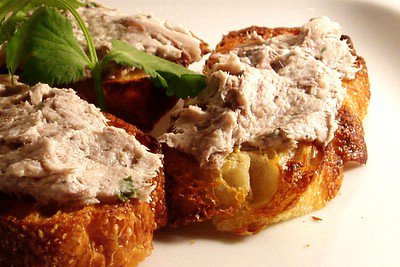
When a bluefish tail was leftover after yesterday's cooking class, I knew it would find a good home in some dish the next night. Any fish leftovers are good, but bluefish leftovers are so good that I sometimes cook bluefish just to have leftovers. The trick to dealing with fish leftovers is to give up the idea of reheating them. Reheated fish does not taste nearly as good as all the delectable things you can make out of it, like crêpes, tacos, burgers, salads, and pâtés. And no fish plays this reusable role more admirably than bluefish. If there were Fish Academy Awards for the best leftover fish, bluefish would definitely win one. Its velvet texture is perfect for any mashed up preparation, and its flavor stays pronounced even when it's cold.

My little bluefish tail was just the right amount for a little pre-dinner snack of bluefish pâté. But as I got the jar of mayo out of my fridge to add to flaked fish, the gym scale materialized out of nowhere. "Helen," it said in its clunky hoarse voice. "What about all that weight you gained over the holidays? I thought you were going to be good at least on weekdays." I hate it when the scale pops into my kitchen unannounced and makes me feel guilty. But I have to admit that on occasion it has given me a good idea or two, so I put the jar of mayo back in the fridge and thought hard about my options.

I've often substituted yogurt for mayo in chicken salad with great results. Yogurt and fish... Hmm, somehow that did not seem like a match made in heaven. But what the heck, I decided to try it. It was such a tiny amount of bluefish that even if I screwed it up and had to throw it away, it would not be a biggie.

In went the yogurt, a quirt of lime, salt, and plenty of pepper. Wow -- it was really good! My initial surprise wore off when I realized that bluefish and salmon taste great with cream cheese, which is milky and tart. The yogurt I used was not far off. It was Greek Total brand whole-milk strained yogurt. That stuff is unbelievably thick and creamy. It gave the pâté luxurious richness and a bright tang to contrast the bluefish.

But isn't that full-fat yogurt a calorie buster? Out of curiosity I decided to do the math. Whole-milk yogurt has 260 calories per cup – that's about 18 per tablespoon. I pulled a jar of mayo out of my fridge – 90 calories per tablespoon. I'll take the yogurt!

Bluefish Pâté

Note: Greek and Armenian yogurts, like Total and Karoun, are sold already strained, and are available at most Whole Foods and Trader Joe's. If you use an American yogurt (even organic brands), you have to strain them in a colander lined with paper towel in the fridge over night.

Serves 6 as an appetizer

1 Lb bluefish leftovers, cooked any way you like
1/3 cup whole-milk strained yogurt or mayo
1/2 tsp freshly squeezed lime or lemon juice
2 tsp Dijon mustard (optional)
1/4 cup very finely minced shallot or onion (optional)
2 Tbsp chopped parsley, dill, or cilantro (optional)
Salt and pepper to taste
  1. Remove skin from bluefish, and flake it by hand into a bowl.
  2. Add yogurt, lime juice, mustard, shallots, and herbs, and mash with a fork until spreadable consistency. Season to taste with salt and pepper.
  3. Serve on toasts.

Tuesday, January 24, 2006

Swordfish Provençal

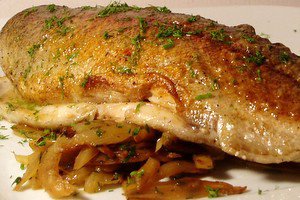
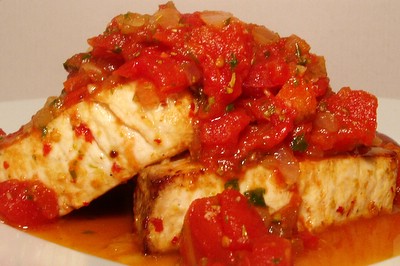
I know what you are thinking -- Helen hasn't cooked fish for ages. I admit that I've been bad about posting fish recipes lately, but that's not for lack of cooking. In fact, I've made 7 fish dishes in the past 4 days. Don't worry, I am not eating fish for breakfast, lunch, and dinner. I am just in the middle of a very busy cooking class semester. The unfortunate thing is that it's hard to teach a cooking class and take mouth watering pictures. The lighting in these places is not great. Besides, I don't want to freak my students out by taking pictures of everything I cook. They think I am pretty geeky about food as it is. Luckily, I just found a picture of Swordfish Provençal that I took couple of months ago. This isn't the most photogenic dish even under the best conditions, but it is usually my students' favorite. Try it -- you'll like it :)

The secret to swordfish: Swordfish is such a dense fish that it needs a good oily marinade to make it tender. Traditional marinade for this dish is just lemon juice, olive oil, salt and pepper. But once I tried Thai Ginger Marinade from Whole Foods (sold in the fish section), I just can't make swordfish without it. That stuff does wonders to dense fish. If your Whole Foods doesn't carry it, there is a recipe for it in the end of my Grilled Tuna.

Substitues: Marlin and Mahi-mahi will taste closest to swordfish, but almost any delicate or firm white fish works with this awesome tomato sauce. Less dense fish like cod, halibut, and striped bass will not need a marinade. Just season with salt and pepper, rub with oil and broil for 8 minutes per inch of thickness.

Sides: Boiled potatoes and plenty of good bread for dipping in the sauce

Serves 4

For the swordfish:
1.5 Lb swordfish steak without skin
6 Tbsp olive oil (or 3 Tbsp olive oil + 3 Tbsp Thai Ginger Marinade)
2 Tbsp lemon juice
Salt and pepper

For the sauce:
2 Tbsp olive oil
1 yellow onion diced
28 oz can of diced tomatoes, drained
2 garlic cloves, finely chopped
2 tsp chopped rosemary
1/2 cup dry white wine
1/4 cup chopped parsley
1 Tbsp butter, softened (optional)

Marinate swordfish (30 minutes to 2 hours before serving):

  1. In a pyrex dish, mix together lemon juice, olive oil, Thai Ginger Marindade (if using), salt and black pepper to taste.
  2. Cut swordfish into 8 pieces and add to the marinate. Turn to coat, cover with plastic wrap, and let sit in the fridge for 30 minutes to 2 hours.

The Sauce (can be done in advance and reheated):

  1. Sauté onions in oil with a generous pinch of salt on med-low heat until soft and golden (8-10 minutes).
  2. Add tomatoes, garlic, rosemary, and white wine. Stir. Cover and simmer until the sauce thickens slightly, 15-20 minutes.
  3. Season to taste with salt and pepper. Stir in the parsley.

Broil Swordfish:

  1. Preheat the oven to broil and wrap a broiler pan with foil.
  2. Remove sworfish from the marinade, but don't dry it. Place it in the broiler pan and broil 4 inches away from the flame for 4 minutes. Flip, and broil 4 more minutes. To test for doneness, cut into one piece with a fork (swordfish is dense, so you have to be assertive). If only a trace of translucency remains, swordfish is done.
  3. (Optional) If you used Thai Ginger marinade, add 2 Tbsp of it into your sauce, and bring the sauce to a boil to kill any possible bacteria in the marinade. This will give your sauce great intensity. Another option for finishing the sauce is to stir in 1 Tbsp of butter right before serving. This will tame the accidity and produce a milder, silkier sauce.
  4. Place 2 pieces of swordfish on each plate and top with sauce.

Sunday, January 22, 2006

Cranberry Cozy

I got tagged by Raquel from Raquel's Box of Chocolate for a common cold remedy meme. What a great idea, Raquel! This also gave me an excuse to write about a wonderful drink that kept slipping off my blogging plate.

Since most of the cold medicines make me sort of drunk -- I took DayQuil before a final in college once and it was not a pretty picture -- I mostly rely on chicken soup and tea. But lately, I've added another weapon to my arsenal of cold remedies. It's a drink that I had at 1369, a Cambridge coffee house that became our sunday morning ritual when we moved to Boston 6 years ago. It's one of those great places that is everything Starbucks is not -- funky and not overly precious. 1369's coffee can be too strong, their music selection can be "interesting", but I love it as is, and can't imagine Cambridge without it. Oh, and did I mention that they have the world's greatest muffins?

Anyway... In the winter, they serve this drink called "cranberry cozy". It is a mix of cranberry juice and hibiscus tea. No matter how cold it is outside, this stuff seems to thaw me from within, coating me in its aromatic vapors and waking me up with gentle tang. I love it so much that I learned to make it at home for those days when I can't get to 1369.

You can make it either with ocean spray cranberry cocktail or with real cranberry juice. Keep in mind that real cranberry juice is extremely sour, so you'll have to add some sugar to make it palatable.

Cranberry Cozy (the Ocean Spray version)
1/2 cup ocean spray cranberry cocktail
1 cup hot hibiscus tea

Cranberry Cozy (real Cranberry juice version)
1/4 cup cranberry juice
1 1/4 cup hot hibiscus tea
1 Tbsp sugar or to taste
  1. Warm up cranberry juice in a microwave or a small pot on top of the stove.
  2. Combine with hot hibiscus tea and sugar to taste.
  3. Sip and feel cozy.

Now it's my turn to tag other bloggers for this meme. I tag:

Stephen from Stephen Cooks

Valyn from Hope It's Good

Andrea from Rookie Cookery

Mzn from Haverchuk

Walter Jeffries from Sugar Mountain Farm

Wednesday, January 18, 2006

Chocolate Bread Pudding

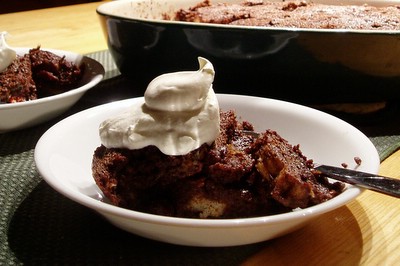
Two years ago, when I got "The Way We Cook" book by Sheryl Julian and Julie Riven, I doggie-eared Perdix's chocolate bread pudding page. "Oh yeah -- I should make it soon!" I always thought when leafing through the book, but the occasion never presented itself. Either it was summer and bread pudding seemed too heavy, or it was a special occasion and bread pudding seemed too homey, or some ripe fruit were begging to be used in a pie (I am much more of a fruit than a chocolate dessert person). But finally, the chocolate bread pudding had its day. What better occasion for this decadent dessert than a skiing trip!

This pudding required a bit of planning since it had to soak overnight, but it was super easy to put together. All I had to do the day of serving was throw it in the oven. I followed the recipe with one exception: I used french bread instead of challah. It still turned out extremely rich and delicious. The sour cherries that the recipe suggests to layer between the bread were a good addition, but I was missing a crunch in this pool of chocolate richness. Next time, I'll add some chopped walnuts of pecans. I might also substitute the cherries for a black currant sauce. When we were in Burgundy, we had an amazing chocolate cake with a liquid black currant center, and I wonder whether that flavor combination would work well for bread pudding.

I am warning you -- unless you are planning on at least 2 hours of physical activity that day or were blessed with a miraculous metabolism, don't try this at home. This is a dessert of mass destruction. It's dark, it's rich, and it's dangerous. So when you are standing over that dish of luscious chocolate sneaking that last bite at midnight (and then one more *really* last one), don't tell me I didn't warn you.

Perdix's Chocolate Bread Pudding
(Helen's version)

Serves 8
If you only need 4 servings, make half the recipe -- this stuff is too rich to have leftovers and it's not nearly as good reheated.

For Pudding:
1 loaf (1 pound) challah or french bread (a round or pullman shape, not a baguette)
1 cup roasted and chopped walnuts, pecans, or hazelnuts
7 ounces bittersweet chocolate, chopped (the darker the better -- I used 85% cocoa)
2 cups heavy cream
1 cup half-and-half
5 Tbsp unsalted butter, cut into pieces
3/4 cup sugar
1/2 tsp salt
4 large eggs
1 teaspoon vanilla extract
1/8 tsp ground cinnamon, mixed with 1 Tbsp sugar

Whipped cream for serving

For Black currant sauce (optional):
1/2 cup black currant preserve
1/4 cup Cassis (black currant liquor)

The night before serving
  1. Butter a 7 x 11 x 2 baking dish or another dish with a 2 1/2 quart capacity. Set it aside.
  2. Remove the crust from the bread and slice it 1/2 inch thick. Line the bottom of the dish with the bread, trimming the pieces to make them fit snugly. Sprinkle with walnuts and cover with remaining bread.
  3. In the top of a double boiler over hot, but not boiling, water, combine the chocolate, cream, half-and-half, butter, sugar, and salt. Cook, stirring with a wooden spoon, just until the chocolate and butter melt.
  4. Remove from the water, wipe the bottom of the pan, and set aside until it is warm but not hot.
  5. When the chocolate mixture has cooled to barely over lukewarm, beat the eggs and vanilla in a large bowl with an electric mixer for 1 minute. With the mixer on low speed, slowly beat in the chocolate mixture (be sure the chocolate is not too hot or the mixture will curdle).
  6. Slowly pour the custard over the bread, and spread it with a rubber spatula.
  7. Sprinkle the pudding with cinnamon sugar. Cover the dish with plastic wrap and refrigerate overnight (8-24 hours).

2 hours before serving:

  1. Remove the pudding from the fridge 1 hour before baking. Lift off the plastic wrap.
  2. Preheat the oven to 350F.
  3. Bake the pudding in the center of the oven for 40 minutes, or until the top is crusty and the custard doesn't wiggle when you shake the pan. Let cool 10-15 minutes while making the sauce.

Black currant sauce:

  1. Combine black currant preserve and cassis in a small saucepan set over medium heat. Bring to a boil, turn down the heat to low, and simmer 1 minute.
  2. Scoop pudding into bowls, top with sauce and whipped cream.

Monday, January 16, 2006

Banana Bread

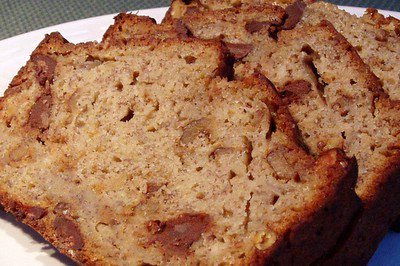
Part 1 – The Quest for the Perfect Banana Bread

Before I tell you about banana bread, I have to tell you about my battle with baking. After 8 years of failed baking attempts, I have finally figured out what my problem was -- my entire life, I’ve been measuring flour all wrong. I would dunk the cup into the bag of flour and smooth it out on the side of the bag to make it even. When Jason saw me do that, he gasped, and whipped out a scale (the accurate person that he is, he always weighs his ingredients when making bread). He had me measure the flour my way and weigh it, and then measure it the correct way (using a knife to level the flour) and weigh that. Turned out I was putting about 25% more flour into all my failed baked goods. What can I say... I am measuringly challenged.

What still puzzles me is that even using the measuring cups correctly, gets me more than 4.5 oz of flour per cup (the official volume to weight conversion). So I give up on measuring cups entirely, and now I just weigh my flour. If anyone has any idea what I am doing wrong, please let me know.

This recent discovery of how to measure flour has increased the quality of my baked goods (and my waist size) tremendously, and I am actually beginning to wonder whether I was better off with my old technique for measuring flour. But I digress, so back to banana bread…

I have made my share of banana breads in the past that all turned out pathetically dry in spite of overly ripe bananas and all those other tricks cookbooks tell you about. I wish they devoted as much time to the explanation of how to measure flour. But this time it was going to be different – not only did I finally learn to measure flour, but I was armed with undisputedly the “the best in the world” banana bread recipe from The Seasonal Cook.

I weighed the flour, I froze my bananas to turn them into liquid mush, I even toasted the walnuts (something I often fail to do). But just as I started to get my ingredients ready, I realized that I was missing the wheat germ, dates, and the walnut extract. Oh no! In my panic of not getting that “best in the world” banana bread after all, I dumped some chocolate chips into the batter hoping that they will make a suitable replacement for the 3 other ingredients.

Will Helen’s banana bread be “the best ever”? Will it even be edible? Stay turned for
Part 2 – “The Taste Test Results”

Between Part 1 and Part 2 of the banana bread saga, the batter went in the oven, made the whole house smell wonderful, came out of the oven, cooled on a wire rack, got wrapped in plastic, frozen, traveled to the Berkshires, and defrosted on the counter for 4 hours.

Part 2 – The Taste Test Results

I couldn’t wait to find out how the bread turned out, so we had it for the first breakfast of our trip. In spite of my wild substitutions, and mishandlings, it came out great – moist, nutty, and delicious. I can’t complain about going from the worst banana bread in the world to second best. But alas, it was only second best… And if there is one thing you’ve probably learned about me by now is that I never settle for anything but perfection. Every time I had a chocolaty bite I couldn’t stop thinking how chewy and musky the dates must have been.

Well, there is always next time. I might go and buy some bananas now, and maybe by the time they finally ripen, I would have lost those extra 10 Lbs (that I keep carrying around since Christmas) and would be ready for the best banana bread in the world.

Berkshires and Muffins

“Wow, that’s so rich!” said Louise as she tasted another one of my creations – butternut squash and hazelnut lasagne. We were deliciously achy after a day of snow shoeing, having dinner to the sound of the crackling fire and Madeleine Peyroux, enjoying each melty forkful of the creamy béchamel that ended with an earthy crunch of hazelnuts.

Jason, his Mom, Louise, and I spent 5 wonderful days in the Berkshires. Of course, some real snow would be nice, but after we came to terms with the mini-spring in the middle of January (can you believe the temperatures hit 55F!), we had a great time. We even got to ski for couple of hours with whatever snow was left on the ground, and became addicted to snowshoeing, which works in any snow conditions.

I loved Becket, MA – the town (or lack there of) where we were renting a house. The whole town consisted of a post office, a convenience store, and a cross-country skiing farm. No cute tourist shops, no restaurants, no cafes, no traffic lights, and no people. The closest real town was 30 minutes away. Luckily, we came prepared with 5 bags of food.

This was a perfect time for all those winter comfort foods that became my family’s favorites over the years: bluefish with crispy potatoes (I substituted celery root for half of potatoes this time and it was even better), beef stew with apricots and prunes (judging by the number of Mmmm's, this was everyone's favorite), butternut squash and hazelnut lasagne that I found on epicurious.com years ago, the world’s greatest French toast made with Iggy’s raisin walnut bread, and blinchiki (Russian crêpes) filled with farmer’s cheese.

There were some experiments as well, and although they were all in the area of baking (not my forte), I have no disasters to report, and quite a few successes. Thanks to the Seasonal Cook’s recipe, I finally baked a great banana bread (to be a subject of a post in the near future). Chocolate Bread Pudding with Sour Cherries (a recipe from Perdix restaurant in Boston via “The Way We Cook” book) was excellent, if a bit outrageous with 2 cups of cream, 1 cup of half and half, and close to a stick of butter.

I always feel like I make a bad impression on Louise, who is a nutritionist, because my special occasion dishes are not exactly the healthiest (and whenever she visits is of course a special occasion :) But she is an absolute sweetheart and tolerates all that cream and butter heroically without even a trace of rebuke. Besides being a nutritionist, Louise is also an amazing baker (that’s where Jason gets his baking gene), and I have to admit that not even 2 cups of cream and a stick of butter could make anything I baked come close to her Flax Carrot Apple Muffins – the greatest baking discovery of this trip. These lumpy looking things make an overly healthy impression at first glance, but take a bite and you are hooked. Chunky, moist, and barely sweet, these muffins are to a carrot cake as an elegant Pinot Noir is to an over-oaked Cabernet. Whenever we’d get back from a hike, I’d curl up by the fire and grab one with tea, savoring its dark earthy richness and the crunch of walnuts. Louise says it’s just a good recipe, but I think it’s her magic touch.


Louise’s Flax Carrot Apple Muffins
(adopted from the muffin recipe on the back of Bob’s Red Mill flaxseed meal)

1 1/2 cup unbleached white flour (fluffed, scooped, and leveled)
3/4 cup flaxseed meal (scooped and leveled)
3/4 cup oat bran
1 cup dark brown sugar
2 tsp baking soda
1 tsp baking powder
1/2 tsp salt
2 tsp cinnamon
1 1/2 cup carrots, shredded
2 apples, peeled and shredded
1/2 cup raisins
1 cup walnuts, chopped
3/4 cup milk (skim is fine)
2 eggs, beaten
1 tsp vanilla
  1. Preheat the oven to 350F. Butter or spray a 12 cup muffin pan (regular size – about 1/2 cup each).
  2. Mix together flour, flaxseed meal, oat bran, brown sugar, baking soda, baking powder, salt and cinnamon in a large bowl.
  3. Stir in carrots, apples, raisins, and nuts.
  4. Combine milk, beaten eggs, and vanilla.
  5. Pour liquid ingredients into dry ingredients. Stir until ingredients are moistened (just until the flour streaks are gone – do not over mix).
  6. Fill the cups with batter almost to the top. Bake for 15-20 minutes or until the tester comes out clean when inserted in the center of a muffin.

Muffins can be baked up to 3 days in advance, cooled, and stored in an airtight container or a plastic bag.

Tuesday, January 10, 2006

Off to ski -- or at least to snow shoe :)

Tomorrow morning, we are packing a car full of food and heading to the Berkshires for 5 days of XC-skiing (or so we hoped). So what if all the snow will be melting and it will be 45 degrees. We'll have a great time anyway. Besides, this might be a perfect opportunity to try show shoeing. I like XC-skiing so much, I could never bring myself to snow shoe instead when the ground is covered with fresh powder. This could be my chance.

What am I cooking? Well, let's see... blinchiki (Russian crepes), beef stew with apricots and prunes, butternut squash lasagna, roasted bluefish, chocolate bread pudding, and last but not least, marshmallows roasted in the fire place (it's one of my secret junk food addictions).

I don't believe we have internet access there, so you'll have to wait until I get back on Monday, Jan. 16 for a report.

Have a great week and enjoy the spring weather if you are in the North East!

Sunday, January 8, 2006

Seared Trout with Braised Fennel

Remember my recent mis-adventures with frozen trout? This is trout with fennel: try 2. After tasting this dish at Ten Tables, I was determined to recreate it at home, and nothing was going to stop me this time. I got fennel, I got fresh trout, I even got a wine to match -- Alsacian mix of Riesling, Gewurztraminer, Pinot Gris, and something else I can't remember (minerally and just stunning with fennel). I don't usually buy that "it's all about ingredients" tale. But it was all about ingredients this time. I guess when your dish only has 2 ingredients, they'd better be good.

Fish substitutions: you can use any fish for this recipe except for really dense ones (this means NO monkfish, mahi-mahi, swordfish, or tuna). If you want the dish to taste similar to white trout, substitute fatty, delicate fish with skin, such as steelhead trout, arctic char, salmon, and bluefish.

Serves 2

1 Tbsp olive oil, plus more as needed
1 large fennel bulb, sliced
1/4 cup dry white wine
1 Tbsp chopped parsley
2 white trout fillets with skin (6-8 oz each)
1/2 Tbsp butter
Salt and pepper
  1. If using fish thicker than 1/2 inch, preheat the oven to 400F.
  2. Set a large skillet over high heat. Add 1 Tbsp olive oil and wait for it to get hot. Add the fennel and cook until most of the slices are golden brown, stirring not more often than once a minute, and adding more oil as it gets absorbed(you'll probably need about 2 Tbsp of oil total). This will take 5-7 minutes. Don't be tempted to stir fennel too often -- really let it brown. Those caramelized pieces are the best part.
  3. Turn down the heat to low, season generously with salt, and add the wine. Cover immediately and steam until all the wine is absorbed and fennel is tender, 7-10 minutes.
  4. Taste and correct seasoning. Stir in the parsley.
  5. Dry the trout well on paper towels and season with salt and pepper on both sides.
  6. Set another large non-stick or well-seasoned cast-iron skillet over high heat. When hot add the butter and swirl to cover the skillet.
  7. Place trout into the skillet skin-side down and cook without disturbing until the skin is browned, about 3 minutes. Flip and cook one minute longer. To test for doneness, separate the flakes in the thick part of the fillet with a fork. If only a trace of translucenly remains in the center, trout it done. If substituting thicker fish, finish cooking in 400F oven so that the total cooking time (searing + baking) equals 8 minutes per inch of thickness.
  8. Divide fennel among plates, top with trout (skin side up) and serve.

Saturday, January 7, 2006

Braised Flounder with Carrot-Currant Stuffing

I was faced with an interesting dilemma at the Whole Food fish counter today: flounder for $9/Lb or grey sole for $16/Lb.

I don't normally compare fish based on their price since the price is just a matter of supply and demand. Swordfish and tuna are expensive and there is nothing you can do about that. And bluefish and trout are generally cheap (at least at the moment). Of course, comparing swordfish to bluefish is like comparing apples to oranges. One is not better than the other -- they are just different.

But flounder and sole -- that's a whole different story. You see, what they call "sole" in New England has absolutely no connection to the "Dover" sole -- the crème de la crème of the fish (though if you ask me, not worth it’s $30+/Lb). “Grey sole” is just another type of flounder. Its flesh is whiter and it is considered to be sweeter and "finer" than your basic garden-variety flounder. But since these fish are so similar, how could I resist putting them in a side-by-side blind tasting. And thus the battle of flounders began.

I decided to use my Grandmother’s braising method where the fish is smothered in carrot onion mixture and braised covered in the oven. But since flounder and grey sole is incredibly thin, I decided to stuff the fillets with carrot and currant mixture and roll them up. The resulting dish was delicate and gently sweet, like a cool autumn day full of warm colors. There was no need for accompaniments -- just a good loaf of bread to dip in the sauce.

I set the plate in front of Jason and asked if he can tell the difference between two types of fish. He took a bite of one fish roll. Then the other… Then the first fish roll again. After much contemplation he decided that one of the rolls was a little more delicate than the other. “Was that the sole?” he asked. Yes, it was. The sole won the taste test, but not by much. Jason said that the only way he could tell the difference was having these two fish side by side.

Is that tiny different worth its price tag? That’s up to you and your budget. I might consider buying sole for special occasions, and sticking to flounder the rest of the time. But the truth is I find both fish to be kind of like chicken breasts – a great vehicle for the sauce, but not much personality of their own. While for a special main course, I prefer fish that are more assertive, these little rolls are perfect for serving warm or cold as the first course.

Braised Flounder with Carrot-Currant Stuffing

Serves 4 as the main course, or 8 as an appetizer

4 Tbsp canola oil
2 yellow onions, finely diced
1.25 Lb carrots, peeled and shredded with food processor
1/2 tsp sugar
1/3 cup currants (or raisins)
1 Tbsp tomato paste
2 Tbsp dry white wine
1 bay leaf
1.5 Lb flounder or sole fillets
Salt and pepper to taste

  1. Preheat the oven to 375F.
  2. Set a large heavy oven-proof skillet that can later be covered over medium-low heat. Add 2 Tbsp of oil, onions, and a generous pinch of salt. Cook stirring occasionally until onions are tender and start to brown, about 15 minutes. Remove to a bowl and set aside.
  3. Return the pan to high heat. Add 2 more Tbsp of oil and the carrots. Cook stirring occasionally until carrots are very tender and start to brown, about 15 minutes. Regulate the heat so that carrots are browning, but not burning.
  4. Put the currants into a small bowl, cover with water, and microwave, until the water is hot, 1-2 minutes. Let stand until currants are plump, about 5 minutes. Strain and discard the liquid. Put the currants into a medium bowl and set aside.
  5. Add the onions back to the pan with carrots. Add the sugar, and stir over low heat until well combined. Add half of the carrot-onion mixture to the bowl with currants and mix well. Set aside.
  6. Return the carrot-onion mixture remaining in the pan to medium heat. Add tomato paste, white wine, bay leaf, and 1.5 cups water. Bring to a boil. Take off heat, season with salt and pepper to taste. Remove to a large measuring cup or bowl and set aside. Don’t wash the skillet yet – you’ll be using it for fish.
  7. Season fish fillets with salt on both sides. Lay them out on a work surface skin side down (skin side is the flat side). Spread a thin layer of currant mixture over the fillets leaving 2 inches on the thin end uncovered. Roll up fillets from the thick end to the thin end and place them in the skillet where you cooked the carrots and onions.
  8. Pour the reserved carrot-onion sauce over the fish, cover the skillet, and set in the middle of the oven for 10 minutes. Cut into one roll with a fork to test for doneness. If you encounter no resistance in the center, the fish is done. Server hot as a main course, or refrigerate overnight (after cooling completely) and serve as an appetizer.

Thursday, January 5, 2006

Braised fennel


Have you ever had one of those disaster weeks when whatever you cook just doesn't taste good? Well, I am having one of those weeks.

Yesterday, it was the butternut squash soup -- I added too much ginger and it came out kind of abrasive.


Today it was trout -- I decided to give frozen fish from Trader Joe's one more try. What a mistake! Isn't it funny, how cooking disasters can look so appetizing, and successes can look so ordinary.


I think I am starting to understand why some people don't like fish. They probably grew up on frozen fish that turns into soft rubber after cooking. You might be tempted to tell me that all sushi is previously frozen, or that frozen fish is preserved at the peek of its freshness. Trust me, I've heard all the arguments -- I still don't like it.

But in this bleak week of wacky soup and rubber fish, there was one marvelous discovery -- braised fennel. I used to be anti-anything-remotely-resembling-licorice. I hated star anise with a vengeance, and I tolerated fennel only in small amounts. But after discovering fennel’s caramelization powers, I turned into its biggest fan. I’ve grilled it and broiled it in the past with great results. And today, I tried a new preparation inspired by a trout with fennel dish at Ten Tables – one of my favorite restaurants in Boston. It was sweet and minerally, the way a good Riesling is. There was no need for embellishments – no spices, no butter, no cream. Just fennel and a little parsley.

Braised Fennel

Serves 2

1 Tbsp olive oil, plus more as needed
1 large fennel bulb, sliced
1/4 cup dry white wine
1 Tbsp chopped parsley
Salt to taste
  1. Set a large skillet over high heat. Add 1 Tbsp olive oil and wait for it to get hot. Add the fennel and cook until most of the slices are golden brown, stirring not more often than once a minute, and adding more oil as it gets absorbed(you'll probably need about 2 Tbsp of oil total). This will take 4-5 minutes. Don't be tempted to stir fennel too often -- really let it brown. Those caramelized pieces are the best part.
  2. Turn down the heat to low, season generously with salt, and add the wine. Cover immediately and steam until all the wine is absorbed and fennel is tender, 7-10 minutes.
  3. Taste and correct seasoning. Stir in the parsley and serve.

Tuesday, January 3, 2006

New Year's Pictures

We are back in Boston. Really well fed (by my Mommy), happy, and tired. We cooked, we baked, we drank, we laughed, and we ate with abandon. I woke up at 4:30am this morning to catch the plane, so I don't think I can write much today, but here are some pictures.


Fried pirozhki with egg and scallions


Baked pirozhki with mashed potato


Holiday zakuski spread (clockwise from upper right): whitefish salad, herring in fur coat, cod liver salad, carrot garlic salad, Olivier (potato) salad, smoked salmon and smoked sturgeon, red cabbage apple salad, salami, chicken liver pate with caramelized onions and lingonberry jam.