
 I find the question, “So how did you learn to cook?” and circumstances under which it’s asked kind of rediculous. People ask me that so casually and so often you’d think it’s as straightforward as “What’s the weather?” “Where do you live?” and “Who are the Red Sox playing tonight?”
But “How did you learn to cook?” is a question as fundamental and complex as “How did you fall in love?” When people ask me that, I never know where to begin. No one taught me more about French cooking than Julia Child, or about Italian cooking than Marcella Hazan. Traveling all over Mediterranean didn’t hurt either. And if it wasn’t for chef Ruth Anne Adams, who took me in as her intern, my knife skills would still be embarrassing. But if I had to choose one person who made me truly fascinated and later addicted to the kitchen, it would have to be my Mom.
As soon as I got my first teeth, I was itching to sink them into something good like caviar, pelmeni, herring, or my Mom’s amazing roast chicken with prunes. Yes, I loved to eat since the beginning of my existence, but it wasn’t until I saw my Mom flipping blinchiki (Russian crêpes) that the concept of cooking came onto my radar. Blinchiki are a weekend breakfast tradition in our family. I am guessing I was 6-7 years old when I first saw my Mom make them. I found the process so fascinating that I spent weekend after weekend watching her pour the batter into a hot skillet, swirl it in a graceful motion that made a perfect circle, gently slide a butter knife under a barely solidified batter, and swoosh! – it was on the other side. It was like magic! How did she get something so liquidy to become solid and paper thin in a matter of seconds? And how did she make it land back in the skillet without a single wrinkle? I remember holding my breath when my Mom would start loosening blinchik (singular of blinchiki) with her favorite butter knife (she had a special knife reserved just for this task). I was trying very hard not to blink so that I could see exactly how she flipped it, but each time it happened too quickly.
By the time I was 9, I started begging my Mom to teach me how to flip these objects of my fascination. But all she’d say was that one day I’ll learn. By 10, I was beginning to get seriously worries that one day will never come. I was imagining being really old, like 20 years old or something and still not knowing how to do it. “If you are so worried,” my Mom said one day, “why don’t you just mix up a batter when you come home from school and practice.” Doing it all alone seemed both exciting and terrifying, but one day I just did it. My first batch resulted in a pile of scrunched up pieces of batter that were too thick, too thin, torn, wrinkled, and generally mutilated in all sorts of ways. By the second batch I actually managed to flip a few! My flipping average was not very good and only 1 in 5 pancakes actually resembled proper blinchiki. But it was definitely progress.
I remember being mad at my Mom for not being there with me when I was learning something this challenging. But my Mom did not believe in cooking classes, recipes, or cookbooks. She believed in practice. Letting me find my own way in the kitchen was the greatest gift she could have ever given me. She was by the stove with me that day in spirit and is to this day. And that’s the story of how I learned to cook.
Dear Mommy, I know you’ll be reading this post. Happy Mother’s Day and thanks for everything you taught me about blinchiki, cooking, and life.
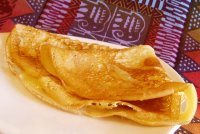
Helen’s Mom’s Blinchiki
Serves 4
1 1/2 cups all-purpose flour
1 tsp kosher salt (or 3/4 tsp table salt)
1 tsp sugar
2 large eggs
1 cup cold milk
1 cup cold water
4 Tbsp oil
Butter for frying
The night before making blinchiki:
- In a large bowl, mix flour, salt, and sugar.
- Beat in eggs and milk into flour using a whisk. Beat until no lumps remain.
- Beat in the water. The mixture should be the consistency of light cream. If too thick, beat in another 1-2 Tbsp of water.
- Beat in the oil, cover, and refrigerate at least for 2 hours or overnight.
- Preheat the oven to 350F.
- Take the batter out of the fridge and whisk to even out consistency.
- Set a well seasoned cast-iron or non-stick skillet 6-10" in diameter with flared sides over med-high heat.
- Unwrap the stick of butter to expose about an inch. Hold the stick by the wrapper and quickly glide the expose end over the skillet to butter it. You don't need to cover every inch of the skillet. 3-4 broad strokes will do.
- Pour: Fill the ladle with batter, pour some into the pan and swivel quickly in a smooth round motion. Pour more as needed to fill in the holes. This is a trial blinchik to give you an idea of how much batter you need for your pan. About a minute after you pour your batter, the bottom will be brown and it's time to flip the blinchik. There are two ways to do that.
- Flip Method 1 - Tossing: If your pan is small and light, the best way is just to toss your blinchik in the air and catch it with your pan. This is really much easier than it looks. Just put a potholder on the counter and bang you pan on it to dislodge the blinchik. Once it moves easily in the pan, quickly move your pan in a circular motion starting down and away from you. The blinchik will jump and flip. It sounds scary, but after a couple of them, you'll be an expert.
- Flip Method 2 - Using a butter knife: This method works for any size or type of a pan. Gently move a butter knife around the perimeter of the blinchik to unstick the edges. Then move you knife deeper in couple of spots to dislodge your blinchik. Once it moves easily in the pan, stick the knife under the blinchik along the full diameter, and flip it onto the other side.
- After 30 seconds on the other side, your blinchik is done. Slide it out of the pan and onto a plate. Repleat the whole process (starting with buttering the pan) with the remaining batter. After you are done making blinchiki, cover the plate tightly with foil and place in 350F oven for 7-10 minutes to rewarm.
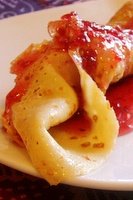
- Present the whole stack of blinchiki to the table and let everyone dip them in lightly salted melted butter, or fill them with preserves or nutella.
16 comments:
To Helen's Mom ... what a legacy ... and because Helen shares so much of what she knows with us, WE too owe gratitude ... so ... many thanks, "Helen's Mom"!
Miam Helen, I know what you mean about finding the roots to your cooking. And our mums seem (and continue to) to have been those fantastic women for us!
I am definitely putting your recipe on the list for the crepe-lover that I am !!! Or maybe I should come and have them at your place, that is a better idea ;-) I will be there in 30 mns, despite the rain! ;-)
My Dear Sweet Heart,
It took me 15 minutes or so to read that post about blinchiki because of constant wiping my eyes from that absolutely wonderful leakage. I'm so touched by the whole thing. To tell you the truth no Mother's day gift could be better then this reading. Who could of think that all those routine things we do in life can impress our children so deep that after 20 years passed they still can be inspired by there memories. It is the precious gift given to all of us - to be remembered by our children. Nothing can make us happier then there good memories. I’d like also to thank your fellow-bloggers for the kind words in my regard. Happy Mother’s Day to all Mothers, Grandmothers and Future Mothers!
LOVE
MOMMY
Oh, Helen!
What a lovely post! It sounds like you have a lovely mom and that she raised a lovely daughter!
What a great post! I had the same fascination with flipping blinchiki when my mom made them on weekends. I ended up tearing most of them, though, and I didn't learn to make them properly until I was "really old"--21 or 22!
oh my goodness ! This is a very touching moment. Even for a guy, i have to dab the corner of my eye - Belated as it is.....Happy Mother's Day "Helen's Mom"
How cute! Reminds me of my mom and I. We call these Palachinky in Czech, almost the exact same recipe! I love these so much, making these is one of my favorite childhood memories.
~Dianka
http://na-zdravi.blogspot.com/
What an enjoyable post! I'm thankful for you and your mom!
Best,
Paz
Beautiful and awesome. Do you know how lucky you are to have a mom who set you free in the kitchen and life? One of the hardest parts about being a mom is seeing when a child is ready for some part of the world and setting them free to go into it. Your mom obviously has that wisdom! Glorious! Since you wrote this post, you probably have the wisdom also.
I'm so glad I've found your site.
HELEN
IT WAS PRETTY WONDERFUL AND SO GRATIFYING TO READ ABOUT RUSSIAN FOOD. I REMEMBER HOW LONG IT TOOK ME TO MASTER SAME PROCESS. I LOVE READING YOUR BLOG, BRINGS BACK A LOT OF SAME FEELING AND MEMORIES.
MARINA
Hi Marina,
Welcome to Beyond Salmon! I am so exciting to have another Russian reader :) I don't cook Russian food too often, but when it has a special place in my heart, and when I make something Russian, I love to write about it.
Cheers,
-Helen
What a lovely post! So nice to see a family tradition being preserved. You're very lucky to have a mother like that!
what a beautiful post! I've been searching for a recipe online for a while now but couldn't find one that really worked. I just made blinchiki for my mom using your recipe and it was great! they turned out lovely. I too always watched my mother making them but she never used measuring cups so when I tried to make mine like hers, it never quite turned out. Thanks!
I just found this recipe--the third in my quest to make blini. They turned out perfect and were easy to make thanks to your detailed directions. Thanks so much for sharing. :)
Hi Helen!
I have been making these forever (years) and they do come out perfect! I actually was never able to make these correctly before I found your post. I was wondering if I want to make sweet crepes what should I do? Should I add more sugar and how much? I see a lot of crepes made with butter. Does that make a difference? I am afraid to experiment because I'd hate to ruin Saturday morning breakfast if they do not come out. Thanks as always:-)
I use the same recipe for sweet and savory crepes. just put a sweet filling into them.
Post a Comment