Friday, September 22, 2006

Parasites in Fish, Part 1 -- Cod worm


This video is a June 2013 update to the original post.

If you've been reading this blog for the past couple of months (or even days), you probably came to expect something appetizing from it. Well, I have news for you folks. The next few posts might shatter your perception of Beyond Salmon for I am embarking on a "Parasites in Fish" series and there is no way I can make this lovely topic appetizing.

Why has a girl that almost flunked biology in high school got so interested in parasites? Sushi of course! Oh, and tartar. And ceviche, too. It’s amazing what I’ll do for raw fish. I've been buying tuna, salmon, and branzino from New Deal to serve raw for over a year and when I tried to go back to restaurant sushi recently, I realized that I've been spoiled for life. New Deal's fish is just better. The question is how much of a risk am I taking by serving raw fish at home?

If you are a squeamish person, new to cooking fish, I suggest that you don't read any further. I had a woman, in one of my classes, tell me that she wouldn’t eat fish again after my little lecture on parasites, and I don't want to be responsible for people stopping to eat fish purely because of squeamishness. If you are cooking the fish (with heat), no harm will come to you. I promise.

No mater how hard I looked, it was hard to find solid information on this topic. FDA was passionate about scaring the media, and the media was passionate about scaring the consumers. What I needed to find was someone passionate about parasites, and after 20 unsuccessful Google queries, I finally figured out what to search for: "parasitology Ph.D." Yes, there are people who care about parasites as much as I care about food and after a few e-mails, I had interviews lined up with 2 prominent parasitologists, Dr. Palm from Institute for Zoomorphology, Cell Biology and Parasitology in Düsseldorf, Germany and Dr. Gardner from Harold W. Manter Laboratory of Parasitology at the University of Nebraska.

First of all, let me say that parasitologists are some of the kindest and most patient people I have ever met in academia. They were willing to explain fish parasites in terms that even I could understand and painstakingly answered all my questions. I learned that there are over a hundred species of parasites that can be found in fish, but only 3 of them are potentially harmful to humans: Pseudoterranova decipiens (a.k.a. “cod worm” or “seal worm”), Anisakis Simplex, and Tapeworm.

Today, our special guest will be cod worm. I remember my first encounter with this critter about 4 years ago. As I unwrapped a cod fillet, I was greeted by a little worm squirming out of the fish. Good thing I heard about these worms before, or I would have thrown the fish in the trash and never set foot into that fish market (actually, it happened to be Whole Foods). In spite of my initial disgust (I am the kind of person who screams at the sight of an itsy-bitsy spider), I inspected the fillet, removed the worms and cooked the fish. It tasted just fine, and as you can see, I lived to tell the tale. These little worms are the pain of any fishmonger's existence because they freak the hell out of consumers. They are particularly common in white fish (cod, haddock, flounder, sole, and halibut), but I've also seen them in swordfish and monkfish. How often do you see them as a consumer? I cook fish at least 3 times a week and I'll see them a few times a year.

To prevent us, consumers, from having to look at these unsightly animals, the fish processors put all white fish through a process called "candling." They put the fillets on glass sitting over a lamp. This allows them to see through the fillet and remove any visible parasites. Think about this process as an airport inspection -- it makes everyone feel better, but it's not foolproof. On occasion, a few worms can escape the inspection and travel from the fish processing facility to your fishmonger and then to your kitchen. If this happens to you, don't panic. Remove the worms, and cook your fish the usual way. If you don't want to cook your fish after seeing the worms, I quite understand. Just don't go out of your way to ruin the fishmonger's reputation. The presence of worms has nothing to do with the freshness of the fish and I assure you that your fishmonger tried his or her hardest to protect you from this terrible experience. Last thing they want to happen is for you to find worms in your fish, but unfortunately this does happen sometimes.

What happens if you eat a cod worm? If it's dead, which it's bound to be if you cooked your fish to opaque state (or 140F), nothing at all happens. Even if you prefer your fish cooked a little less (120-130F) like I do, the odds of you eating a live worm are very slim. It would have to be a really hardy worm to survive those temperatures. If you are serving fish raw, and one of those guys manages to stay intact after you sliced the fish, and makes it all the way to your tummy intact, you are in trouble. Your stomach will eventually kill them, but since they originate in seals, they can get quite comfy in any mammal including us humans making the experience extremely unpleasant. As Dr. Palm puts it, “It is better not to eat them alive.”

What does this mean to serving fish raw or cured? That’s a topic that deserves its own post, so stay tuned.

You might also want to see these Frequently Asked Questions that people ask me about cod worms.

p.s. On a happier note… I’ll be away in California on vacation starting tomorrow, but I look forward to responding to all your questions and comments and telling you more parasite stories when I get back.

Parasites in Fish, Part 2 -- Anisakis and Tapeworm

Tuesday, September 19, 2006

Bluefish Fajitas

Remember that tomatillo salsa verde I wrote about last week? Trying to make 2 servings of sauce is almost impossible, so I always have leftovers. And they often become the inspiration for dinner the next day. The leftovers of salsa verde put me in a Mexican mood (or to be more precise Tex-Mex or Cali-Mex). The result of this inspiration were bluefish fajitas -- probably completely unauthentic, but terribly good. I sprinkled skin-on bluefish fillet with salt, pepper, cumin, and coriander and seared it on the skin side in a cast iron pan with a little oil until crispy. Then flipped it, spread sliced peppers and onions around it and finished it in the oven until done (about 5 minutes at 400F). The bluefish then went onto a plate to rest, while I finished cooking peppers and onions on the stove top over high heat. In went a little minced garlic, a good squirt of lime juice, a large handful of minced cilantro, and flaked bluefish (yes, I do eat the skin, but you don't have to ;)

I served it with warm tortillas, guacamole, chopped tomatoes, "Total" Greek yogurt (instead of sour cream), and of course tomatillo salsa verde. Yum!

Ignore the presentation on the picture above, and roll your fajitas to enclose the filling completely. The one on the picture is open purely for food porn purposes -- you didn't want to miss the filling, did you?

Fish substitutions: red snapper, grouper, striped bass, cod, haddock, halibut, tilapia, barramundi, mahi-mahi, swordfish, tuna (seared rare), or any fish leftovers.

Monday, September 18, 2006

Eggplant stuffed with carrots, garlic, and herbs


Now that I’ve converted Jason into an eggplant eater, I’ve been playing around with eggplant recipes. This one is a variation on a dish my Mom used to make in Moscow when I was little. With all the garlic and herbs, it feels more like a Georgian or Armenian dish. I am not sure of its origins, but maybe my Mom will chime in with a comment about where she got this recipe. I haven’t had this dish since we left Russia 15 years ago, and although I improvised a bit, it brought back some great childhood memories. In Russia, we used very aromatic sunflower seed oil for cooking. You can find it at Whole Foods, or you can go to a Russian store and buy a bottle that’s cheap and excellent. But feel free to substitute it with olive or canola oil (olive oil is a better substitute in the stuffing and canola is a better substitute for frying the eggplant).

Note: this dish is better made the day before to let the flavors mingle, so plan accordingly.


Serves 4-6 as an appetizer


For Stuffing:
4 Tbsp sunflower seed or olive oil
1 large yellow onion, finely diced
1 1/4 Lb carrots (about 5 large), peeled and shredded
3 garlic cloves, mashed with a pinch of salt
1/2 cup parsley and/or cilantro
Salt to taste

For the eggplant:
1 large eggplant, sliced lengthwise ¼ inch thick
Sunflower seed or canola oil for frying
Salt

Make the Stuffing:
  1. Set a large heavy skillet over medium-low heat. Add 2 Tbsp of oil, onions, and a generous pinch of salt. Cook stirring occasionally until onions are tender and start to brown, about 15 minutes.
  2. Add 2 more Tbsp of oil, carrots, and salt to taste. Turn up the heat to medium. Cook stirring occasionally until carrots are tender and start to brown, about 15 minutes. Turn down the heat to medium-low, and continue to cook until the mixture is sweet and very flavorful, 5-10 minutes.
  3. Stir in garlic and parsley or cilantro. Taste and correct seasoning.
Salt the eggplant:
  1. While stuffing is cooking, sprinkle eggplant generously with salt on both sides and lay out on paper towels for 15 minutes. It will release a lot of liquid resulting in better consistency after frying.
  2. Dry both sides of the eggplant well with paper towels right before frying.
Fry the eggplant:
  1. Set a large heavy skillet over high heat. When the skillet is hot, add enough oil to make 1/8 inch layer. Make sure your eggplant is dry. Place as many eggplant slices as will fit into the skillet in one layer. Fry until golden brown, 2-4 minutes. Flip and fry on the other side adding more oil as necessary to help the eggplant brown.
  2. Repeat with remaining eggplant adding more oil between batches and after the flip. Be generous with the oil, or the eggplant won’t caramelize properly.
  3. As eggplant slices are done, remove them to a plate lined with paper towel to absorb the oil. You can stack the slices up as long as you layer paper towels between them.
Stuffing:
  1. Cool the eggplant and stuffing until you can handle them comfortably.
  2. Sprinkle the eggplant slices with a pinch of salt and pepper (go easy here since the eggplant is somewhat salted already). Why are you adding more salt? Because most of the salt you sprinkled on the eggplant before frying leaked out with the liquid the eggplant released.
  3. Spoon about 2 Tbsp of stuffing onto an eggplant slice. Spread the stuffing out to cover the whole slice, and roll it up from the thin end to the thick end. Repeat with remaining slices.
  4. Cover and refrigerate overnight. Bring to room temperature before serving or if you are as impatient as I am, you’ll eat it cold and still love it.
The eggplant will keep for up to 4 days.

Thursday, September 14, 2006

Grilled Swordfish with Tomatillo Salsa Verde and Watermelon Radishes

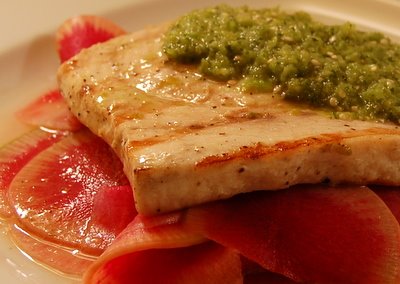
Surreptitiously, today’s dinner came out so well, that I just had to write about it. As of 6pm, all I knew was that I had swordfish in the fridge. The deciding moment came when I bit into a little green tomato looking thing called tomatillo in the farmer’s market in Belmont.

I’ve seen them around before, but never tried one until today. When I asked the farmer what they were like, he told me to take a bite. I don’t know if tomatillos are always this good and I am worried that I’ve been ruined for life. I had to lean over the counter as the sweet juices started running down my hands. It was like a mix of tomato with kiwi – sweet in a refreshing sort of way. The dinner was decided. I marinated swordfish in jalapeño, lime, and garlic, and made a salsa out of tomatillos to go on top.

Since I was on a roll with new veggies, I made a salad out of watermelon radish that we got in our farm share. The newsletter said that it was a very spicy radish with a surprising pink belly (thus the watermelon name). Good thing I read the newsletter since the radish’s cream colored skin made me think it was a turnip. As all spicy radishes, it can be tamed by a few squirts of citrus or vinegar. I used lime to go with the swordfish and salsa verde. It came out with a nice crunch and a hint of sweetness and spice.

Grilled Swordfish with Tomatillo Salsa Verde and Watermelon Radishes

Fish substitutions: mahi-mahi (without skin), marlin (without skin), halibut steak (with skin), tuna (without skin) (if using tuna, leave it rare by cutting the cooking time in half). Other possible substitutions with skin are red snapper, striped bass, bluefish, barramundi, and salmon. If using those, skip the marinade, and rub the fish with salt, pepper, and a little oil right before grilling.

Serve 4

For Swordfish:
4 swordfish fillets without skin (6 oz each)
1 Tbsp fresh lime juice
1 garlic clove, minced
1/2 jalapeño, seeded and minced (use less if you prefer it less spicy)
1/4 cup olive oil
Salt and pepper to taste

For Salsa Verde:
8 medium tomatillos, with paper-like husks removed
1 garlic clove, minced
1/2 cup cilantro leaves
1/2 jalapeño, seeded and minced (use less if you prefer it less spicy)
1 Tbsp fresh lime juice
3 Tbsp olive oil
Salt and pepper to taste

For Watermelon Radish Salad:
2 watermelon radishes, peeled
1 Tbsp lime juice
Salt to taste

1. Marinate Swordfish:
In a medium pyrex dish, combine lime juice, garlic, jalapeño, olive oil, salt and pepper. Mix well with a fork. Add swordfish and turn to coat. Cover with plastic and refrigerate 30 minutes to 2 hours.

2. Make Salsa Verde:
Quarter tomatillos. In a bowl of a food processor, combine tomatillos, garlic, cilantro, jalapeño, and lime juice. Process until chopped into tiny pieces. With the food processor running, drizzle in the olive oil. Move to a bowl and season with salt and pepper.

3. Make Radish Salad:
Slice radishes into very thin slices (1/16 of an inch) using a mandolin or an adjustable blade slicer. You can also grate the radish with a food processor. Mix with lime juice and generous amount of salt.

4. Grill Swordfish:

Preheat the grill to high.

Remove swordfish from the marinade and dry on paper towels. If substituting fish that doesn’t need a marinade, season heavily with salt and pepper on both sides, and coat with 1 Tbsp of oil.

Dip a wad of paper towels into oil, pick it up with tongs, and brush the grill.

Place fish on the grill (skin side down if substituting fish with skin) and cover. Grill for 8 minutes per inch of thickness, turning half way through cooking time. To test for doneness, make a small cut and peek inside. Fish is done when a trace of translucency still remains in the center. For more info, see tips on how to grill fish.

Divide radish salad among 4 plates, top with fish, and salsa verde.

Wednesday, September 13, 2006

Bread and Lilies

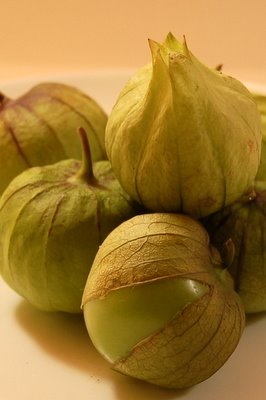
Sunday morning, I crawled out of bed to the smell of rising dough. When I walked into the study, Shel Silverstein's book was lying on my desk opened to...

Oh this shiny new computer –
There just isn’t nothing’ cuter.
It knows everything the world ever knew.
And with this great computer
I don’t need no writing’ tutor,
‘Cause there ain’t a single thing that it can’t do.
It can sort and it can spell,
It can punctuate as well.
It can find and file and underline and type.
It can edit and select,
It can copy and correct,
So I’ll have a whole book written by tonight
(Just as soon as it can think of what to write).

And in front of it sat... that's right -- a shiny new computer (and a shining new monitor too). That was the best birthday present Jason could have given me! I hear this thing has a great processor and comes with a food blogging chip that can crank out 5 posts a week, so you can expect some good reading on Beyond Salmon any day now. My old computer was threatening to die, but knowing how busy Jason was, I didn't think he'd have time to put one together for me. Our attitudes to computers are the same as those to tart dough, pasta, and bread. What do you mean you can buy one already made?!

The end of summer is a super busy birthday season in our family. I have a feeling that 80% of people are born in August and September and the rest are distributed among other months. At least this has been my impression based on the number of birthday gift certificates I've been sending out for Helen's Kitchen cooking classes lately and the number of birthday candles blown out in my own family. My best friend Gaia and my husband Jason's birthdays just passed in August, my Dad's is today, and mine was this past weekend. Daddy, if you are reading this, I wish you a very Happy Birthday and better health in the coming year.

When we saw my parents last week on vacation in Montreal, they gave me a huge fish platter for my birthday. As you can imagine it’s a very Helen type of gift and I already put it to good use for a whole grilled striped bass. Can you guess what the other present was by looking at this picture? You see the sharpness of the fish head, and the fading out of the background? As I just learned, it's called depth-of-field and something you can only achieve with...

A "real" camera. Nikon D50 was a joint present for Jason and me from all of our family. We don't remember having this much fun with a digital toy in years! I must say that Jason is catching up to f-stops and apertures better than I am, but I am enjoying the fruits of his photographic labor (the credit for the striped bass picture goes to him).

I really wish I made better use of this new toy on Sunday night when Jason kicked me out of the kitchen and made me an absolutely incredible birthday dinner. But I was enjoying the warm baguette, creamy asparagus soup, and grilled tuna too much to think about pictures. The dessert simply knocked my socks off. It was a pear tart tatin that was just… oh my, how can words describe it? It was the perfect fall desert with golden juicy pears and the dough tucked around them like a blanket. I must warn you though, the flaky edges of the crust coated with caramel are dangerously addictive. But hey, the calories eaten on a birthday don't count!

The digital and cooking toys are nice, but the real gift is sharing my life with Jason, my family, and friends. For this I am forever grateful.

Sunday, September 10, 2006

Honey Garlic Grilled Eggplant

A few months ago, a Beyond Salmon reader asked me why she couldn’t find a single eggplant recipe on my blog. I have nothing against eggplants, I assure you, but they have fallen out of favor with Jason way before I knew him, so I’ve avoided cooking them ever since we met. But my knight in shining armor has been conquering all the weird veggies at a frightening speed. There are so few left that I am not sure what I am going to do once he starts eating them all. It’s always been a bit of a sport for me to get him to eat asparagus, cauliflower, beets, and other denizens of the vegetable kingdom, and I will miss the challenge of inventing the most irresistible, mouth-watering dishes to get certain veggies on Jason’s good side?

Getting an eggplant in our CSA share gave me excuse to use try the cooking technique I picked up from Chef Ruth-Anne Adams during my internship with her. Jason bravely ate a bite. And then another one. And then eggplant was no longer on the forbidden veggie list. In fact, it is now welcomed in our house with open arms.

What makes this recipe so good is the honey-garlic marinade. Honey on eggplant? Let me explain. You won’t really taste the honey, but it helps the eggplant caramelize on the grill. The results are musky and succulent. I am sure that when you try this eggplant you won’t have any shortage of ideas for serving it, but here are a few to get you started:
  • With garlicky-minty yogurt as an appetizer
  • With goat cheese in a sandwich
  • With lamb as a side dish
  • With pasta or pizza as a topping

Honey Garlic Grilled Eggplant

Note: Aleppo chili that this recipe calls for is available in Middle Eastern markets. It’s not spicy at all, but sweet and musky. If you don’t have it, substitute it with a pinch of Spanish smoked paprika, or skip it all together.

Serves 2

1 eggplant (2 if using small Italian eggplants)
1 Tbsp honey
2 Tbsp olive oil
2 mashed garlic cloves
1 tsp aleppo chili (optional)
2 tsp balsamic vinegar
Salt and pepper
  1. Peel stripes of skin off the eggplant to create a zebra like pattern of skin and no-skin. This is not only decorative, but makes the skin easier to bite. Slice eggplant into ½ inch thick circles.
  2. Lay out a large sheet of paper towels. Sprinkle eggplant generously with salt on both sides and lay out on paper towels. The eggplant will release a lot of liquid. This will help get rid of bitterness (if any) and make the eggplant more succulent and less watery after it’s cooked. Let sit for 15 minutes, then dry both sides well with paper towels.
  3. In a large bowl, mix honey, olive oil, garlic, chili, balsamic vinegar, salt and pepper to taste. Dunk both sides of each eggplant slice into this marinade.
  4. Preheat the grill to high. Grab a wad of paper towel with tongs, dip it in oil, and brush it on the grill.
  5. Place the eggplant slices on the grill, cover, and turn down the heat to medium. Grill until marked, about 3 minutes. Turn 90 degrees to make cross-hatch grill marks. Grill until marked, about 3 more minutes.
  6. Brush the slices with remaining marinade, flip and repeat the grilling procedure on the other side. Regulate heat so that the eggplant is browning, but not burning. Remove to a plate, and drizzle with olive oil.

Tuesday, September 5, 2006

Perfect steak at last!

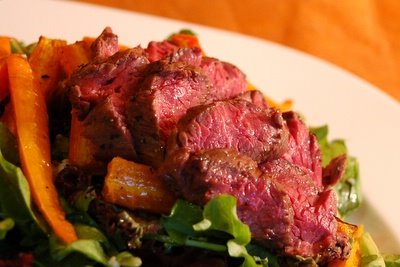
After sprinkling parmesan on the Swiss chard, and tossing the carrots with butter, I grabbed my media pass and re-entered my kitchen in a capacity of a journalist. My mission was to document the making of a steak by a man.

“We are ready, chef. Would you like to trim the steak?” I asked.
“Oh, you are welcome to do that part,” Jason said with a shy smile. “Actually, if you want, you can even season it for me.”
“But I thought I was only allowed in the kitchen as a fly on the wall!”
“Hey, all I said was that I’ll try to put the steak in the oven and take it out of the oven at the right time. I never claimed I can do all that other stuff.”

Oh well, so much for being the media. I put down my notepad, rolled up my sleeves, trimmed the steak, and sprinkled it with plenty of salt and pepper. The cast iron skillet was already preheating in the oven.

“The steak is ready for you, chef. What’s your timing plan?” I asked.
“30 second sear on one side, 30 second sear on the other side, and then 6 1/2 minutes in the oven at 500F.” This sounded reasonable considering the fact that our last steak was practically raw inside. Although the timing was barely longer than what we used last time, the steak was much thinner (only 1 inch instead of 1-2/3), so it all sounded about right.

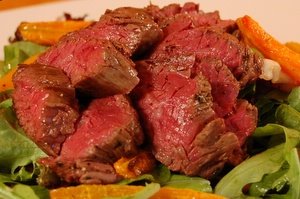
7 1/2 minutes later we were closely studying the finished steak like a team of doctors and fretting that its temperature was a tad too high (130F instead of our intended 120F). The 3 bites in the thicker part that came out medium-rare were excellent, but the rest of the steak that came out medium was on the dry side. This was grass-fed rib-eye, which is leaner than the usual grain-fed beef and terribly unforgiving. A few degrees under and you are chewing on raw meat. A few degrees over and all the moisture is sucked out of it. And with this high heat method, it was almost impossible to get the right doneness in more than 25% of the steak.

The bad news was that we still didn’t have the ultimate steak recipe even with the man at the stove. The good news was that I, representing all the meat-loving women of the world, still had a chance to redeem myself. Unfortunately (or fortunately) we were leaving for Montreal the next day and I had to wait whole 4 days for a rematch.

As we were driving back to Boston, I formulated my plan. It involved getting a ton of steak and beating this problem into submission. In computer science terms, this would be called “brute force”. Buying a ton of grass-fed rib-eye for $22/Lb seemed ridiculous, so I opted for a much cheaper grain-fed hanger steak for $7/Lb. It's a shame that hanger steak is not widely available because it is a superb cut of meat that combines flavor with tenderness. In the Boston area, Savenor’s market carries it on regular basis.

My strategy was to cause the meat as little heat disturbance as possible. I got this idea from the slow-roasted salmon that is cooked at 250F for 20 minutes (that’s long for a fish). This technique is not big on flavor (so it should only be done to very flavorful proteins), but it produces the most delicate melt-in-the-mouth texture. The connective tissue melts completely, leaving the flakes rare throughout and very tender. Since hanger steak does not need much help in the flavor department, I thought this idea stood a chance.

After a quick sear in a super hot pan, I removed the steak to a plate and let both the steak and the pan cool down for 10 minutes while preheating the oven to 250F.

I then seasoned the steak with salt and pepper, returned it to the pan and placed it in the oven for 14 minutes. Hanger steak is one of those cuts that are best medium-rare to medium. If left completely rare, the connective tissue does not have a chance to melt and the steak tastes chewy.

When I pulled it out of the oven, the thermometer was registering 125F on thicker parts and 130F on thinner ones. But the temperature didn’t go up as much during resting since the surface of the steak was not nearly as hot coming out of 250F oven as it was coming out of 500F oven. I made a small cut in one of the pieces to test for doneness, and left the other one untouched just to see if there would be a difference in taste between the cut and uncut piece. In a blind taste test, Jason couldn’t tell the difference between the two pieces and neither could I (though it was not a blind test for me). The juices leak out of the steak regardless of searing or leaving it intact. Even the butcher at Savenor’s market in Cambridge confirmed that not cutting into meat to save the juices is an old wife’s tale.


Ah, perfection at last. The steak was beautifully rosy from the surface to the center without a trace of chewiness. I specially didn’t put anything on this steak besides salt and pepper to really test the difference in texture and flavor. But I am sure that a nice red wine reduction or a generous pat of herb butter would have made it even better.

Another thing I liked about this method is that the difference in doneness between thick parts and thin parts of the steak was minimal. If your steak is not a perfectly rectangular block, you can still have every bite exactly as you like it.

Oh, and did I mention that testing for doneness was a breeze? Even if you thermometer does not end up perfectly in the center, you’ll get a close enough reading. Or you can “cheat” and simply cut half way into the center of the steak and take a peek. When steaks are cooked at high heat, they’ll cook much more during resting. So when you cut into a steak to test it for doneness, you have to do more guess work -- a steak that looks very rare at the time you take it off the heat might get to either medium or medium-rare during resting based on its thickness. But a steak cooked at low heat that looks rare at the time you take it off the heat will be just barely more done after resting than it was at the time you took it off the heat.

Whether this is the ultimate steak is the question only you can answer. As I now realize after 3 weeks of research and experimentation, there are two types of steak people –

Charred outside with rare inside also known as “black and blue” (big flavor but chewy)
vs.
Evenly red throughout (less flavor but tender)

Kind of like brownies – you are either a fudgy brownie person or a cakey brownie person. I tend to believe that food can be objectively evaluated, but even I have to admit that some things are a matter of taste. If you like your steak “black and blue,” slow-roasting is not a good technique for you. But if you want every bite to be juicy and smooth as butter, give this a try.

Slow-roasted Hanger Steak

Hanger steak has a grizzle running through its center. Ask your butcher to remove it and trim all the silver skin and outside fat. You’ll end up with two cylindrical muscles (a thick one and a thin one).

If you can’t find hanger steak, try this recipe with skirt steak, rib-eye, tenderloin, or pretty much any other steak. The timing will vary, so I suggest you start testing your steaks after 10 minutes in the oven per inch of thickness to be on the safe side.

Serves 2

3/4 Lb trimmed hanger steak
1 tsp canola oil
Salt and Pepper

1 hour and 15 minutes before serving
Take the steak out of the fridge and let it sit at room temperature for 45 minutes. This will help it cook more evenly.

25 minutes before serving
Preheat the oven to 250F.

Cut the steak into pieces that can fit comfortably into the skillet (about 4 inches long). Dry the steak very well on paper towels.

Set a heavy-bottomed skillet over high heat until very hot, at least 3 minutes. Add canola oil. As soon as it starts to smoke, place the steaks into the skillet in one layer without crowding. Cook without moving for 1 minute. Flip and cook without moving 1 more minute.

Remove the steaks to a plate and take the pan off heat. Cool the steaks and pan for 10 minutes. The steaks will release lots of juices – you can reserve them for making the sauce.

Season the steaks generously with salt and pepper on both sides. Return the steaks to the skillet and place in the oven for 12 minutes (for an average hanger steak). 5 minutes before estimated cooking time, put a plate in the oven to warm up.

Remove the skillet from the oven and test steaks for doneness with an instant read thermometer and/or by cutting half way down into the center of the steak. When the thermometer registers 125F, the steak is medium-rare. If you are cutting into the steak, it should look a tad more rare than your ideal doneness. If the steak is not done, return it to the oven and test every 2 minutes.

Remove steaks to a warm plate, optionally top with a dollop of garlic-herb butter, and cover with foil. Let rest 3 minutes. If you want to make a simple pan sauce, you can deglaze the pan set over high heat with steak juices, red wine, broth or water. After taking this reduction off the heat, swirl in a dollop of butter.

Slice the steak against the grain, fan out on the plate and serve with the juices accumulated on the plate where the steak was resting and the pan sauce.

Note on alternative timing
This recipe takes a bit of planning, but you can use the time lags to your advantage when making these steaks for company. Instead of bringing the steak up to room temperature before searing, sear steaks right out of the fridge, then cool, and refrigerate. When your guests arrive, remove steaks from the fridge and let them sit at room temperature for 45 minutes while serving drinks and appetizers. Then season the steaks and put them in 250F oven for 12-15 minutes. If cooking for a large crowd, you can sear steaks in batches and then finish them on a large baking sheet.