
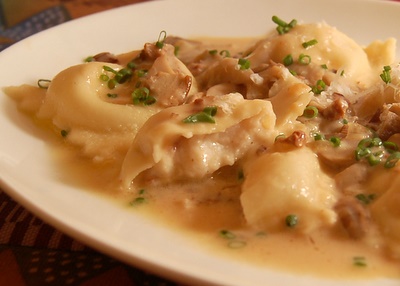
Happy New Year, everyone! Sorry for being such a blog bum lately. Thanks to everyone who checked up on me to make sure everything was ok. The reason for lack of writing was that we were gone for two weeks during the holidays to visit family, and during our trip both Jason and I got sick. We are finally doing better, and yesterday I even cooked something :) The something was ravioli. I have this tendency to not get my act together with recipes until "Ta-da! Nick of time." During the drive back from Baltimore, I realized that I am teaching a pasta class this Sunday and I don't have my pasta dough recipe written up -- aaaaah, start panicking! The worst part was that I was barely well enough to make a soup, let alone pasta from scratch. I told myself not to panic, eat lots of chicken soup (I am never sick enough to make that ;), drink lots of tea, and rest. Luckily, by Friday, I was feeling well enough to spend a few hours in the kitchen testing the dough recipes. My dough experiments turned into some very yummy ravioli. Since I had some left over cannellini beans, I mashed them up in a food processor with a little cream cheese, then added some finely chopped prosciutto and sauteed onions for a killer filling. The first day I served them with a creamy wild mushroom sauce,

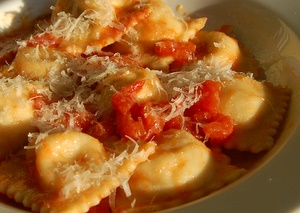
and the second day with Marcella Hazan's tomato, onion, butter sauce. Both were fabulous.
So, here we go -- how to make pasta dough...
Ingredients:
When it comes to any dish made out of dough, people like to have some mystique around the ingredients -- New York bagels are so good because of New York water, good baguette can only be found in France because of their flour, etc. I think it's all a bunch of BS, including the claim that you need Italian "OO" (double zero) flour to make good pasta. Yesterday, I made a batch of dough with OO flour and another one with all-purpose flour and there wasn't any difference as far as I could tell. And unlike Jamie Oliver, I used basic large eggs from Whole Foods instead of "the freshest organic ones straight from the farm." Really guys, don't fret about your ingredients -- it's all in the wrist! The only ingredient you might not already have in the house is semolina flour. I find it useful for sprinkling the surface that will fold the finished pasta, but all-purpose flour will work too.
For 4 main-course servings of pasta, you'll need:
9 oz all-purpose flour (2 cups spooned and leveled)
2 tsp kosher salt (or 1-1/2 tsp table salt)
2 large eggs
1-3 Tbsp cold water
1 tsp olive oil
Semolina flour for sprinkling finished pasta
Measuring:
This is important and trickier than you think. Flour and eggs are very difficult to measure. The only real way to measure flour is by weighing it (which, unfortunately, is not a popular method in the US). Measuring it with a cup can give you as much as 25% difference between cooks. If you must use a cup, see the tart dough technique on how to measure flour. Eggs are not very consistent either. Even the ones in the same box can be a little different. To deal with these irregularities, I suggest you break the eggs into a glass measuring cup and add enough water to give you 1/2 cup of wet ingredients. Eventually, you don't have to obsess about measurements. You'll be able to judge based on the feel of the dough, but if this is your first time making fresh pasta, accurate measurement is the easiest way to get the right consistency.
Equipment:
Theoretically, you can make pasta with nothing more than a fork and a rolling pin. I just don't think it's such a good idea. It's a labor intensive process, and there is a lot of technique to worry about, so I suggest you employ the following equipment:
- a food processor
- a pasta machine (I use Imperia hand crank one)
Technique:
Stage 1: Integrating wet and dry ingredients
- Put flour and salt into a food processor bowl and process for 10 seconds.
- Put eggs into a glass measuring cup. Add enough cold water to make 1/2 cup (about 1 Tbsp water). Add the wet ingredients and 1 tsp oil to the flour in the food processor.
- Turn on the processor and mix until ingredients are evenly distributed. Mixture will be sandy and crumbly.
- With the processor running, add another 1 Tbsp cold water through a feed tube. At this stage the mixture should start coming together into a ball. If you are not getting a ball after 30 seconds of mixing, open the processor and squeeze a chunk of dough with your fingers. If it comes together and feels like play dough, it's done. If not, restart the processor and drizzle in a little more water, 1 tsp at a time.
Turn the dough out onto a work surface and gather into a ball. Knead for 8 minutes. The dough should be soft, pliable, and slightly tacky, but not sticky. It should not stick to the work surface or your hands. If it sticks, add a little flour and continue kneading. Don't short cut this step. Kneading is what develops gluten and makes your dough elastic and workable later.
Stage 3: Resting
Wrap the dough tightly in plastic wrap and refrigerate for 1-8 hours.
Stage 4: Rolling
- Cut the dough into thirds. If you doubled the recipe, cut it into sixths. Work with one piece of dough, while keeping the others tightly wrapped in plastic -- dough dries out quickly.
- Set the pasta roller to the thickest setting. Flatten out a piece of dough. Sprinkle it with flour and shake of excess. Put it through the pasta roller. Fold it into thirds like a letter, flatten it with your hands, and put it through the roller again. Sprinkle with a little flour as necessary so that dough doesn't stick. Repeat the folding and rolling process 4 times.
- Set the pasta roller to the next thinner setting. Feed the dough through. Keep reducing the setting and feeding through the dough making it thinner and thinner each time. I roll mine out to the thinnest setting on my machine. As you thin out the dough, it will get longer and longer. When you crank it through, don't stop in the middle or it will stretch and tear. Feed it with one hand and turn the crank with the other. As soon as you see the dough show out the other end, you can let go of the dough from the top and use that hand to pull it out the bottom. This does take some practice to master, especially that each pasta machine is a little different. Experiment to see what works for you.
The dough sticks to the machine
Try sprinkling the dough with flour before rolling it with the machine. If it still sticks, your dough might be too wet. Try using less water next time.
The dough tears when it goes through the machine
Collect the torn up dough. Knead it into a ball, flatten it out and try again. Sometimes this happens with perfectly good dough. If this happens with every piece of dough that you try, you might need to adjust the proportions of liquid to dry ingredients next time.
Variations:
Once you master the basic recipe, feel free to experiment. You can make a Piedmont pasta by using only egg yolks for your liquid. You'll need a ton of them. There is a reason this is called a 40 yolk pasta. I find that even substituting 1 egg with all yolks gives the pasta a nice rich silkiness. Or you can make a leaner pasta by using only 1 egg and more water. Start with 1/2 cup of liquid ingredients for 2 cups of flour and then add water as necessary to get the right consistency.
I haven't taken any pictures of shaping ravioli and it's so much easier to show than to explain. I'll try to do it again and write a post about it.
18 comments:
Hope you and Jason feel better Helen! Funny, I made fresh pasta this week too -- to make lasagna -- and had a whole conversation about it last night with the Chef at Ten tables where we dined ;-)
deliciously yummy looking ravioli!
Hi Helen, I too was wondering if you were OK and I'm happy to see you back. Too bad you got sick, but I hope you're well now. The ravioli look beautiful. Happy New Year!
Hi Bea,
Mmmm -- lasagna :) What kind was it?
Cheers,
-Helen
Another great post, Helen. Glad you're well enough to get back in the kitchen. Thank you for demystifying ingredients. I think too many cooks, professional and otherwise, sometimes tend to get a little too precious with food and ingredients.
Your cannellini bean and cream cheese raviolis with prosciutto and onions sound incredible, by the way.
As a relative newbie in the food blog arena, I've become painfully aware of the panic of deadlines you talked about--yours for a class, mine for my self-imposed posting schedule. But somehow, we always manage to pull it out of the fire.
Wow, what great tips! Looks delicious!
Your cannellini bean and cream cheese raviolis with prosciutto and onions sound incredible, by the way.
Hi Terry,
Just wanted to confirm your suspicion :-) The ravioli Helen made with the canellini bean filling were incredible! She's been a bit uninspired lately. But, when she served me these ravioli, I felt like I had been transported to Hugo's (in Portland, ME), who's Chef's menu was one of the best meals we've ever had! It felt like one of those rare dishes where the combination of ingredients were transcendent---I never thought the individual ingredients could taste so good.
Jason
Thanks for confirming my suspicions, Jason. I love your description of the transcendent quality of this dish. That's one measure of cooking in our household--is it "restaurant good"? Conversely, when we eat out, we often judge our meals by whether it's better than something we could make, or perhaps something we COULDN'T make, at home.
Oh, and congrats to you on the PhD, Jason--and impending fatherhood. Lots of exciting changes for both of you!
Oh guys,
You warm my heart! Your encouragement has even inspired me to get out of my soup and potatoes rut. I have something interesting in store for tonight's dinner and if it works, I'll post about it.
Cheers,
-Helen
Helen, this weekend must have been the pasta weekend in food blogosphere! I made and blogged about it too, my first attempt. Wow, my wrists were sore for three days!! I know my next round will go better after all I learned. You can read about it over on my blog.
Hi Mike,
You can use this recipe as is for pelmeni or to be more authentic, you'd have to use less eggs and more water. For pelmeni and vareniki, the proportions I use are:
13.5 oz all-purpose flour (3 cups spooned and leveled)
1 Tbsp kosher salt (or 3/4 Tbsp table salt)
1 egg
3/4 cup water
Just like in the pasta recipe, I very strongly suggest weighing the flour (at least the first few times). Cups are just not accurate enough. Unless you already know what the dough should feel like, but then you wouldn't be asking for the recipe :)
The technique is exactly the same as for pasta. No need to drizzle in water a little at a time. Put it all in the food processor at the same time as the egg.
I roll out my pelmeni dough by hand with a rolling pin, but if you have a pasta machine, it will work just fine. For pelmeni, I'd stop at the next to last setting to make it a tad thicker than I do for ravioli.
Good luck!
Cheers,
-Helen
Making pasta is one of my culinary resolutions this year--so thanks for this thoughtful and simple explanation.
Hi Helen-
I'm a newbie to your site, and after reading through all your wonderful commentary on pasta-making, I was wondering if you might happen to know where I could purchase a checkered ravioli pin in the Boston area. I just finished reading "The Lost Ravioli Recipes of Hoboken" and it inspired me to try making MY great grandmmother's raviolis this weekend (stuffed with garlicky Italian pot roast). I thought a press might make the job go faster, as the author recommended in that book.
Thanks in advance for any help! Meridith
Hi Meridith,
I buy all my kitchen tools on-line. Here is the ravioli maker I use.
Cheers,
-Helen
I know you posted this quite a while ago, but wanted to thank you. Thanks, especially, for giving permission to use regular flour!! I have used your recipe three or four times now, and have had very good results
Last night I tried making pasta with 1.5 cups flour and .5 cup resistant starch (I have been entranced with the texture and fiber content of the Dreamfields low carb pasta, and wanted to try making something like it myself). It was a little more fragile-- on the thinnest setting of the pasta maker, the filling broke through the dough, so I had to use the second-to-thinnest setting. I've also tried turning it pink with some beet liquid (used instead of water), and have had very good results!
Thanks again!
Looks like a really great thing to learn. Simple pasta recipes done with fresh pasta are always the best. I'm gonna try do some of my usual pasta recipes with fresh stuff.
Could you please clarify the folding technique when starting the pasta machine steps? I'm confused about which direction to fold it ("letter" doesn't explain if the fold is in line with the pasta or across the length of the pasta), and then what direction to feed it back again into the machine (do you put it back in with an open edge leading or on the edge of the fold). As many times as I have tried this, I never seem to get a nice even sheet like I always see in the picture. Thanks!
Hi Andrew,
Unfortunately, it's a hard thing to explain without pictures. But after making pasta for several years, I found this traditional step of letter folding to not really be necessary. Just put your piece of pasta through the machine. You'll likely get a very long oval. Fold in the sides and put it through the machine again so that the folded sides are on the right and left side of the rollers. Then start thinning out.
Note that you almost never get a perfect rectangle. Just try to get as close to it as possible.
Try searching for videos on google for "how to roll out pasta dough"
Cheers,
-Helen
Thanks for sharing. My arm is killing me from mixing dough with a fork. I can't wait to try your food processor method. Thanks again.
Please visit me at:
The Unprocessed Adventure
http://theerdzcookingadventure.blogspot.com
Post a Comment