Tuesday, April 29, 2008

Provençal Green Bean and Potato Stew

Remember the porridge? Yes, the one that Goldilocks found at the table of the Three Bears. Feeding my Baby Bear gave me a whole new appreciation for that porridge. Not because it was steel cut, or organic, or even local. No. That's too sophisticated for us at the moment. The reason that porridge is so near and dear to my heart is that it was in Mama Bear's bowl, Papa Bear's bowl, AND Baby Bear's bowl. That's right. Baby Bear was having the same thing as Mama and Papa bear. That's the holy grail of everyone's family meal. But as this Mama Bear is learning, it's easier said than done.

Food trends go out of style with my 9 month old faster than with Gourmet magazine. Just a few weeks ago, purées were all the craze. We liked them all -- green beans, broccoli, sweet potatoes, parsnips, celery root. If you can buzz it, we can eat it. Now, purées are totally passé. We are all about finger foods now. If we can't hold it, touch it, and smoosh it, we are not eating it. The problem is that we only have 2 tiny teeth and can't chew too well. In theory, we should be joining what all parenting books call the "family table." But all those books don't take into account that my green vegetables are still crunchy when cooked, ground beef only makes an appearance in medium-rare burgers, and I probably won't be making chicken noodle casseroles with cream of mushroom soup any time soon.

I haven't found a solution to this "yuppie Mama and Papa bear" problem yet. By the time I do, I am guessing that Baby Bear will have a mouth full of teeth, and she'll be able to eat most of our regular foods. Meanwhile, I am taking baby steps in finding foods we can enjoy together. The latest find is a Provençal style green bean stew. This is one of the few dishes where green vegetables are intentionally overcooked, yet taste irresistibly good. When the stew is done, the veggies are very soft, but retain their shape and are easy for baby bear to pick up with her little fingers.

The trick is using LOTS of olive oil. Onions, garlic, tomatoes, and herbs don't hurt either. I had some new crop potatoes, so I threw those in too. This dish works perfectly well with regular green beans, but I saw Kentucky wonder beans in my produce market and decided to give them a shot. They looked like green beans on steroids and came out very tender and juicy in the stew.

I can't wait for summer when zucchini and eggplant are in season. Ratatouille would make an excellent meal for Mama, Papa, and Baby bear.

Provençal Green Bean and Potato Stew

Serves 4 bears

1/4 cup olive oil
1 large yellow onion, diced
3 garlic cloves, minced
2 tsp mince fresh rosemary and/or thyme (optional)
14.5 oz can of diced tomatoes with juice (preferably Muir Glen)
1 Lb green beans, trimmed and cut into 1 inch lengths
2/3 Lb boiling potatoes, cut in half, then sliced 1/8 inch thick (no need to peel)
Salt
  1. Set a large, heavy skillet over med-low heat. Add the oil, onion, and a generous pinch of salt. Cook stirring occasionally until onions are completely translucent and just starting to turn golden, 12-18 minutes.
  2. Add garlic and herbs. Cook stirring until aromatic, about 1 minute.
  3. Add tomatoes, green beans, and potatoes. Season generously with salt, stir, cover, and bring to a simmer. Regulate heat so that the vegetables simmer gently and cook until all vegetables are very soft, 45-60 minutes. Don't worry about overcooking. Green beans will turn brown and have that awful canned bean look, but they'll taste heavenly. Trust me. Tastes good hot or cold. Makes fabulous leftovers.

Monday, April 28, 2008

Cranberry Walnut Bread

Cranberry Walnut Bread -- another hit from Rose Levy Beranbaum's The Bread Bible. I have only one word for you: cheese course. Hmm, I guess that's really 2 words. But no matter. It is the type of bread traditionally served in French restaurants with the cheese course. Dark, nutty and firm. It gives you enough support for the cheese, but is not so crusty that you have to tag and pull on it with your teeth. A perfect tangy sweet accent that shows of any cheese in the best light.

I made 3 tiny changes to the recipe:
  • increased the salt by 1/4 tsp table salt (or by 1/2 tsp Diamond Crystal Kosher salt).
  • substituted about half of the finely ground walnuts with finely ground almonds. I was a tad short on walnuts and since they were a substitution themselves (the original recipe was for Raisin Pecan bread and I was making the Cranberry Walnut variation), I thought the bread would survive.
  • I opened the oven door for 20 seconds after the first 10 minutes of baking to let the steam out and help the crust to form.
Maybe I should embark on a project to make every single one of Rose's breads by the end of 2008. It's a bummer that Helen-Rose Project doesn't have the same ring as Julie-Julia project. Besides, I don't think I have the right personality.

Friday, April 25, 2008

Zucchini Risotto

When it comes to cooking, there is no such thing as too much improvisation. Unless, of course, you are teaching a class. Sure, there are some little substitutions I am happy to make in a class: Spanish mackerel for bluefish, mint for cilantro, rib-eye for New York strip... As long as the basic technique of the dish is the same, I'll throw in pretty much anything. But adding a completely new dish to the class last minute -- that's a big no-no in my book. Why not? Because the students need recipes and recipes need testing (at least if I want to guarantee that the dish will come out just as well when my students are on their own rather than in my kitchen).

But cooking ideas have a mind of their own and if one particularly good one shows up a few hours before class, I am not going to show it the door. Last week, I taught a Spring Fling class to give people ideas on what to do with spring produce. I had my menu all planned out; but when I looked at the allergy info for my students, I realized that I am in a bit of a pickle. One student was gluten-free, another was lactose intolerant, and last minute, a girl who was vegan signed up. The parsnip soup, radish spread, asparagus salad, and rhubarb compote were either vegan and gluten-free already or could be easily modified, but the main course was giving me trouble. I still didn't have one as I went shopping the day of class. I crossed my fingers and hoped that something would inspire me, and sure enough something did. Zucchini! I suddenly remembered making a zucchini risotto before and that became our main course.

I decided not to cook zucchini before adding them to the rice, thus allowing their juices to release right into the risotto. This worked like a charm and the risotto turned out beautifully. Since it was the one recipe missing from the handout packet, within a week I started getting e-mails asking for it. Oh-oh, that's what happens when I improvise in class. The good news is that it encouraged me to write down this recipe and to test it by making this awesome risotto again.

Zucchini Risotto

Serves 4 as the first course / 2 as the main course

Note: if using leeks, here is how to clean them properly

4 cups water
2 Tbsp olive oil
1/2 cup finely diced shallot (or leek, or spring onion, or whatever onion you have on hand)
1 cup risotto rice (such as Arborio, Carnaroli, or Violone Nano)
1/2 cup dry white wine
1 medium zucchini, grated
1-2 Tbsp butter (optional)
A squirt of fresh lemon juice
A handful of grated parmesan (optional)
Salt
  1. Pour the water into a kettle and bring to a boil.
  2. Set a medium-sized, heavy sauce pan over med-low heat. Add the oil and shallots. Cook, stirring occasionally, until completely translucent and tender.
  3. Turn up the heat to medium, add the rice, and cook, stirring constantly, for 2-4 minutes or until the grains are mostly translucent and only white in the center.
  4. Pour in the wine and cook, stirring constantly, until the wine is absorbed.
  5. Add enough water to cover the rice by 1/2 inch (about 2 cups), 1 tsp kosher salt (or 1/2 tsp table salt), and cook, stirring occasionally, until most of the water is absorbed. This is a good time to take a breather from all that stirring. Set the table, get yourself a glass of wine, relax, and save your energy for the finish line stirring. As long as the rice isn't sticking to the bottom of the pot, you are fine. Keep adding water 1/2 cup at a time and stirring as necessary. The less water you have in the pot, the more you have to stir.
  6. After 15 minutes of cooking the rice with water, start tasting it. When it's still a bit crunchy, but close to that perfect al dente stage, stir in zucchini with any accumulated juices, season with salt to taste, and continue cooking stirring constantly and adding water 1/2 cup at a time as necessary so that the rice doesn't stick. Taste the rice every few minutes and as soon as it's almost tender, but still toothsome, turn off the heat.
  7. Add a bit more water if risotto looks stiff. Stir in the butter and a little cheese (if using). Reserve the rest of the cheese to sprinkle on top during serving. Give it a good squirt of lemon, taste and correct seasoning (you might need more lemon juice and/or salt). Cover and let rest 5 minutes. Serve sprinkled with cheese and drizzled with good olive oil.

Tuesday, April 22, 2008

A loaf of love - hearth bread versions 2.0 and 2.1

"What are you talking about? I can't teach a cooking class," said Jason shaking his head as if I just proposed something totally naughty.

"But it's not a cooking class," I replied. "It's a bread baking class."

"Doesn't matter. I can't get up in front of all those people and talk. Why don't you teach it?" he replied hitting the ball back into my court.

"Hmm, let me think-- because I don't know how to bake bread!" I answered. That's not completely true. I can make good focaccia and brioche, but the crusty and holey artisan loaves give me serious hibby-gibbies.

"I'll teach you," said Jason lighting up enthusiastically, "and then you can teach everyone else."

I think he's been dying to teach me how to bake bread for years. The problem was that I never showed much interest. It was always fun to talk to Jason about his bread experiments*, the water percentages, and the types of flour. But to attempt them myself? No, thanks. The two day process involving insanely wet dough (kneaded by hand may I point out), slashing the top with a razor blade while managing not to deflate the dough, and shoving the loaves in the oven with one swift motion... I got shivers just thinking about it. I even look away when Jason does it. It seems like the loaves will go *splat* right against the back wall of the oven, but somehow they always end up right on the baking stone and within minutes the steam of ice-cubes makes them puff up and turn from wet mush into bread. Just like magic.

Artisan bread baking is like having a baby. It's a life changing experience one needs to be ready for. It usually goes much better if you figure out how to let the baby (or bread) join your life rather than how to stop your life for them. As my friend Olga, a neurologist who had 2 babies while doing residency, puts it: "The only way to go through it is calmly and happily." A few weeks ago, I decided that I was finally ready for real bread, and gave Rose Levy Beranbaum's "Basic hearth bread" a try, but it wasn't what I was hoping for. Jason's forensic analysis revealed that the dough wasn't wet enough, needed more salt, and longer rising time. My curiosity and desire to get magic to happen with flour, finally got the better of me, and so began my bread baker's apprenticeship with Jason.

We decided that I should follow Jason's recipe rather than Rose's the first few times, since I had the luxury of having him right there to talk me through it and answer my questions. The only difference was going to be that I'd shape the dough into boules (round loaves) instead of baguettes that Jason makes, since boules are easier to shape and get in the oven. I was also going to proof on parchment paper and slide it right into the oven instead of proofing on canvas and doing the dangerous transfer to peel and then to oven. The plan was for me to do the whole thing myself, but Jason would supervise the process and be there for moral support.

I weighed my flour, brought the water up to room temperature and soon my hand was stuck in sticky goo. Jason was holding Sammy with one hand and sprinkling flour onto my goo with the other. "You need to maintain internal wetness, but get enough flour on the outside to be able to knead it," he said. He is an amazing teacher in one-on-one situations. That's how I fell in love with him. He was my partner in physics, in fundamentals of electrical and computer engineering, and in computer architecture. In physics, we became friends; by the fundamentals, we had a secret crush on each other; and by architecture, we were in love. Ours was not a love at first site. It was an affection that grew out of understanding and patience. It grows each day, even after 8 years of marriage. But being stuck in that messy goo of dough with Jason by my side, gave me the kind of butterflies I haven't felt in my stomach since we were bending our heads over color-coded wires.

24 hours later, there was a bread sitting on a rack, cooling. You have to wait at least 2 hours to cut it, which always drives me nuts and kills my ability to function. It's just like being in love. I keep stopping by the kitchen every 10 minutes just to stare at it. Maybe at some point I'll be more nonchalant about it. We put Sammy to bed, had dinner, and finally it was time to cut the bread. Here is some advice if you want to learn to bake great bread -- don't try to make it for a particular occasion or a meal, at least not until you get good at this. If you go through all the stages of rising, proofing, and baking at your own pace, you won't have to restructure your whole day around the bread. When I start kneading dough, I look at it this way: at some point this week, we'll have bread.

Anyway, so how was it? A huge improvement from Try 1. The bread had great flavor, good level of chewiness, and the crust wasn't burnt, like my first try at hearth bread. But there was still lots of room for improvement. I didn't get the holes I was hoping for, and the crumb was a tad doughy. Jason had a suggestion for each problem. I used all-purposed flour for this bread as he does for baguettes. AP flour has less gluten resulting in smaller, more even holes that are perfect for baguette. But since a boule has more crumb vs crust, it needs more structure, and bread flour would be more appropriate. Jason explained that it would give me bigger holes and more chew. The doughiness, he said, was simply under-baking.

My second try of Jason's recipe was all by myself. Sure I could do it with Jason around, but could I handle this unruly goo on my own? I made another batch using bread flour, longer baking time, and higher temperature. The results -- big holes I was dreaming of, good chewiness, and very crisp crust. Jason gave me an approving nod when he got home. I thought I got a bit carried away and over-baked it slightly. But with bread, it's better to over-bake then under-bake. Although I think it was my best try yet, I think I can do even better next time. That's one of the cool things about bread. It's a perpetual learning experience.

I don't think I mentioned the source for this bread recipe yet. It's our heroine and great source of inspiration, Julia Child. Jason modernized it by using SAF instant yeast, bread stone, and ice-cubes, but we owe the basic technique of extremely wet dough and long rises to her.

At some point, I'll write up Jason's recipe in the gory detail necessary to reproduce his wonderful bread. Meanwhile I'll just post some of my lab notes.

Basic hearth bread, 2.0:
16 oz AP flour, plus extra for kneading (amount unknown)
4 tsp Diamond Crystal Kosher salt
1 tsp SAF instant yeast
1 3/4 cup water, 70-90 F
  • First rise 3 hours at room temp, then continued overnight
  • Second rise at room temp around 3 hours
  • Proof: 3 hours on a rimless cookie sheet lined with parchment paper
  • Baking: preheated oven to 450F for 40 minutes, slashed the dough, added 8 ice-cubes on the bottom of the oven, immediately slid the parchment paper onto the stone. Baked for 13 minutes. Reduced the oven to 400F. Opened the door for 20 seconds to let out steam and rotated loaves. Baked additional 19 minutes. Internal temp was 200F. Cooled on rack.
Results: Perfect level of salt, good flavor, moderate chew, crust needs to be crisper and browner, a little doughy inside, small holes

Basic hearth bread, 2.1:
16 oz bread flour, plus extra for kneading (used 4.4 oz)
4 tsp Diamond Crystal Kosher salt
1 tsp SAF instant yeast
1 3/4 cup water, 70-90 F
  • First rise 3 hours at room temp, then continued overnight
  • Second rise in the fridge overnight, plus 2.5 hours at room temp next day
  • Proof: 2 hours, 40 minutes on a rimless cookie sheet lined with parchment paper
  • Baking: preheated oven to 475F for 40 minutes, slashed the dough, added 8 ice-cubes on the bottom of the oven, immediately slid the parchment paper onto the stone. Baked for 10 minutes. Reduced the oven to 425F. Opened the door for 20 seconds to let out steam and rotated loaves. Baked additional 24 minutes. Internal temp was 200F. Turned off the oven, cracked the door open, and left the bread on the stone another 5 minutes. Internal temp was 209F. Cooled on rack.
Results: Very crusty (almost too much, but not burnt), perfect large holes, good flavor, good chew, a tad dry inside. Next time, take out at 200F.

* please note that Jason's bread journal and recipe are a little out of date. He's made great progress since 2007, but finishing a Ph.D. thesis, starting a job, and becoming a father interfered with keeping up his bread notes.

Tuesday, April 15, 2008

Pizza

Any recipe whose main ingredient is flour is a bit of an undertaking, in my opinion; but the ones involving flour and yeast are full blown chem labs involving constant vigilance, precision, planning, and organization. So it's no wonder I used to make my own sushi more often than my own pizza crust. It always seemed more work than this most casual of all dinners deserved.
My usual pizza dough was from Stella's in Watertown (a pizza shop 5 minutes from our house). They were always willing to sell me a piece of raw dough, allowing me to improvise with toppings and have freshly baked pizza with no dough hassle. But I've gotten a little addicted to Rose Levy Beranbaum's Bread Bible (he-he, like you haven't noticed yet ;) and her feelings about the pizza crust were so in tune with mine, I just had to give her crust a shot.

You see, our pizza edges always ended up on our husbands' plates. I came to accept those tough, dry, and doughy edges as a part of life. But Rose, my new hero after Julia Child and James Peterson, was determined to come up with a pizza dough worth eating to the last crumb. When her husband finally didn't get any extra edges, she knew she achieved perfection. When Rose Levy Beranbaum talks about perfection, it's not without a cost. Maybe not blood, but at least some sweat and tears are definitely in order. Imagine my surprise, when the whole dough making process took only 2 minutes. This included measuring the ingredients, by the way. Rose's solution to tender, crackly crust is no kneading. It seemed strange the first time I made this recipe. You combine the dry and the wet ingredients, stir them together with a spoon just until the flour streaks are gone and consider yourself done. But strange as this might seem, the cleverness of this recipes is sublime. If it was a mathematical proof, it would be called "elegant" by any math geek. Since kneading exercises gluten and give the breads their structure and chew, no kneading give you tenderness.

To my relief, Rose also eliminates the cornmeal normally used to slide the pizza onto the hot stone. I hate the grittiness cornmeal gives the crust, and loved her idea of shaping the pizza right in the pizza pan using olive oil to help the dough not stick and brown well. Rose suggests pre-baking the pizza in the pan with no topping, then adding toppings and sliding it directly onto the stone. I don't have a pizza pan, so I tried her method on a cookie sheet lined with parchment paper. It didn't give me the crispness I was hoping for. Without toppings, the dough puffed up in the middle and didn't get a chance to crisp up in the center. On my second attempt, I put the toppings right on the raw dough and slid the parchment paper from the cookie sheet onto the stone. The crust got perfectly crisp throughout, without being hard or chewy, and the olive oil gave it almost focaccia type savoriness. For the first time, Jason didn't get any of my edges, but he decided that the sacrifice was worth it. He even proclaimed it to be the best pizza he'd ever had.

Now we have our pizza ritual about once a week. I make the sauce and the dough the night before. They take about 5 minutes of active work each, and while the sauce is reducing and the dough is rising (about 30 minutes) I can do dishes. I refrigerate both the sauce and the dough overnight. It's more convenient and tastes better when done ahead. On the pizza day, right around Sammy's bath time, I pull the dough out of the fridge, stretch it on a parchment lined cookie sheet and preheat the oven. It keeps the kitchen warm for Sammy's bath, and gets the pizza stone nice and hot. An hour later, Sammy is bathed, fed, and in bed, dough has risen, oven is pre-heated, and I feel like a good multi-tasking mother. To tell you the truth, I suck at multi-tasking, so anything that allows me to fake it makes me feel good. It's time to bake the pizza. The toppings are whatever veggies happen to be in the fridge. The topping in the picture is roasted Brussels sprouts (I know, that's a bit wacky. Roasted portabellas the week before were better, but I didn't take a picture). I slide the pizza in the oven for 8-10 minutes, and dinner is served. Oh, and what would a pizza be without a bottle of wine and a movie? I must say, it goes particularly well with a bottle of Tohu (New Zealand Pinot Noir) and an episode of Foyle's war.

Perfect Pizza
Adopted from Rose Levy Beranbaum's Bread Bible

Special equipment:
Rimless cookie sheet
Parchment paper
Pizza/bread stone

Dough:
113 grams (4 oz) unbleached all-purpose flour
1/2 tsp SAF instant yeast
1/2 tsp sugar
1/2 tsp table salt (or 1 tsp Diamond Crystal Kosher salt)
79 grams (1/3 liquid cup) water at 70-90F
18 grams (4 tsp) olive oil

Make the dough
8-24 hours before serving (or 2 hour before serving for impromptu pizza bakers)

In a small bowl, whisk the flour, yeast, sugar, and salt. Make a well in the center and pour in the water. Stir with a rubber spatula or wooden spoon just until the flour is moistened and the dough begins to form, about 20 seconds. Do not over-mix! The dough will be very sticky and rough looking, not silky smooth. Pour the oil into a 2-cup glass measuring cup. With oiled fingers or oiled spatula, place the dough in the cup with oil and turn it to coat on all sides. Cover it tightly with plastic wrap. If making the dough at least 8 hours in advance, let the dough rise for 30 minutes at room temperature, then refrigerate it until ready to use. If making the dough 2 hours in advance, let rise for 1 hour at room temperature and proceed to shaping. The dough should be roughly doubled in size before shaping.

Shape the dough and preheat the oven
1 hour before serving
Line a rimless cookie sheet with parchment paper. Get the dough out of the cup with an oiled hand. With the other hand, pour the oil remaining in the cup onto the parchment lined cookie sheet. Spread it around with your free hand in a large circle (10 inches in diameter). Place the dough on the oiled parchment paper and press it down gently with your hands to deflate it and form it into a disk 5 inches in diameter. Cover the dough with plastic and let it rest 15 minutes.

Set a rack in the lowest level of the oven. Place a pizza/bread stone on it. Preheat the oven to 500F for at least 30 minutes before baking.

With oiled fingers, gently stretch the pizza dough into a circle 10-11 inches in diameter. It should be very thin, but be careful not to rip it. If it does rip, however, don't panic. Just smoosh it back together where it rips. Cover with plastic wrap and let rise 30-45 minutes.

July 12, 2010 update:
I found that proofing the dough isn't really necessary if you want a very thin crust pizza.  Just stretch, top, and bake immediately.  You still have to preheat the oven for at least 30 minutes.  Alternatively, you can grill the pizza.

Top and bake the pizza
When dressing the pizza remember that less is more. Spread a very thin coating of sauce over the dough (it usually only takes about 1/2 cup of tomato sauce or 1/4 cup of pesto) leaving a thin border around the edges. Sprinkle with 3/4 to 1 cup grated mozzarella and the toppings of your choice. I often include a second cheese (like feta or ricotta in the toppings).

Slide the parchment paper with the pizza onto the stone. Bake for 8-10 minutes until the crust is nicely browned around the edges and underneath (lift an edge with tongs or spatula to check). Slide the pizza and parchment back onto a cookie sheet to get the pizza out of the oven. Slice and serve immediately.

Helen's all-purpose tomato sauce

This makes enough for about three 10-inch pizzas, but since we don't eat THAT much pizza I usually use the rest of it to top pasta, fish, etc.

2 Tbsp olive oil
1 yellow onion, diced
3 garlic cloves, minced
2 tsp fresh rosemary, minced (optional)
14.5 oz can of diced tomatoes with juice (preferably Muir Glen)
A pinch of chili flakes
1/2 bay leaf (optional)
1/2 Tbsp butter (optional)
Salt

Set a small saucepan over medium-low heat. Add olive oil, onions, and a generous pinch of salt. Cook stirring occasionally until completely translucent, very tender, and golden brown, about 15 minutes. Stir in garlic and rosemary and cook until fragrant, about 1 minute. Add tomatoes with their juice, chili flakes, and bay leaf. Simmer until most of the liquid evaporates and the sauce thickens, stirring every 10-15 minutes or as often as necessary to make sure the sauce doesn't stick to the bottom of the pan. This will take anywhere from 30 minutes to 1 hour depending on your pan. Take off heat, and swirl in the butter. Cool slightly and puree with a food processor or blender (I use immersion blender) until slightly chunky. Cool completely and use as needed. The sauce will keep in the fridge for up to 3 days.

Friday, April 11, 2008

Basic Hearth Bread -- Try 1

There is nothing like beginner's luck to give you a false sense of confidence. Ever since I started using Rose Levy Beranbaum's The Bread Bible, incredibly yummy things have been coming out of my oven. After playing around with focaccia, brioche, pizza, and scones, I decided to finally try a hearth bread. That's Jason's domain. Last time I tried to make a hearth bread (the kind that is supposed to have a crackling crust and holey, chewy crumb) I ended up with something quite pathetic. But that was years ago. It was before I found Rose's book, before I learned to measure flour, before I got over my compulsion to improvise, and before I got over my fear of terribly sticky dough. I was sure it was going to be different now. But it was not to be...

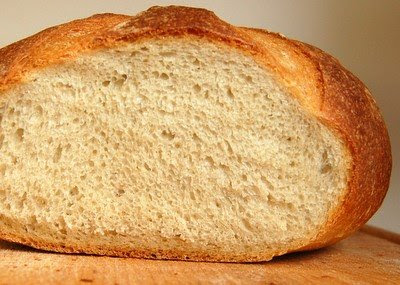
I followed Rose's recipe for basic hearth bread to the letter and couldn't wait to taste my little loaf. But no holes for me :( It was also a tad bland -- easily remedied with a little salt. I'll have to wait for Jason, from the dough forensics department, for a proper hole analysis.

Thursday, April 3, 2008

Rack of lamb, continued

I just got some great comments on the rack of lamb post, and I thought I'll highlight a few issues and try to address them. I did post a reply in the comments, but hey -- how many people actually read the comments?
Jon: Oh no! The fat/"chewy stuff" is my favorite part! In fact, I know many-a-foodie that agrees with me and absolutely cherishes the fat. Granted, its all personal preference and I can certainly see how some (or maybe most) don't like it, but I wouldn't be so quick to judge that there's a conspiracy marketing ploy that's keeping butchers from removing the outer flap. I feel its gives a richness and pleasing contrast in texture. Just an opinion - always enjoy your posts.
Is the fat the good part? It depends. The fat inside the muscle, called marbling is the good part. It makes the meat juicy and flavorful. But the fat between the muscles is usually surrounded by connective tissue making it chewy.

Just like everything else with food, whether to eat the flap is a matter of taste. Some people LOVE meat so much (for example, my Dad :) that they don't want to waste any of it. What's a little chewiness when it's flavored with lamb?! According to them, it's all good. I am like that with fish. I often find myself eating parts of fish most people wouldn't. But when it comes to meat, I am much pickier. Don't get me wrong. I enjoy meat, but I only want to eat it if it's perfect. Having something stuck in my teeth totally kills the experience for me. As Diana pointed out, there is a way to rescue the flap, trim it, and cook it separately eliminating all the chewiness.

If you are cooking lamb chops (vs a whole rack) and will be browning the eye,I wouldn't mind leaving the flap on. In case you don't want to eat the flap, you can easily remove it without eliminating the parts that are seared (searing is what develops flavor in meat and it would be a shame if the part you are actually going to eat would not be seared). If you do want to eat the flap on individually cooked chops, it will be nicely browned and more fat will render out of it than when the rack is cooked whole making the flap even yummier, if that's your thing.

But if we keep saying that everything in cooking is a matter of taste, we'll never be able to have a real discussion or improve on the final results, so I will stand my ground and say that in a side by side comparative tasting, the trimmed rack of lamb would win. I've never been served a rack of lamb with the flap in an upscale restaurant, so I must not be the only person who thinks it should be trimmed completely when cooked whole.

About the butcher conspiracy -- I am not trying to say there is one. But butcher's are not chefs (at least most of them aren't). And even when it comes to chef's, there are two types: the Jamie Oliver type (easy-going, it's-all-good), and Thomas Keller type (obsessive perfectionism). I tend to lean more towards obsessive perfectionism, so I find chewiness in meat simply unacceptable.
Jo: I NEVER want them to trim it. I much prefer to trim it to my liking. I have taken home far too many cuts that looked great in the case and then when I opened the package after they performed their job it was a disaster.
But that is just my preference.
I totally agree with Jo that most butchers don't do a good job, so I never ask them to trim it and normally do it myself. It just so happens that one of the guys who works at Fresh Pond Market (Crosby, though I am not sure about the correct spelling of his name) is really good. He trimmed it perfectly, which was a great surprise to me :)

Tuesday, April 1, 2008

The rack of lamb, undressed

I was checking out the lamb rib chops at Fresh Pond Market, when the vision of a juicy rack of lamb came to me. "Could you give me a rack not cut into chops?" I asked the butcher. "Sure," he said, "but you have to buy the whole thing. We don't sell it per pound. It's $28 per rack." Taking a whole rack didn't seem like a problem since a rack normally serves two. But since I normally see prices of meat per pound, I was trying to figure out in my head whether that was cheap or expensive and whether we should have a rack of lamb for dinner on a random Tuesday night. But before I figured it all out, the little red nuggets sitting on their bones like lollipops on a stick got the best of me. I was suddenly a kid in a candy shop and I couldn't resist. "I'll take it." The butcher disappeared for a few minutes and then handed me a paper package.

When I got home, I sharpened my boning knife and got ready to trim my lamb before coating it in rosemary and garlic. I unwrapped the package, and my jaw dropped. It was all gone. The flap, I mean, and all that fat, and connective tissue that normally sits on top of that little red nugget called the "eye." Was I sad that the butcher got rid of about a quarter of my rack? No! On the contrary, I was jubilant. Finally, there is a butcher in Boston who trimmed the rack of lamb to my liking.

I've never had any luck asking butchers to prep the meat for me and after a few years I gave up. With fishmonger, its a different story. I am always asking them to scale, gut, trim the fins, remove the gills, fillet, debone, and skin to make my life easier. But butchers... They always try to convince me that all the fat and connective tissue is "the good stuff that gives the meat its flavor." At first, I tried to listen. But when time after time, we ended up pushing the chewy pieces towards the edge of our plates, I gave up and started striping racks of lamb to the very eye. After getting over the shock of how much I had to throw away, I was much happier with the final results. Now the herbs and spices were stuck to the yummy part and were not discarded with all those chewy pieces. Every bite was sublime, and eating was a joy, not an obstacle course.

How come more butchers don't trim their meat? My guess is that it's all about marketing. If they sold the meat already trimmed, they'd have to raise their prices by 20-30% and lose some customers. And if they trimmed it after weighing it, most customers would be upset that after paying for 2 Lbs of meat, they only brought home one and a half. With fish, the story is more clear cut. I've never seen anyone upset that they didn't get the scales, gills, and guts. But with meat, it's a bit more fuzzy. It's also tricky that whether to trim the meat or not depends on the cut and the method of preparation.

With tough cuts that are going to be braised or cooked slowly to that fall-off-the-bone texture, the answer is easy. You can cut some of the fat cap off, but don't trim the connective tissue. You'll be cooking that piece of meat for so long and at such a low temperature that the connective tissue will melt away leaving you with spoon tender and moist meat. This happens when the internal temperature of the meat reaches 200F. But when you are cooking your meat to medium-rare (120-130F internal temp for beef, lamb, and veal) the connective tissue is not going to melt and it's best to trim as much of it off as possible.

What makes it psychologically difficult is that the cuts that don't require additional trimming are the cheap ones, and the cuts that do are pricey. Throwing away a quarter of the $18/Lb meat, just doesn't seem right. That's why I like Fresh Pond's policy of buying a whole rack. When there is no per pound price, they don't have to worry about giving me less meat than what I paid for. I paid for one beautiful rack of lamb and that's what I got.

A little about anatomy of a rack. A rack of lamb is equivalent to rib-eye cut from a cow. The eye is bigger on one side of the rack than on the other. On the side where the eye is biggest, I prefer to trim all the way down to it.

But on the side where the eye is smallest, I prefer to leave a little bit of the flap.

This makes the rack more even and allows it to cook to a more even internal temperature. My lovely butcher at the Fresh Pond Market even got this subtle thing right. See how he left a little bit of the flap on the smaller end? So sometimes, a bit of the fat cap or flap can be useful. On a New York strip, I keep a little on the skinny end of the steak to protect it from overcooking. But you always have to ask yourself: what is this stuff doing here? If the answer is that it's here because I paid for it, you might not be eating the best possible steaks and roasts. If this sounds wasteful, think about it this way. You are saving your body from saturated fat consumed with less than the optimal amount of pleasure.