Wednesday, November 30, 2005

Fig and Blue Cheese Tartlets

Of all the great appetizer I picked up from Ruth-Anne Adams while working at Casablanca in Cambridge, this one is my favorite. These little tartlets are great crowd pleasers and reheat beautifully if made in advance. What better way to welcome your guests to the holiday table than a combination of musky figs and creamy blue cheese! Serve them with a bold, fruity Shiraz as an hors-d'oeuvre or the first course.

Makes 18 tartlets

Fig Filling
1 Tbsp olive oil
1 cup sliced shallots (about 2 large)
3 cups dried figs, quartered
1/4 preserved lemon (or zest of 1 lemon plus 1/2 tsp salt)
2 rosemary sprigs
3 Tbsp balsamic vinegar
3 Tbsp honey
1/4 cup red wine

  1. Set a heavy pot over medium-low heat. Add oil and shallots and cook stirring occasionally until shallots are tender and golden brown, 6-8 minutes.
  2. Add figs, lemon, rosemary, balsamic vinegar, honey, and wine. Cook on low stirring occasionally until the mixture thickens and turns deep brown, about 15 minutes.
  3. Take off heat and cool slightly. Figs can be prepared several days in advance and refrigerated.

To assemble tartlets
Cooking spray
1 Lb package fillo dough, thawed
Olive oil for brushing dough
Fig filling (see above)
4 oz mascarpone cheese
1/2 Lb “Great Hill Blue” cheese (or other mild blue cheese), crumbled

  1. Preheat the oven to 400F. Set the racks in the middle and bottom-third positions.
  2. Spray muffin pan with cooking spray or brush with oil.
  3. Lay out 5 layers of fillo dough brushing with olive oil between each layer. Keep the rest of the fillo covered with a damp paper towel.
  4. Cut the dough into squares 4 inches on each side. Fit the squares into muffin cups and repeat to make a total of 18 tart shells.
  5. Fill each tart with 1 Tbsp fig filling and top with 1/2 tsp mascarpone and 2 tsp blue cheese.
  6. Bake tartlets in the middle of the oven for 8 minutes. Move to the bottom-third and bake another 4 minutes or until golden brown.
  7. Let the tarts cool for 5 minutes, remove to a serving platter, and serve hot.

Tartlets can be made up to a day in advance, cooled, and refrigerated. To serve reheat at 375F for 8-10 minutes.

Tuesday, November 29, 2005

Let's go shopping!

Not that kind of shopping -- fish shopping :) Over Thanksgiving I had a chance to organize my thoughts on the topic of buying fish. Sorry this is a bit long -- I guess I had a lot of thoughts.

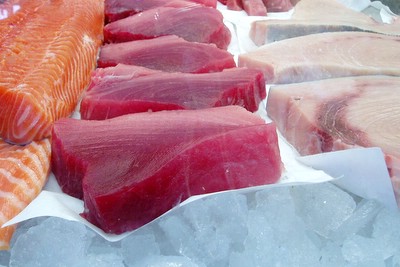
A good fish counter gives me the same thrill as a Provencal fabric market – all those beautiful colors and textures tempting me with possibilities. There is salmon, showing off its orange flesh accented by thin stripes of succulent fat. The bluefish is draped like gray velvet of a cozy robe. The stately halibut stands out like a bride in a white satin gown. Delicate fillets of sole are piled like transparent folds of chiffon. But I remember the times when fish shopping was scary, unpredictable, and smelling of disaster. Why? Let’s see:
  • This little shack looks like it’s about to fall over. Is it safe to buy fish here?
  • Is it bad that it smells fishy?
  • What if the fish is not fresh and will make me sick?
  • My recipe calls for “striped bass” and they don’t have it – help!
  • How much fish do I need for 2 people?
  • What on earth is “sable”?

Does that sound familiar? The worst part is that fish is not cheap, so buying an unfamiliar fish at $15/Lb might seem a bit risky. But luckily, I had an ally in my quest to buy and cook fish – the fishmonger.

The Fishmonger

Until I met Mike, salmon used to be my fish of choice. It’s reliably available, fairly inexpensive, and familiarly pink. But one day, I asked Mike if there is some other fish he can recommend for me to try. He raised one of his heavy dark eye brows and I noticed a sparkle in his eye. “The bluefish is really excellent today. It just came in.” I eyed the strange looking gray fish with hesitation. “What is it like?” I asked starting to regret my curiosity. Mike was sounding so enthusiastic about it that I would not have the guts to say no, and might have to take that strange critter home. “It’s delicate and very flavorful, Miss. And it’s almost impossible to dry out. How are we cooking it?” “I was going to broil it.” “Great! It’s also great grilled.”

I couldn’t have had a better introduction to bluefish. The success of my first venture beyond salmon helped me trust Mike and encouraged me to be nosy in fish markets. The amazing thing is that I never seem to run out of questions and the fishmongers never seem to tire of answering them. Here are some questions you can ask your fishmonger to break the ice.

If they are reluctant to answer them, consider going to another fish market.

Q: When did the fish come in?
A: A competent employee of a fish market should know (or be willing to find out) when a particular fish came in because it’s essential for telling you how long you can keep it before cooking. “Yesterday” is a perfectly good answer. Fin fish (unlike shellfish) is fresh for about 1 week after it was caught.

Q: How long can I keep it before cooking?
A: Fresh fish can be stored for at least 2 days in the fridge before cooking. If the fishmonger says you can only cook it today, the fish was stored too long at the fish market.

Q: What is this fish like?
A: A good fishmonger tasted most fish she sells. She should be able to give you a description of the texture, flavor, and fat content.

Q: What are some good ways to cook this fish?
A: If you are new to cooking fish, asking fishmonger for recommended cooking methods can steer you away from a disaster of grilled sole or poached swordfish. If you are in a mood to grill or in a mood for a light dinner of simple steamed fish, don’t hesitate to tell your fishmonger. They’ll often be ready with a great recommendation.

If the fishmonger can answer all those questions with confidence, you know you are in good hands. You’re more likely to encounter expert fishmongers in small Mom and Pop shops than in chain supermarkets, but you never know. Mike was a fishmonger in a regular Boston supermarket chain. Many supermarkets have excellent fish departments, particularly organic chains like Whole Foods. The trouble with non-organic chains is that they can be extremely inconsistent in the quality of their fish department from one store to the next. It all depends on the manager of their fish department, not on the brand of the supermarket chain. This brings us to the topic of what a good fish market looks like.


The Fish Market

Here is a check list you can use to evaluate the fish market.

  • Floors should be clean.
  • The market should be well lit so that you can see the fish well.
  • All steaks and skinless fillets should be stored on cookie sheets or parchment paper set on ice. They should not come in direct contact with ice so that their flesh is not damaged by melted ice.
  • Large fillets with skin, like a whole side of salmon can either be stored like skinless fillets or placed directly on ice since the skin creates a barrier between the flesh and ice.
  • All whole fish should be buried directly in ice. Since they have the skin to protect them from water.
  • The fish should have a very mild smell or none at all. You can ask the fishmonger to hold out a fillet so that you can smell it. If you don’t feel comfortable doing that, smell the fish when you get home.
  • Whole fish should have clear eyes and bright red gills without any brown discoloration.
  • There should be no gaps between the flakes of fillets (except for the center of the fillet where the pin bones were removed) and fillets should be glistening and feel firm to the touch. You can ask the fish monger to press the fillet with their fingers. If the flesh doesn’t bounce right back and you can see the indentation where the fingers touched the fish, the fish was mishandled. If you don’t feel comfortable asking the fishmonger to do that, check the fish when you get home.

Fish on Mondays
Monday is not the best day to buy fish. Fish markets do not get deliveries on Monday because fishermen don’t fish on Sunday. Even in the best fish markets, the selection of fish on Monday is likely to be smaller than on other days. It’s perfectly safe to buy and eat fish on Monday, but I don’t recommend keeping it until the next day.

After talking to several fishmongers in the Boston area, I found out that this "don't buy fish on a Monday" rule no longer applies. Some fish are actually delivered on Mondays. It all depends on where they are coming from. Since fin fish stay fresh for about a week after they are caught, it's perfectly reasonable to buy them on any day of the week.

Ready, Set, Cook!
Ready to cook fish is a pleasure to bring home. Here are some chores a fishmonger would be happy to help you with at no extra charge:

  • Cleaning a whole fish (scaling, gutting, removing gills, and fins)
  • Filleting a whole fish
  • Removing skin from fillets

Just remember to ask!

Finding a fish market near you
Word of mouth is the best way to find a good fish market. Ask your co-workers, neighbors, and friends. If you like fish dishes at a local restaurant, ask the chef for advice.

With growing popularity of food related newsgroups on the internet, the “word of mouth” got a whole new meaning. Here are two newsgroups organized by geographic area where you can post questions:
www.chowhound.com
www.egullet.com

Wednesday, November 23, 2005

Halibut Dressed as T-Bone? Mais Oui!

There was a good article in NY Times today about David Burke's view on fish: if it doesn't have fat, flavor, and caramelization, it's not worth eating. "I don't want to go out and order red snapper with fava beans," he said, "It just doesn't do it for me." He is no fish phobe; he just thinks that fish should be treated with the same culinary bravado as meat rather than left in the timid health-food-land. He cooks all fish with the skin and on the bone to preserve every bit of moistur and fat.

Fat=Flavor

and it's to be sought out, not thrown out. When cooked this way, even mild halibut can withstand a steak treatment with pepper, a good sear, and all. Burke also recommends that you don't rush to flip your fish -- really let it brown.

Browning=Caramelization=Flavor

I have to say that I greatly agree with him. One of the reasons I cook fish 3-4 times a week is because I treat it like meat. I am not stingy with salt and usually go for bold flavors. I sear, grill and broil more than poach, steam, and bake. Just because it tastes good, doesn't mean it's bad for you. The Gods of healthy eating don't always require sacrificies.

Halibut Dressed as T-Bone (NY Times link requires registration)

Tuesday, November 22, 2005

Salmon Teriyaki

In spite of what the title of the blog might imply, I love salmon. One of my students just reminded me about the Salmon Teriyaki dish we made in One Fish, Two Fish, Red Fish, Blue Fish class, and I was inspired to make it for dinner. It was the first "real" fish dish that I learned to make in college, and it's still one of my favorites. Thanks for a great idea Natalie!
Fish Substitutes: Steelhead trout, arctic char

Serves 4

1/4 cup duck sauce or “sweet and sour” sauce
1/4 cup teriyaki sauce or Tamari soy sauce
1 inch ginger, peeled and finely grated (optional)
4 Salmon fillets with skin or steaks, 6-8 oz each
Salt and pepper
  1. Preheat the oven to broil*. Wrap a broiler pan with foil.
  2. Mix duck sauce, teriyaki sauce, and ginger (if using) in another baking dish large enough to hold salmon in one layer.
  3. Season salmon with salt and pepper. Place the salmon in the dish with sauce and turn to coat on both sides.
  4. Place salmon in the broiler pan skin side down (reserve the teriyaki sauce). Broil 4 inches away from the flame for 4-6 minutes or until nicely browned. If the thin parts start to burn, cover them with foil.
  5. Turn the oven down to 400F.
  6. Pour the reserved teriyaki sauce over salmon and finish in the oven so that the total cooking time (broiling + baking) is 8 minutes per inch of thickness. To test for doneness, separate the flakes in the thickest part of the fish with a fork and peek inside. Salmon is well-done when a trace of translucency remains in the center.**
* Note on broiling: Only gas broilers work well enough to brown the fish. If you have an electric oven, it's best to preheat it to 425F, flip the salmon onto its skin in the dish with the sauce, and bake for 10 minutes per inch of thickness. It won't brown, but will still be excellent.
** Note on doneness: Salmon tastes best slightly undercooked and it's safe to eat it that way. Feel free to take it off the heat when the center is pretty translucent.
We are going to visit family over Thanksgiving, so I'll be away for a while.
I wish you all a happy and very yummy Thanksgiving!

Sunday, November 20, 2005

Seared Tuna with Pomegranate Topping

With all those beautiful pomegranates appearing in our stores, it was impossible to resist making Ruth-Anne Adams' pomegranate almond topping. Oh sorry, let me back up. Ruth-Anne is the chef at Casablanca restaurant where I did my internship. Her beet salad with this crunchy, juicy, sweet, and sour topping is one of my favorite fall dishes. The pomegranate topping is so good, I can eat it all by itself, but it does make a great accompaniment to salads, poultry, pork, and lamb. As I found out last night, it even goes well on fish as long as it's dense and bold like tuna. Although tuna with pomegranates seemed like an unusual combination, the celery root that I served with them pulled it all together beautifully. Silky tuna with creamy celery root, punctuated with a little juicy crunch -- yum! It was one of those dishes where the whole is much greater than the sum of its parts.

For tips on removing pomegranate seeds, see California Pomegranates site.

To make the topping, you'll need concentrated pomegranate juice (also known as pomegranate molasses). Although it's rarely available at regular supermarkets, you can buy it at most Middle Eastern grocery stores and over the internet. Russo's in Watertown, and Armenian stores in Watertown are some of the Metro Boston stores that carry it. It costs $2.50 - 3.00 (more if you buy it over the internet) and can be stored for up to 2 years even after opening.

Pomegranate Topping

1/4 cup toasted almonds, chopped
2 Tbsp capers, chopped
1 shallot, finely minced
Seeds of 1 pomegranate
1 Tbsp concentrated pomegranate juice
2 tsp honey
1 tsp olive oil

Mix all ingredients in a small bowl. This topping can be made several hours before serving and stored covered in refrigerator.

Seared Tuna with Pomegranate Topping and Creamy Celery Root

Serves 4

1/2 + 1/2 Tbsp butter
1 Tbsp olive oil
4 tuna steaks (6 oz each)
Salt and Pepper
Creamy Celery Root
Pomegranate topping (see above)

  1. Set a large heavy skillet over high heat. When it's hot, add 1/2 Tbsp butter and 1 Tbsp olive oil.
  2. Season tuna very generously with salt and pepper on both sides, and place in the skillet.
  3. Sear 1 minute per side for rare (2 1/2 minutes per side for medium -- I wouldn't recommend cooking it any more than that). Remove from heat and top with remaining 1/2 Tbsp butter.
  4. Divide celery root among 4 plates, top with tuna and pomegranate topping.

Dobby the Celery Root

Meet Dobby the Celery Root. Yes, I know -- only his own mother could love him. But when mashed with a little cream and butter, not only is he delicious with a little astringency reminiscent of celery, but looks appetizing enough to compete with mashed potatoes. This creamy little side dish is a perfect accompaniment for fish and lighter meats since it's not as ladenly starchy as potatoes.

Serves 4

2 large celery roots
2 Tbsp butter
Salt
2 Tbsp cream
  1. Peel celery root by cutting off its bumpy skin with a knife. It's too bumpy for a vegetable peeler. Cut into 2/3 inch dice.
  2. Set a large heavy pot with butter over medium heat. When butter is melted, add celery root. Season generously with salt and mix well. Turn the heat down to medium low, cover the pot, and braise until tender stirring occasionally, about 25 minutes.
  3. Add the cream and puree with an immersion blender or in a food processor. If celery root cools too much by the time you are ready to serve it, rewarm in 375F oven.

Saturday, November 19, 2005

Lazy man's butternut squash ravioli

I had a craving for butternut squash ravioli for weeks now, but haven't had time to make my own pasta dough. So, when I saw Diana's post over at Off the Bone about pasta with pumpkin, I had one of those "aha" moments. Of course! Why not just mix butternut squash with boxed pasta? It's not exactly the same as biting into a toothsome, silky wrapper of home-made pasta and having the creamy butternut squash burst out of it, but it's pretty darn close and a breeze to prepare.

Diana's Italian professor, who gave her the recipe, would not approve of my liberal additions to this simple dish, but I couldn't help it. I threw in some roasted portabellas and sage crisped in butter. My excuse for sage was that I needed to use it before it went bad. Can't think of any legitimate excuse for portabellas except that they taste so good with butternut squash.

Serves 4

1 small butternut squash
2+1 Tbsp olive oil
2 portabella mushroom caps
8 oz pasta
2+1 Tbsp butter
12 sage leaves
1 garlic clove, minced
1/4 cup grated parmesan
Salt and pepper
  1. Preheat the oven to 400F and set the rack in the lower third of the oven.
  2. Prepare a large pot of water with salt for pasta and bring to a boil while roasting veggies.
  3. Cut butternut squash in half lengthwise, remove the seeds, and cut into 3/4 inch slices. You don't have to peel the squash since the skin tastes good when roasted.
  4. Season squash generously with salt and pepper, drizzle with 2 Tbsp olive oil and spread in a large shallow baking dish in one layer.
  5. Roast in the lower third of the oven for 30 minutes. Flip and roast another 20-30 minutes or until very tender and slightly caramelized.
  6. After flipping squash, season mushrooms with salt and pepper, drizzle with 1 Tbsp olive oil, and add to the butternut squash baking dish if there is room or another baking dish. Roast 20-30 minutes so that the mushrooms and squash are done at roughly the same time.
  7. Slice portabellas 1/4 inch thick.
  8. Cook pasta according to box instructions.
  9. While pasta is cooking, set a skillet with 2 Tbsp of butter over medium heat. When butter is melted, add sage leaves in one layer. Fry until they stiffen slightly, about 1 minute. Flip with a fork, and fry until crisp, about 1 minute. Remove sage to a plate and set aside.
  10. Turn down the heat to low, add the garlic and cook until golden, about 1 minute. Take off heat and cool slightly, 2-3 minutes.
  11. Season garlic butter with salt and add a sprinkle of parmesan. Mix well.
  12. Drain pasta, and mix with butternut squash, mushrooms, sage leaves, garlic-sage butter and additional 1 Tbsp of extra butter. Sprinkle with cheese and serve.

Tuesday, November 15, 2005

Butt Ugly, but oh so good!

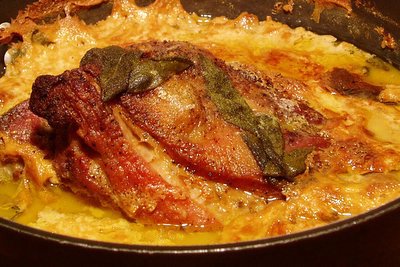
Boston Butt is not really a butt -- it's a pig's shoulder. It's one of the best cuts to use for a braise since it's tough and fatty and has lots of connective tissue. After 3-4 hours in the pot, it turns into fall-of-the-bone deliciousness. There are many great braising recipes for pork, but none as wonderful in their simplicity as Bolognese Style Pork Braised in Milk.

This dish is the ugly duckling (or should I say "ugly piglet") of the Italian cuisine. As the pork braises, the milk curdles and the sauce looks like something went badly wrong. Don't worry -- that's what's suppost to happen. It might not look pretty, but it all tastes great: the pork, the milk curds, and the separate liquid infused with lemon, garlic, and sage.

Unfortunately, I lost that Saveur magazine where I first saw this recipe couple of years ago, but here is my interpretation.

Note: If you live in Boston area, John Dewar is a great place to buy Boston butt. Yes, I know their prices are normally outrageous ($30/Lb for rack of lamb anyone?), but I got my Boston butt there for only $2.99/Lb. No, there is no typo -- the decimal point is after the 2 :)

1 Tbsp olive oil
3 Lb pork shoulder or roast
8 cups of milk (roughly)
6 garlic cloves, peeled and left whole
10-12 sage leaves, whole
Zest of 2 lemons, taken off with a vegetable peeler
Salt and pepper
  1. Preheat the oven to 300F.
  2. Dry the pork on paper towels and season heavily with salt and pepper.
  3. Set a heavy pot that is deep enough to fit the pork over high heat. Add the oil and wait for it to heat up. Add the pork fatty side down and let it brown. Turn it several times until it is brown on all sides.
  4. When you place the pork on its final side, turn down the heat to medium, add the garlic and cook until it is golden.
  5. Add the sage leaves and lemon peel and cook until fragrant, about 1 minute.
  6. Pour in enough milk to barely cover the pork. Season milk generously with salt (taste and correct seasoning), and bring to a simmer.
  7. Partially cover the pot and set in the middle of the oven. Cook until the milk curdles and turns golden brown, 3-4 hours.

Monday, November 14, 2005

Blue Cheese Pizza with Figs and Pears Recipe

Here is a recipe for the pizza I wrote about on friday. Actually, it's a recipe for the toppings. They will work on top of your favorite pizza dough baked your favorite way. I usually bake mine on a pizza stone in the bottom of the oven for 8-12 minutes at 500F to get it nice and crispy. If you haven't made pizza before, check out Stephen's blog for basic technique.

Sticky Figs
15 large dried figs
1/8 Moroccan Lemon, sliced paper thin (or zest of 1 lemon plus a generous pinch of salt)
5 rosemary sprigs
1 Tbsp honey
1 Tbsp balsamic vinegar
1/4 cup port or (1/4 cup red wine plus a little extra honey)

  1. Trim and half figs.
  2. In a medium sauce pan, combine figs, rosemary, honey, vinegar, and port. Cook over medium heat until the liquid turns syrupy and coats the figs, 10-15 minutes.

You'll probably end up with more figs than you need for the pizza, but you can use the leftovers with roast meats or on a cheese plate.

Caramelized Onions
2 Tbsp olive oil
1 red onion, sliced
2 tsp balsamic vinegar
Salt

  1. Set a large skillet over medium heat. When hot, add the oil, onions, and generous pinch of salt. Cook stirring occasionally until onions are tender and golden brown, 8-10 minutes.
  2. Add balsamic vinegar, reduce heat to medium-low, and cook until onions are deep brown, 5-6 minutes longer.

For 14" pizza
1 pizza dough (store bought is fine)
Flour for rolling out the dough
Lots of corn meal
some pinenuts
some shreaded mozzarella (about 1 cup)
some crumbled blue cheese (about 1 cup)
1 bosc pear, cored and sliced (optional)
some dried cranberries (optional)

  1. Roll out the dough on a floured surface to 1/4 inch thick.
  2. If baking directly on the stone*: Place pizza on a peel very heavily sprinkled with corn meal or semolina. If you don't have a peel, an unside-down cookie sheet covered with parchment paper will do the trick (don't forget the corn meal). Alternatively, place pizza on a cookie sheet.
  3. Spread a layer of onions, then figs. Pine nuts make a great addition. Sliced pears and/or dried cranberries are good too, and can even be used in place of figs. Top with shredded mozzarella and crumbled blue cheese. Sorry, I don't have exact measurements. But you are not really going to measure your pizza toppings, are you?
  4. Position the peel with the pizza over a pizza stone and yank the peel from under it. Or place the cookie sheet with pizza on the stone (or directly in the oven if you don't have the stone). Bake until the cheese melts and the crust browns, 8-12 minutes at 500F.

*Warning: Transfering pizza with toppings onto the stone is a bit tricky and can result in toppings falling off and burning. To avoid having dinner to the sound track of your fire alarms, bake pizza on the cookie sheet unless you are an experienced pizza baker.

Saturday, November 12, 2005

Salt Cod and Potato Cakes


Have you noticed the stinky salt cod in your local fish market and wondered who buys this stuff? The French do (they call it Morue), Italians do (they call it Baccala), Spanish do (they call it Bacalao), and Portuguese do (they call it Bacalhau). So all those Mediterranean folks buy this thing that looks like fish jerky, and smell outrageouly fishy, and find some very creative uses for it. Brandade de Morue Spread is a specialty of Provence, and Italian fritters made with salt cod are some of the best fish cakes in the world.

Surprisingly, most salt cod actually comes from North American waters, not Mediterranean. At some point, cod was such a cornerstone of the New England economy that it earned itself a place in the State House in Boston. If you are ever on a tour, go see the sacred cod that hangs there. So, I think it's only proper that we Bostonians stop turning up our noses at salt cod and learn to cook with it.

Once you soak it in water for couple of days to remove the salt and then poach it in milk, it loses its aggressive saltiness and tastes like the sea. This recipe was inspired by Mario Batali's salt cod fritters I saw in Saveur about a year ago. He mashes salt cod with potatoes, cream, and garlic, shapes the mixture into patties, and pan-fries them. This is no fancy meal, but it's finger-licking good!

This is an easy recipe, but it takes some planning. I prefer to start it 3 days in advance. This gives me 2 days to soak cod, and 1 more day to chill the patties before frying them.

Serves 4 as the first course

1 Lb salt cod cut into 3" pieces
2 cups milk
4 halved garlic cloves
1 large Yukon gold potato
1/2 cup heavy cream
1/2 cup olive oil (divided)
Sliced rustic bread
Arugula for garnish
  1. Soak cod in a bowl full of cold water for 2 days, changing the water every 12 hours (I usually do it in the morning and in the evening). Remove cod from water and dry on paper towels.
  2. Put milk and half of the garlic into medium pot and bring to a boil over moderate heat. Immediately reduce heat to medium low and add cod. Simmer for 35 minutes. While cod is cooking, steam potato over a pot of boiling water for 35-40 minutes or until tender when pierced with a knife or toothpick. Remove cod from milk and cool. Remove potato from steamer and cool. Discard milk.
  3. Bring cream and the remaining garlic to a simmer over medium-low heat and cook for 5 minutes. Take off heat and cool for 10 minutes. Mash garlic with a fork.
  4. Peel potato and mash it with a fork in a bowl until smooth. Add 1/4 cup olive oil, cream with mashed garlic, cod, and mix well. Form the mixture into 3 inch long oval patties, cover and refrigerate for 30 minutes or up to 24 hours.
  5. Set a large non-stick skillet over moderately-high heat. Add 1/4 cup olive oil or enough to form 1/8 inch layer. When the oil is hot, put cod cakes into the pan in one layer. Fry for 2 minutes or until nicely browned, flip, and fry 2 more minutes or until browned on the other side. Remove the cakes to a plate, but don't turn off the heat.
  6. Put the bread slices in the skillet where the cod cakes were cooked, and toast until golden brown, 1-2 minutes. Flip and toast until golden brown on the other side. Serve fish cakes on toasts with lightly dressed arugula.

Friday, November 11, 2005

Blue Cheese Pizza with Figs and Pears


You can dress me up, but you can't take me out. We were all set on going out this Friday night. I even got dressed up for work so that we could go to Grotto. But I got so caught up at work that I forgot to make a reservation. Me, without a reservation on friday night -- it's unbelievable what Distributed Computing Toolbox can do to you. When I finally called Grotto at 4pm, they were booked.

After considering our other dining out options on this freezing Friday night, Jason and I decided to go home, open a good bottle of wine and make pizza. As usual, I cheated with the dough and stopped by Stella's pizza in Watertown to pick some up. To tell you the truth, I couldn't make better pizza dough if I tried. Jason is saying that even he couldn't make better pizza dough if he tried, and that's saying something (see his bread journal for more info). I cooked some dried figs with thinly sliced Moroccan lemons, balsamic vinegar, honey, and rosemary to get them soft, sticky, and deliciously savory. Rolled out the pizza dough, topped it with caramelized onions, sticky figs, Bosc pear that I meant to use for some days now, dried cranberries, pinenuts, mozzarella, and Great Hill Blue Cheese.

Jason is dragging me away from the computer now, so if you want a recipe, drop me a line, but I just wanted to say that this was just the kind of dinner I was craving this Friday night -- homey and absolutely yummy :)

Tuesday, November 8, 2005

Lentils with Caramelized Brussel Sprouts

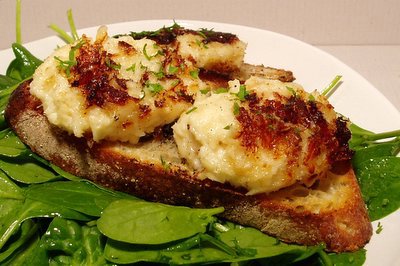
Lentils and Brussel Sprouts -- every kid's nightmare and my delight. I think the reason American kids have such immense dislike of all things green is that they've been fed steamed vegetables their entire childhood. So if you've had some bad childhood experiences with brussel sprouts, try this recipe. It's better than therapy for recovering from bad childhood memories.

And about those lentils... I know it sounds strange to give thumbs up to a cookbook I don't even have, but I owe those impeccable lentils to Judith Barrett, the author of Fagioli: the Bean Cuisine of Italy. I saw her recipe for lentils in Boston Globe a while ago and that's how I learned to cook perfect lentils -- whole beautiful little beads of earthy goodness, not mushy yet perfectly tender. The trick is to not cover the pan, cook them on very low, and add salt only when they are almost tender. Adding salt late in the cooking of beans is a common trick, but cooking them uncovered is the tip I haven't seen in other books. In my experience, lentils and beans taste best when cooked a day in advance and stored in their liquid.

Serves 4

Brussel Sprouts:
1 Lb brussel sprouts
2 Tbsp olive oil
1 tsp honey (optional)
2 tsp balsamic vinegar (optional)
Salt and pepper
  1. Preheat the oven to 425F.
  2. Cut off the ends of brussel sprouts and cut them in half. Place them in a baking dish large enough to hold them in one layer and toss with olive oil, salt and pepper.
  3. Roast in the bottom third of the oven for 20 minutes. Stir, drizzle with honey and vinegar (if using), and roast another 5 minutes.
Lentils:
2 cups French green lentils (du Puy lentils)
6 cups water
1/4 cup dry white wine
1 Tbsp olive oil
2 Tbsp butter (divided)
1 large onion sliced
2 tsp Dijon mustard
1/2 cup heavy cream, lightly whipped
Salt
  1. Combine lentils and water in a large pot. Cover and bring to a boil. Uncover immediately. Turn down the heat to low and cook at a bare simmer until almost tender, about 20 minutes.
  2. Add wine and season generously with salt. Cook another 5 minutes. Take off heat.
  3. Set a large skillet over medium heat. Add 1 Tbsp of oil and 1 Tbsp of butter. When melted, add the onions and generous pinch of salt and cook until golden brown, stirring occasionally, about 10 minutes.
  4. Drain the lentils reserving the cooking liquid.
  5. Add the lentils and 1 Tbsp butter to the skillet with onions and mix well. Keep warm over low heat.
  6. Put the liquid back into the lentil pot and reduce by half over high heat, about 5 minutes.
  7. Stir in the mustard until dissolved, then whipped cream. Taste and correct seasoning.
  8. Serve lentils topped with mustard cream sauce and brussel sprouts.
Note: The brussel sprouts and lentils taste great even without mustard cream sauce. You can also serve them as two separate dishes.

Sunday, November 6, 2005

In Helen's Kitchen

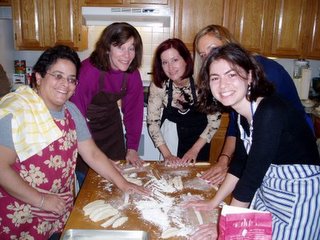
I did it--I taught a cooking class in my own kitchen! After teaching at CCAE for several years, I decided it would be fun to offer classes to groups of 6-8 people who know each other and like playing with food. It was also a welcome change to cook with my own equipment without having to drag it somewhere else. We cooked, we drank wine, we laughed, we took pictures, and we had a great time. The only problem was that we ended up with too much food.

The theme of the class was "Fall Harvest". We made:

Here we are enjoying our salads, wine, and cheese


Gnocchi (left) and Swordfish (right)

We learned all kinds of cooking techniques: from infusing butter with sage to testing fish for doneness. The most important tip was using the "claw grip" to cut veggies and herbs -- that's how we made sure to slice the onions, not our fingers.

Thank you so much to Kristin, Mike, Loren, Helen, Audrey, Carly, and Greg! I loved cooking with you guys.

For more information, check out the Helen's Kitchen website.

Thursday, November 3, 2005

Sea Bream with Fennel and Oranges

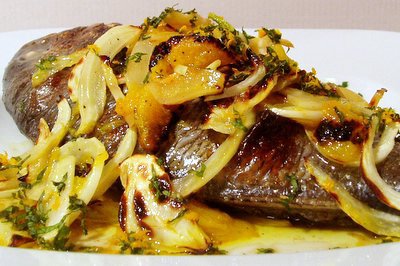
Sea Bream is a small fish with flavorful white flesh and delectable skin. It often appears in fish markets under its European names: Dorade, Dorado, and Orata. It weights about 1 Lb, yielding 6-8 oz of meat -- just right for one portion.

Broiling is a great method for browning the skin of a whole fish without one of those oval fish skillets. This is also one of my favorite ways to cook fennel. It soaks up orange and fish juices and gets beautifully caramelized and sweet.

Fish Substitutions: This recipe works with any whole fish that is small enough to fit under the broiler (under 2 1/2 Lb): Red snapper, Mediterranean bass, Black Bass, Trout, and Arctic Char are all good substitutions.

Serves 2

2 whole sea breams, scaled, gutted, gills and fins removed
1 1/2 Tbsp olive oil
1 fennel bulb, thinly sliced (white part only)
Sections from 2 oranges (tip: see how to section an orange)
1 tsp balsamic vinegar (optional)
Herbs for garnish (fennel fronds, parsley, cilantro, or mint)
Salt and pepper

  1. Preheat the broiler. Wrap a broiling pan with foil.
  2. Rinse sea breams and thoroughly dry with paper towels in and out. Place in a broiling pan, season with salt and pepper in and out, and coat with 1/2 Tbsp of olive oil.
  3. In a bowl, toss fennel and oranges with remaining 1 Tbsp of olive oil and balsamic vinegar. Season with salt and pepper, and spread over fish.
  4. Broil fish for 10 minutes flipping half way through cooking time. The bream will be done at this point. For fish substitutions thicker than 1 inch, turn the oven down to 425F, and finish cooking in the oven so that the total cooking time (broiling plus baking) is 10 minutes per inch of thickness. Check if the fish is done by inserting a knife between the top fillet and the back bone. If you meet no resistance and can gently start to lift the fillet off the bone, the fish is done.
  5. Place the fish on serving plates, top with fennel and oranges, and pour the juices from the broiling pan over fish. Sprinkle with herbs and serve.

The New Deal Fish Market

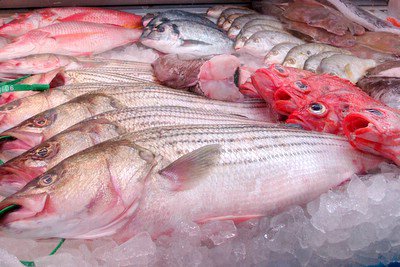
Stepping into the New Deal Fish Market in East Cambridge always makes me smile. Whole Foods might have good quality fish, but do they greet me by name? Do they remember which fish I bought last week? Do they take care scaling and gutting my fish as if they were going to cook it themselves? That’s why I love the New Deal Fish Market – they treat every customer like family, they educate people about fish, and they take pride in what they do.

Carl is the third generation owner, who quit his engineering job to continue his family’s business. If you need advice on how to cook any fish, just ask Carl. He’ll even give you his mother’s recipes from their family’s home town of Gaeta, Italy. His father, Sal is a walking encyclopedia of fish. First he asks you where you are from. Then he gives you a tour of the fish counter in YOUR language (Italian, French, Spanish, Portuguese, Japanese). You should see him fillet!

In this age of prepackaged fish soaked in preservatives, it’s refreshing to see the New Deal’s fish counter packed with whole fish. Although you can have any fish filleted to order, I just can’t resist the chance to get a nice little fish that I can cook whole. It’s no extra work for me, since Carl or Sal will clean it for me, and the fish tastes so much juicier and more tender cooked on the bone. This weekend I got a couple of Sea Breams (also known as Dorade in French, Dorado in Spanish, and Orata in Italian). Stay tuned for the recipe.

New Deal Fish Market
622 Cambridge St., Cambridge, MA
617-876-8227
Hours: Mon 3pm-7pm, Tue-Fri 10am-7pm, Sat 9:30-6:30, Closed Sunday

Tuesday, November 1, 2005

Buying and Storing Fish

Finding a Good Fishmonger and Fish Market
  • Questions to ask your fishmonger
  • Learning to judge if fish is fresh
  • Finding a good fish market
  • Fish on Mondays

Fish Buying FAQ
  • The fish market smells fishy. Is that a bad sign?
  • What about Fresh vs. Frozen fish?
  • What about Farm-Raised vs. Wild fish?
  • Is prepackaged fish any good?
  • How much fish should I buy?