Thursday, March 30, 2006

Radish spread

The gorgeous weather we've been having in Boston makes me want to drop everything and spend every waking moment outside (or in the kitchen cooking the spring veggies). You know what this means, don't you? I might have to do the unthinkable and spend a bit less time blogging. Gasp!

But I just had to tell you about this radish spread. It's as addictive as being outside on a beautiful spring day. It has only 3 ingredients and takes 2 minutes to make. So you have absolutely no excuse not to try it. If you like radishes, you'll love it. If you don't like radishes, you'll change your mind about them, I promise.

My favorite spring open-faced sandwich is a slice of bread with this radish spread and smoked salmon. Mmm -- particularly good when eaten on a picnic.

Radish spread

10 medium radishes, trimmed and quartered
2 Tbsp chopped shallots (or white parts of scallions)
8 oz whipped or regular cream cheese
Salt and pepper
  1. Combine radishes and shallots in a food processor and process until finely chopped.
  2. Add cream cheese and process until smooth scrapping down the sides of the processor bowl as necessary.
  3. Remove to a container and season with salt and pepper. Store covered in the fridge and use within 3 days.
What are you waiting for? Stop surfing the web and checking your e-mail. Pack yourself a nice little picnic basket and enjoy spring.

Monday, March 27, 2006

Technique of the Week: How to cook asparagus

I first saw asparagus on the packet of McCormick's Hollandaise sauce. We were invited for dinner to Nancy and Howard’s – an American family who was helping us adjust to our new country when we moved here in ’91. I was 13, and found US fascinating, particularly all the interesting foods. Baltimore suburbs were not what you’d consider a culinary destination, particularly in the early 90s. But I didn’t know that. All I knew was that this place had 5 brands of butter, cool fruits like mango, and strawberries in December -- completely unheard of in Russia at the time. So when I saw Nancy cooking asparagus and then pouring the yellow sauce from the special packet all over it, I was intrigued.

What was even more intriguing was that her kids wrinkled their noses when asparagus dish reached them, and passed it on without a moment’s hesitation. Since I was determined to try everything at least once, I plopped a few slippery spears that threatened to fall apart onto my plate. I barely managed to cut these mushy sticks into bite-size pieces. Not only were they mushy, they were stringy too. When I finally got to tasting one of them, I learned that Nancy’s kids were right. These frog-colored sticks were pretty bad.

US has gone through such a culinary revolution in the past 15 years that it’s hard to believe it’s the same country. You can now find celery root and sorrel in many supermarkets, figs are found not only in Fig Newtons, and restaurants serve duck liver and sweetbreads. By now, asparagus is as exotic as potato. And yet, most asparagus served as home is still the same brownish stringy mush it was 15 years ago. Most men and children still hate it, and most women righteously cook it (or dare I say overcook it) and pretend to like it because it’s good for you.

So, throw away that asparagus steamer (it’s a useless piece of equipment) and get ready to cook all the wonderful spring asparagus that’s now in season.

Trimming asparagus:

It’s best to trim asparagus by breaking off the thick end of each spear. It will naturally break at the spot where it is tender. Cutting the ends off with a knife will make it hard to guess just how much to take off since it varies from one spear to the next.

Peeling asparagus:

Peeling asparagus is optional and labor intensive. If you ask me it affects the presentation more than the taste. But if you want a perfectly delicate spear from tip to toe, you might want to peel the bottom 2 inches.

Unlike carrots and potatoes that are best peeled while being held in one hand, asparagus is easiest to peel while it’s lying on your work surface. Start 2 inches from the thick end and peel towards the end of the spear. Rotate the spear with your other hand and clean off your peeler after each spear. In my opinion, this tricky procedure is only worth it if you are blanching asparagus.


Method 1: Blanching (cooking in boiling water and then shocking in ice-bath)

This cooking method results in crisp, delicate, and refreshing asparagus.

Fill a large skillet with 2 inches of water and bring to a boil. Season generously with salt and add 1/4 tsp rice vinegar or lemon juice (this helps asparagus stay green).

Prepare a large bowl of water with ice.

Add asparagus to boiling water and spread it out in a pan. Cover and bring to a boil. Cook just until you can pierce its thick end with a fork, but still encountering a trace of resistance, about 2 minutes. Err on the side of undercooking.


Immediately remove asparagus with tongs and place in prepared ice water (this stops the cooking process instantly and prevents asparagus from overcooking).


Cool completely. Remove from water, and dry well on paper towels.


My favorite way to serve blanched asparagus is chilled as a first course or a side salad. This really shows of its crispness and freshness. Whisk together 1 Tbsp lemon juice, 1/4 tsp Dijon mustard (optional), and 3 Tbsp good olive oil. Season with salt and pepper. Arrange asparagus on a plate, sprinkle with a little kosher salt and drizzle with lemon vinaigrette. You can serve it as is, or top with lemon zest and finely shredded parmesan.


Method 2: Pan-frying

This cooking method results in full-flavored asparagus with great caramelisation. If you are going to convert someone into an asparagus lover, this is the way.

Set a large skillet over high heat. Add 2 tsp olive oil. Place asparagus in a pan in one layer and cook until one side is browned, about 2 minutes.


Turn asparagus with tongs to let the other side brown, about 2 minutes. Cook asparagus until bright green on all sides, constantly tossing it with tongs, about 1 minute.


Make sure to keep the spears lined up in the same direction during the whole time (this ensures they all get in contact with the pan).

Sprinkle with a little kosher salt and remove from pan.

You can serve pan-fried asparagus hot as a side dish or chilled as an appetizer. Try drizzling with a little balsamic vinaigrette or wrapping it in prosciutto – yum!


Whatever you do, don't cook asparagus in advance and "keep warm" as McCormick's suggests -- that's what makes it mushy and stringy. It only takes 5 minutes to make. So cook it last minute and serve immediately, or cook in advance and serve it chilled.

Sunday, March 26, 2006

Slow Roasted Salmon With Chive Oil

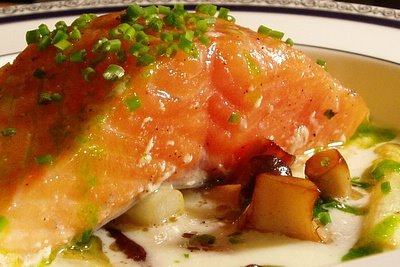
While surfing the food blogosphere this Friday afternoon, I stumbled on Is My Blog Burning event, hosted by Too Many Chefs. It's a monthly theme event that food bloggers from far and wide participate in, and this month's theme is to prepare a weekday dinner from scratch in 30 minutes or less. "That's too easy!" I thought. About 90% of fish dishes on Beyond Salmon are my weekday dinners and they all take less than 30 minutes. But then I realized that the deadline was this Sunday, which meant that I wouldn’t have a chance to make any more "weekday" dinners, and the plans I had for the weekend were not exactly 30 minute meals. Of course, I could post something I've made before, but that would be cheating.

I started working my way through the list of dishes I was planning to cook this weekend:
  • Pork tenderloin with polenta cakes and broccoli rabe -- nope, that needs a marinade
  • Rhubarb pie -- yeah right
  • Fresh pasta with pea pesto -- you are kidding!
  • Turnip soup with maple cream -- really easy, but has to simmer for a while
  • Slow roasted salmon with chive oil -- that's it!
How can something "slow roasted" be a 30 minute meal? Bear with me.

My rule of thumb for cooking fish is high heat (400F or higher) and quick cooking time (8-10 minutes per inch of thickness). But what are rules for, but to be broken? A while ago, on some website (maybe Chowhound), I heard of Charlie Trotter's slow-roasted salmon. The idea was to cook it at very low temperature, like 250F, until it's evenly medium-rare throughout. Even at 250F it will takes only 15-20 minutes. This idea captured my imagination, and after playing with it for a while I finally settled on a way to make a killer dish out of it. The trick is to be generous with salt when seasoning (this makes the salmon taste kind of like smoked salmon), and to take it out of the oven when it is still translucent (for that melt-in-your-mouth texture). And you know how smoked salmon is perfect with chive cream cheese? I borrowed that idea from New York bagel shops, and added a squirt of chive oil to the silky salmon. Its bright green notes are both savory and refreshing.

Wouldn't it be better to actually find Trotter's recipe? Maybe. But that would take all the fun out of it. I like messing around with the idea until I get it just right, and I hate following recipes. This is probably not the best thing to tell you right before giving you a recipe :)

Back to the 30 minute meal challenge. Our friends were coming over for dinner on Sunday night and I was planning to make a dressed-up version of the slow-roasted salmon. The salmon itself needs no prep work, and the chive oil can be done while salmon is roasting in about 2 minutes. But can I dress this dish up and still keep it under 30 minutes?

Ready, set, go! I snipped the tips of white asparagus and reserved them for later. Chopped up the stems and starting cooking them in a little water. 28 minutes remaining. While asparagus was cooking, I cleaned and chopped up some wild mushrooms and started cooking them Julia Child's way (with butter, squirt of lemon juice and port, first covered on low, then uncovered and sautéed until browned). 18 minutes remaining. Oh good, asparagus was done. I added cream and pureed it with an immersion blender. Shit, I can still taste the skins! Oh no -- quick, put it through a sieve. Mmm, nice and creamy -- that's better. 10 minutes remaining. The mushrooms are starting to brown. Throw in asparagus tips and rinse the blender (good thing immersion blenders are easy to wash). 5 minutes remaining. Chop the chives, add the oil, and bzzzzzz (more immersion blender fun) -- done! I saved the 1 minute step of putting the salmon in the oven for when our firends got here.

Of course, I dirtied 3 pans and an extra bowl for the chive oil, and this was 30 very intense minutes. After a full day at work, it's hard to have enough concentration to go this fast. For a more realistic weekday version, skip the wild mushrooms and asparagus puree. Put the salmon in the oven, trim and sautee asparagus (green or white), and make the chive oil. And have yourself a 20 minute no stress meal.

Slow Roasted Salmon With Chive Oil

Serves 4

For Chive Oil
1 bunch chives, coarsely chopped
1/3 cup olive oil
Salt

For Salmon:
4 salmon fillets with skin (6 oz each)
salt and pepper
2 tsp butter, plus more for buttering the pan

For Sauce and Sides:
1 Lb white asparagus, trimmed
2 Tbsp heavy cream
1 Tbsp butter
12 oz fresh wild mushrooms, trimmed and coarsely chopped
1 tsp lemon juice
2 Tbsp port or red wine
Salt

Chive Oil:
  1. Puree chives and oil in a blender or food processor (immersion blender works best). Season with a pinch of salt.
Salmon:
  1. Preheat the oven to 250F. Butter a baking dish.
  2. Generously rub salmon fillets with salt and pepper, and place them in a buttered dish skin side down. Top each piece with 1/2 tsp butter and place in the middle of the oven for 18 minutes per inch of thickness. Salmon is done when you can insert a knife between the flakes without much resistance (it should feel like cutting through butter), but it is still translucent inside and out. Don’t wait for it to flake!
While salmon is cooking, make the sauce and sides:
  1. Set a small saucepan with 1/2 cup salted water over high heat and bring to a boil.
  2. Cut of the tips of asparagus (1 inch), and reserve for later. Cut the stems into 1/2 inch pieces and put in a saucepan with boiling water. Cover and cook until tender, about 4 minutes. Take off heat, add cream and puree with a blender or a food processor. Put through a fine sieve, pressing hard on solids. Taste and correct seasoning. Return to the saucepan and keep warm on low heat.
  3. Set a large skillet over medium-low heat. Add 1 Tbsp butter and wait for it to melt. Add mushrooms, lemon juice, and port. Season with salt. Cover and cook until mushrooms give off the liquid, about 6 minutes. Uncover, turn up the heat and cook stirring occasionally until starting to brown, about 3 minutes. Add asparagus tips and cook stirring occasionally until mushrooms are brown and asparagus tips are tender, about 3 minutes.
  4. Divide asparagus puree among 4 plates. Top with sautéed asparagus and mushrooms. Place a piece of salmon on top of each plate. Spread a teaspoon of chive oil on top of each piece of salmon. Drizzle a little more chive oil over the plate and serve.
Note: You'll have plenty of chive oil leftovers. Keep them in the fridge for up to 3 days. Use as a bread dip and a topping for fish and pasta.

Thursday, March 23, 2006

My First CSA share

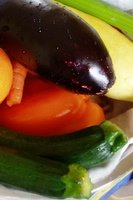
Until last summer, most of the food blogs intimidated me. They had stunning photography that looked like something out of Gourmet and clever stories that their authors churned out 4-5 times a week. How on earth did they manage to do that while having a full-time job simply amazed me.

I was happy writing about food on my little website and never considered starting a food blog until one day I found the Seasonal Cook. To tell you the truth, I don't remember how I stumbled on her blog, but I instantly fell in love with her adventures in the kitchen. She was describing her experience with buying a share in a farm and relying on it for her vegetables during the summer and fall. I heard about the idea of Community Supported Agriculture (CSA) before, but Seasonal Cook's vivid prose made reading about it simply addictive. Each week I wondered what she'll get in her share. And once she annouced the ingredients of the week, my mind set to work coming up with yummy possibilities. It was like a veggie TV serial.

It didn't take me long to realize that we lived 10 minutes away from each other, and by the end of the summer we met in person. It felt so great to talk about food, farms, cookbooks, and restaurants without people looking at you funny (most of my friend think my obsession with food is a bit excessive). Shortly after that meeting I decided to start a blog and sign up for a CSA share.

Although the CSA season doesn't start for another couple of months, now is the time to sign up for it. The share I bought is from Brookfield Farm in Amherst, MA. The reason I chose this farm is that they deliver to several Boston area locations, which makes it very convenient for me. Thursday night, I'll have to stop by someone's house in Cambridge to get my box of freshly picked veggies. Then I'll have all of Friday to decide what to cook, and the whole weekend to implement my ideas. I've been waiting for the season to start the way kids wait for Christmas.

If this sounds like fun, check out the Brookfield Farm or other CSA farms, but do so soon as most of them have very few shares left. For a list of New England CSA farms, see the Seasonal Cook's blog.

Of course cleaning and chopping 12 Lb of veggies each week can be a bit overwhelming, and many of my students who bought a farm share before told me that they had a hard time keeping up with all the chopping. This gave me an idea to offer a knife skills class for beginners in Helen's Kitchen. What better way to start the farm share season than sharpening your knife and learning to slice, dice, and mince!

Wednesday, March 22, 2006

Goulash with Spaetzle

When your computer dies on a monday night, you know it's not going to be a good week. If you've been wondering why it's been so quiet on Beyond Salmon, that's why. Having to re-install windows and all my applications, dealing with physical therapy appointments for my back, vet appointment for our cat, and craziness at work was just too much. I don't mean to bore you with my whining, but is it friday yet? Sometimes you need an emergency weekend.

I was going to start this post with "Nothing was going right this week." But that would not be quite true. The goulash with spaetzle was going very right. In fact, this comfort food saved my sanity this week because I could count on a pot of this great stew waiting for me when I got home. I've been itching to make a goulash ever since Diana's post on Off the Bone about her trip to Budapest. Diana's description of this glorious stew reminded me of our honeymoon in Prague, and it suddenly dawned on me that I'd never tried making goulash before. This situation had to be remedied at once. I basically followed Diana's recipe, but couldn't help incorporating a bit of Julia Child's Boeuf Bourguignon technique, and an extra slow, extra long braise. The result was a spoon tender, melt in your mouth stew that is perfect for comforting people in distress (even ones with broken computers).

Serves 6-8

3 Lb beef chuck, cut into 1 inch cubes
2 Tbsp lard or oil
2 onions, finely sliced
2 medium carrots, finely sliced
1/4 cup sweet paprika
2 Tbsp flour
4 cups beef stock
4 garlic cloves, minced
1 bay leaf
Salt and pepper
  1. Preheat the oven to 300F.
  2. Dry the beef well on paper towels
  3. Set a large, heavy, oven proof pot over high heat. Add 1 Tbsp lard and wait for it to melt. Add as much beef as will fit in one layer without crowding the pot and brown well on all sides. You'll have to do it in batches. Remove beef to a bowl and set aside.
  4. Add the remaining Tbsp lard, onions and carrots to the pot and cover. Turn down the heat to medium-low, and cook stirring occasionally until vegetables are tender and starting to brown, 5-7 minutes.
  5. Turn up the heat to medium-high. Return beef to the pot, season generously with salt and pepper. Stir in paprika and flour. Cook stirring constantly until no streaks of flour remain. Continue to cook stirring for another minute.
  6. Add beef stock, garlic, and bay leaf. Bring to a simmer. Then cover and set in the middle of the oven for 3 and 1/2 hours. The stew is done when the beef is spoon tender.
Cool completely and store in the fridge for up to 4 days, or freeze. As all stews, this one tastes better when reheated.

Serve with spaetzle, noodles, potatoes, or just good crusty bread.

Monday, March 20, 2006

Food Psychology

"I didn't die or anything. I didn't even throw up -- so I guess they were not nearly as bad as I expected." That was Jason's response to my first attempt to make eggs en cocotte for him. The good news is that he still loves me (a really good ham and butter sandwich with those eggs must have helped :) He even claims that he is willing to give the eggs a second shot, but I think I should wait a while before putting him through this traumatic experience again.

I guess there are some dislikes that are set in stone by our memories or cultural expectations. We all have them. Even people who claim to eat everything (like me ;) have something they dislike to the core of their being.

You'll never guess what incredient is my worst nightmare. When I order tasting menus in restaurants or eat at friends' houses, I always hope and pray that I won't have an encounter with it. Of course, I could tell the restaurants that I am allergic, but I always worry about missing out on some great dish just because I don't eat this one little ingredient. It's white, it's mild, it's creamy, so innocent looking, and yet it has some unmistakable taste that I just can't learn to like. Have you guessed what it is? It's goat cheese. I know, it's hard to believe, especially that I love cow and sheep cheeses (hard, soft, runny, stinky, moldy -- I love them all). I even like goat meat! But goat milk makes me feel terribly uncomfortable. I have recently learned that the ickiness is mostly gone if the cheese is warm and melty. But if it's cold, I just can't stand it.

My parents tell me it's because of a bad experience I had with goat's milk when I was a kid. We were renting a house in the country side for vacation and the nearby goat farmer gave them some milk. I don't know what it's like in other countries, but in Russia parents are convinced that there is nothing better for their child's health than the warm milk right from the cow or goat. They say I hated it so much they never gave it to me again.

Interestingly enough, I don't remember this at all. I only found out about it because my Mom told me recently. I find my goat milk amnesia strange because I remember vividly everything I've ever eaten since I was 4 years old. Jason and I keep joking that I have culinary autism. But I don't remember the goat milk incident. It must have been such a terrifying experience that I blocked it out of my mind. I think I missed my calling as a food psychologist. I can totally see a session of food therapy: "So tell me, how did that Brussels Sprout make you feel?"

Thursday, March 16, 2006

Swordfish Kebabs with Aioli

I had some Aioli (garlic mayo) left after the Provence class that I taught this weekend, and I was looking for a good use for it that didn't involve bread. Don't get me wrong -- aioli spread on a good toast is pure heaven. But it would take a lot of bread to use up all my aioli, and calories (even consumed in heaven) do count. That's when swordfish came to the rescue. Marinating it in oil is a great trick for making it juicy and tender. And what is mayo, but a whole bunch of oil?

I cut up the fish into cubes, threw in some onion, zucchini, and peppers, poured aioli over the whole thing and mixed it up. Let it sit for half an hour, skewered and broiled. The results were succulent. You couldn't actually taste the mayo -- most of it got caramelized under the broiler giving swordfish and veggies that beautiful glow and gutsy flavor.

When I first heard from a friend about coating swordfish in mayo before cooking, the idea sounded a bit archaic to me. Isn't that what people in the 60's used to do -- drown everything in mayo? But I must confess -- that's not a bad strategy when it comes to swordfish.

Fish substitutions: marlin, mahi-mahi, or any other dense fish

Veggie substitutions: you can use any combination of summer squash, zucchini, cherry tomatoes, onions, and peppers. For a more exotic twist, add some pineapple.

Serves 4

For Aioli:
1/2 cup mayo (Hellmann’s works great, but don’t use low-fat)
2 garlic cloves, mashed
1 Tbsp lemon or lime juice
Cayenne pepper or hot sauce
Salt

For Swordfish:
1.5 Lb swordfish without skin, cut into 1” cubes
3 cups veggies cut into 1” cubes (see veggie substitutions above)
Salt and pepper
2 tsp chopped rosemary (optional)

  1. In a large, non-reactive bowl, mix mayo, garlic, and lemon juice. Season aioli to taste with cayenne and salt. Add swordfish and veggies to aioli, sprinkle generously with salt and pepper, and mix well. Let sit for 30 minutes at room temperature.
  2. Preheat the oven to broil and wrap the broiler pan with aluminum foil.
  3. Put alternating pieces of swordfish and veggies on skewers and place them in the broiler pan. Sprinkle with rosemary.
  4. Broil 4 inches from the flame for 4 minutes. Flip the skewers and broil 4 more minutes. To test for doneness, cut into one cube of fish. If only a trace of translucency remains, the fish is done. It will continue to cook after it’s off the heat and will be completely opaque by the time you eat it. Alternatively, you can grill swordfish over high heat for 4 minutes on one side and 4 minutes on another side.

Tuesday, March 14, 2006

Oeufs en cocotte (eggs baked in ramekins)

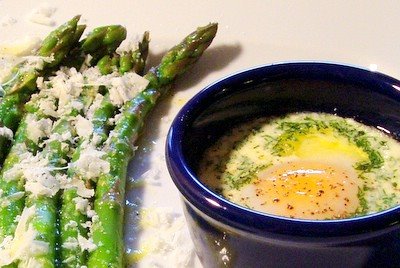
What do you eat when you are home alone? Everyone has some favorite food that the rest of their family can't master any enthusiasm for. Mine is not some obscure organ meat or strange animal -- Jason eats all of those. It's not even beets -- he started eating those about a year ago. It's simply eggs. Poor guy had a bad childhood experience at his friend's house with an egg casserole that scarred him for life. So, no eggs in our house for breakfast -- not sunny side up, not scrambled, not poached, and definitely not in a casserole.

Eggs are not a biggie for me. If he didn't eat fish that would be another story, but I can live without eggs for long periods of time. But if I ever end up working from home, like happened this Monday, I invariably end up making eggs for lunch. I usually go for an omelette or sunny side up, but after reading Clotilde's post on oeufs en cocotte on her fabulous Chocolate and Zucchini blog, I've been dying to try them. Since timing is everything with eggs, I decided to consult Julia Child's Mastering the Art of French Cooking for a second opinion. I only had 2 Tbsp of cream left in my fridge so failure was not an option. The whole procedure seemed straight forward enough:
  1. Preheat the oven to 375F.
  2. Butter the ramekin.
  3. Add 1 Tbsp of cream and optional flavorings (all I had was cilantro, so that became my flavoring).
  4. Set the ramekin in a pan filled with 3/4 inch of boiling water and wait for cream to warm up. Baking the eggs in a water bath keeps the egg white extremely tender.
  5. Break an egg into the ramekin and set the pan in the oven until the white is just set, but the egg is still jiggly, 7-10 minutes. Mine took 9.
  6. Sprinkle with salt and pepper. Scoop the cloudy white and liquid gold of an egg into your mouth. Moan with pleasure. I served my little treasure of an egg with blanched asparagus drizzled with lemon vinaigrette and parmesan.
This was so awfully good that I might try to make it for Jason this weekend. After 5 years of marriage, I've never attempted to cook eggs for him. Oh sure, I got him to fall in love with asparagus, sushi, and cauliflower, but eggs seemed to be a painful subject I just didn't want to raise. However, something happened last week that gave me hope. I tried making a mushroom leek quiche following Papaya Pâté's instructions for custard and Jason thought it was seriously good and didn't mind the eggs at all. Of course, a cup of cream probably helped, but making sure the eggs were not over beaten or over cooked might have had something to do with it too.

Will Helen risk her marriage for the sake of eggs? Come back on Sunday to find out.

Sunday, March 12, 2006

Technique of the Week: Rolling out and baking tart dough

In the last installment of Technique of the Week, we left off with tart dough waiting patiently for the tart baking day in the fridge or the freezer. The baking day has arrived. Your mission should you choose to except it is to roll out the dough without letting it crack and bake it without letting it get soggy from the filling. What you want is a perfectly crispy, buttery, and flaky dough that is so good not even your scrumptious filling can overshadow it. Here is a step by step guide on how to do it.

Special equipment
Pastry scraper
A tart pan
4 cups dry beans or rice
Pizza stone (optional, but handy)

If the dough was frozen, move it to the fridge 1 day before rolling it out, then proceed as follows.

Rolling out the dough

Step 1: Remove the dough from the fridge 30 minutes before rolling it out. This will let the butter soften and make it easier to roll out.

Step 2: Roll the dough on a floured surface with a floured rolling pin to 1/8 inch thick. Start rolling in the center of the dough and roll away from you. Turn the dough 1/4 turn after each roll. Clean off your pin of dough scraps periodically.


If the dough cracks around the edges when you start to roll it, pick it up with floured hands, and squeeze the edges together to merge the cracks, then continue rolling.


If the dough starts to stick to the counter, slide the pastry scraper under it to unstick, move the dough to the side, and add more flour to the counter. It’s normal for the dough to crack around the edges. If you get a crack that is so large it will show once the dough is fitted into the pan and trimmed, you will need to patch it. Cut a piece of dough from an edge where you have extras, wet your finger and brush the edges of a crack, then glue your patch on top of the crack and press it down with your palm. Sprinkle with flour and roll over the patch with your rolling pin. Slide a pastry scraper under the patched part of the dough to release it from the counter.


Step 3: Flip the dough over the rolling pin and transfer to the tart pan.


Fit the dough into the sides of the pan without stretching it and press it into the grooves.


Roll the rolling pin over the top of the dough to trim the excess.


Step 4: Chill the dough in the fridge for 30 minutes while preheating the oven.

Pre-baking the tart shell

Step 1: Preheat the oven to 400F with a rack in the bottom third of the oven. If you have a pizza stone, place it on the rack.

Step 2: Line the tart shell with parchment paper or foil and dry beans (or some other weight) and bake in the bottom third of the oven for 18 minutes.

Step 3: Remove parchment paper with beans, lightly poke dough with a fork at 1/2 inch intervals to prevent it from puffing up, and return to the bottom third of the oven for 5 more minutes. Cool the beans and save them for your next tart. I think my beans are 6 years old by now :)


Ta-da -- you have a pre-baked tart shell that will withstand even the wettest filling. Now you can fill the tart shell and finish baking it according to your recipe.

Saturday, March 11, 2006

Whole steamed fish with ginger and scallions

Looking at my Outlook schedule last monday morning was depressing enough to start drinking office coffee. It was burnt and just plain bad, and it wasn't going to help me deal with the insane number of meetings I had that week, but still... And then the phone rang. Am I late somewhere already? After looking at the caller ID, I breathed a sign of relief. It was my Mom. "You have a minute?" All our conversations start this way, and I am yet to have one that actually took a minute. "Sure!" how could I say no to procrastinate dealing with customers and developers.

"How was the borsh?" I spent half an hour trying to get some sort of semblance of a borsh recipe out of my Mom over the weekend. We don't cook Russian food with recipes, so giving a recipe for a dish you know like the back of your hand is harder than you'd think. I am lucky if I get a rough idea of ingredients. The measurements, temperatures, and timings are usually described with the words "some", "a lot", and "a little". I don't mind. By now I know how to interpret my Mom's recipes, and that borsh was great. "I think it will be even better today." I said, "You know how it's never at its best the first night."

"How was rockfish?" I asked. My Mom was asking me for advice on rockfish this weekend and I was curious how it turned out. Rockfish is Maryland's name for striped bass. It's the pride and joy of Maryland fin fish and one of my favorite fish. "Oh, I didn't get it," she said appologetically as if knowing how much I wanted her to try it. I was so close -- I almost got my Mom to try a new fish. "Why not?" I asked. "I figured maybe you can make it for us when you come. Besides, I wasn't sure if it's really the same thing as striped bass. What if it's different! Maybe you can get it in Boston, and take a picture for me and post it on your blog." "Sure, I'll take a picture of striped bass for you. Not that I need an excuse to cook a whole striped bass, but this will encourage me to get it next time I am in the store."

So, here it is -- striped bass or rockfish or whatever the local name for it is. It's one fish you can never mix up with any other because it has stripes :)


Whole steamed fish with ginger and scallions

How to make a steamer: Traditionally, the fish is placed on a plate, then set on a rack inside the wok filled with boiling water, and covered with a dome cover. If you don't have a wok, you can easily improvise a steamer by using some commonly available kitchen tools. I fill my large turkey roasting pan with 1-2 inches of water, and set one of the gas stove burner grates inside to serve as a riser for the plate with fish. You can also use empty tuna cans that have been opened on both sides to make a ring. Couple of tall cookie cutters would also do well. Make sure that the water is at least half an inch below the top of your riser, so that it doesn't touch the plate with fish. Whatever you use for a riser should be at least 1.5 inches tall to allow you to pour in enough water. For a cover, use a large piece of aluminum foil. If using a large turkey roasting pan, set it over 2 burners.


Fish substitutions: striped bass (shown in the picture), tautog, black bass, Mediterranean bass, sea bream, red snapper, or any non-oily whole fish under 3 Lb. You can also use fish fillets or steaks (halibut is perfect for this recipe).

You might find this Guide to buying and cooking a whole fish helpful.

Serves 4

1 inch fresh ginger, minced
1/4 cup finely chopped scallions
One 2.5 Lb whole fish, scaled, gutted, gills and fins removed
Salt and pepper
2 tsp sesame seed oil
2 Tbsp Teriyaki sauce

  1. Set up a steamer by using a wok or a large roasting pan as described above.
  2. Rinse the fish under cold water, pat dry with paper towels, and place on a plate. For fish over 2 pounds, cut four 1/2 inch deep slits on each fillet (the slits should score the fish crosswise -- from the tummy to the backbone). Rub the fish with salt and pepper. Stuff some ginger and scallions into slits and sprinkle the rest over fish.
  3. Bring the water in the steamer to a boil over high heat. Set the plate with fish inside the steamer. Cover tightly with a domed cover or aluminum foil. Steam on high for 8 minutes per inch of thickness (a 2.5 Lb fish will take 12-14 minutes). Note: if using steaks or fillets, steam for only 6 minutes per inch of thickness.
  4. To check if the fish is done, insert a fork in the back of the fish and try lifting the top fillet off the bone. If you can mostly separate the fillet from the bone and only encounter the resistance towards the center of fillet, the fish is done. It will continue to cook as it rests. Turn off the steamer and allow the fish to sit uncovered for 5 minutes. Remove the plate from the steamer being careful not to spill any juices that accumulate on the plate.
  5. In a small saucepan, warm up sesame seed oil and soy sauce and pour over fish. Present the fish whole to the table. Fillet and serve over rice.

Tuesday, March 7, 2006

How to cook a whole fish

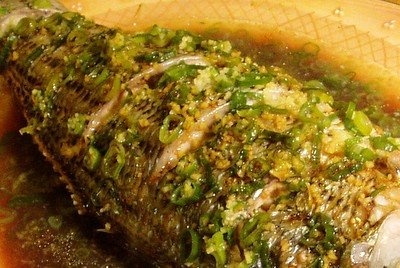
Actually, the first question is not "how," but "why." So, why would you cook a whole fish? The same reason you’d cook a whole chicken – when the flesh is cooked on the bone, it tastes juicier and more flavorful. It also allows you to enjoy small fish that would turn out rather dry if filleted before cooking, like Mediterranean sea bass (branzino), and Sea Bream (dorado). Contrary to the belief of most cooks, preparing a whole fish is not a laborious undertaking. Here is how.

Find a good fishmonger that has a reasonable demand for whole fish. Since cooking whole fish isn’t very popular with home cooks, regular supermarkets can’t turn over their supply fast enough and the whole fish they are selling might not be as fresh as their fillets and steaks. How do you know if the fish is fresh? It has bright red gills and no fishy smell. The common wisdom about clear eyes does not always hold. I’ve seen fish with clear eyes that were starting to smell, and I’ve seen fish with slightly cloudy eyes that were still fine. In fact, the fish I cooked this weekend had one completely clear eye and one just barely cloudy eye – I doubt only half of it was fresh :) In fact, it was one of the best striped bass I've ever eaten.

Ask the fishmonger to scale it, gut it, remove the gills, and remove the fins.

Here is where the guts were:


Here is where the gills were:


And here is where the fins were:


Is that cheating? Not at the slightest. You don’t pluck the chickens or butcher cows yourself, do you?

Rinse the fish before cooking (to get rid of any blood that might have accumulated in the package) and dry very well inside and out with paper towels.

Cook the fish according to your recipe. For approximate timing consult the table in the Doneness Guide.

Check the fish for doneness by inserting a knife between the backbone and the top fillet and lifting the fillet slightly off the bone. If the flesh does not want to separate from the bone, cook the fish a few minutes longer and check again. Remember that the fish continues to cook after it’s off the heat, so it should be removed from the heat when a trace of translucency still remains in the center and you encounter a bit of resistance near the backbone bone when you try to lift the fillet.


Let the fish rest for 4 minutes per inch of thickness before filleting. You can serve small (less that 1 Lb) whole fish as individual servings and let each person take them apart. For larger fish (or for diners who prefer not to mess with the bones), here is how to take apart a whole fish. Note that you don’t have to remove the skin. In fact, any fish that is small enough to fit in your oven whole is likely to have a yummy skin.

Step 1: Make an incision along the dorsal fin from head to tail.


Step 2: Make an incision to separate the top fillet from the head.


Step 3: I prefer to separate the tummy and snack on it in the kitchen while filleting fish for all those lazy people. Even if you try to lift that part off the bone, the ribs are likely to come along with it. I find that the only good way to deal with the situation is to use my hands and pop those yummy fatty bits right into my mouth. The tummy is the fattiest part of the fish – if this was a pig, this would be the bacon.


Step 4: Gently slide two spoons under the fillet to loosen it from the bone and move it to a plate. The top fillet is tricky to remove whole, particularly for large fish, so don’t panic if you break it. It will taste just as good.


Step 5: Lift the back bone from tail to head and discard. Reach into the head on the dorsal fin side to make sure you got every bit of the fillet. If you are not squeamish, lift the hard shell above the gill openings and remove the cheeks. On larger fish they are lip-smacking good. As you might have guessed, that’s the bits I snack on when I am filleting fish for a crowd. If you want the cheeks, you have to take apart your own fish.


Step 6: Run your spoon on the tummy side removing the large rib bones near the head and a row of smaller bones near the tail.


Step 7: Run your spoon along the dorsal fin side separating a row of bones from the fillet.


Ta-da! You have a filleted fish.

Did you notice that a Striped Bass turned into a Spanish Mackerel half way through this post? In the world of food blogging, everything is possible :)

Sunday, March 5, 2006

Technique of the Week: Pie and Tart Dough

Nov 16, 2013 update -- here is my updated dough method on video.

I hate all those recipes that tell you how easy it is to make pâte brisée (tart dough) – rub the butter and flour together, add a little ice water, don’t handle too much, and you are done. If it was that easy, there’d be way more good pies and tarts in this world.

I set out on the tart dough quest 6 years ago (after spending a semester in France). 50+ tarts later I can finally say that I have achieved perfection. Though I don’t see a reason why perfect pie dough should take this much experimentation.

If only the recipes spent more time on the basics and less time on the “butter vs. shortening” and “all-purpose vs. pastry flour” debates, I think I'd be all set. The thing is -- it’s all about the technique, not the ingredients. All-purpose flour is just fine. And I prefer using all butter since it gives the dough more flavor. The rest as they say is “in the wrist.”

So, if you’ll stop at nothing to achieve delicate, buttery, flaky tart dough, keep on reading.

Illustrated Guide to Pâte Brisée (tart and pie dough)

These instructions describe how to make tart dough with a stand-up mixer, which I find to be the easiest method. You could also use a food processor or a pastry blender.

For two 10 inch tarts (savory or sweet)

Ingredients:
2 1/2 sticks butter, chilled (refrigerator temperature)
3 cups unbleached all-purpose flour (13.5 oz)
1 tsp table salt (or 2 tsp Diamond Crystal kosher salt)
2 tsp sugar
1 cup ice water (you'll only need about half of it)
1 tsp distilled white vinegar

Special Equipment:
Stand-up mixer
Dough scraper

Step 1: Freeze the bowl and the flat beater of a stand-up mixer until cold, about 5 minutes.

Step 2: Cut the butter into 1/4 inch cubes. Place on a plate and freeze for 10 minutes (but no longer).

Step 3: Measure the flour. Precision is extremely important here. If you end up with too much flour (which is what happens if you scoop it with a measuring cup), your dough will be tough and hard to roll out. Measuring flour by weight is the only accurate way. So if you have a scale, use it to measure 13.5 oz of flour.

If you don’t have a scale, stir the flour with a spoon to fluff it, spoon it into a measuring cup, and level off excess with a knife. Do not scoop flour with a measuring cup as you will compress it.

Step 4: Attach the chilled bowl and the flat beater to your mixer. Add the flour, salt, and sugar. Mix on low speed until combined, about 30 seconds.

Step 5: Add the butter and toss with your hands to coat each butter cube with flour.

Cover the mixer with a towel to avoid flour splashes, and mix on low until the butter lumps are the size of peas and the mixture is the consistency of oatmeal. It’s better to under-process than over-process. Since the bowl is covered with a towel, stop the mixer every 20 seconds to see how it’s going (it is likely to take about 1 minute total). If chunks of butter get stuck, scrape down the bowl with a rubber spatula.

Here is what the mixture should look like when you are done.

Step 6: Add the vinegar to the ice water and mix well. Measure out 1/2 cup of this liquid (without ice-cubes).

With the mixer running on low, slowly drizzle in 1/2 cup of liquid into the dough. After all the water is in, give it another 5 seconds and turn off the mixer.

Pick up a chunk of dough and squeeze it in a fist. If the dough holds its shape, it’s done. If it still feels sandy and falls apart as soon as you let it go, turn the mixer back on, and drizzle in more water 1 Tbsp at a time. Test after each addition.

Step 7: Turn out the dough onto a clean counter and arrange it into a large rectangle (8 inch by 15 inch).

Starting on one short side of the rectangle and working your way to the other, smear each bit of dough with the heel of your hand in short quick strokes. The whole procedure should take about 30 seconds, so be quick or the butter will start to melt. This creates layers of butter and flour and will make your dough more flaky.

Gather up the dough with a pastry scraper.

Divide the dough into 2 piles.

Step 8: Force each pile into a thick disk.

It might not want to stay together, but you need to show it who is the boss. If it is too crumbly, kneed it shortly (just 4-5 folds and turns).

Sprinkle each disk with flour on both sides, wrap tightly in plastic and refrigerate at least for 2 hours and up to 2 days, or freeze for up to 2 months. Phew, you are done!


Hmm, I believe this is the longest post I’ve written since starting this blog, so I saved the rolling out and baking instructions for the next post.