If
Romeo and Juliette left you teary-eyed, wait till you hear
Helen and Kampachi. Some tragic love stories take place on the streets of Verona, some in Egyptian palaces, and some in Boston fish markets.
* * *
I stopped by
Captain Marden’s on my way home last week in search of something to grill. After checking out the usual suspects – swordfish, tuna, mahi, grouper, bluefish – I noticed a sign next to some off-white fillets that read “Hawaiian Kampachi, New! FARM-RAISED, $18.95/Lb”
I didn’t know what intrigued me more – the hefty price tag, or “FARM-RAISED” advertised in such big letters. All fish at Marden’s are labeled with either “farm-raised” or “wild”, but on most tags it is the fine print, not the headline. Considering how many times I’ve seen customers change their mind about a fish once they saw the “farm-raised” label, I was surprised Marden’s would emphasize it.
Unfortunately, Kampachi and I weren’t properly introduced. If the Captain (Marden’s owner), or Tom (one of his knowledgeable fishmongers) would have been working that day, they’d give Kampachi a proper introduction listing its merits and accomplishments in the culinary world. But since neither one was around, I took a chance and asked the fishmonger on duty what Kampachi was like. “Hmm … it’s kind of like swordfish,” he replied with so little confidence it was obvious he’d never had it before. Guys like this don’t make my mantra of “just ask your fishmonger” very convincing. I wish they could honestly say when they have no clue.
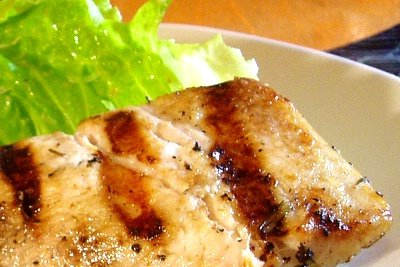
Kampachi fillets were no bigger than a red snapper, so it wasn’t likely to be as dense as a swordfish. Of course, there are some smaller fish that are firm (like grouper), but they tend to have a thick and rubbery skin. Kampachi’s looked fine and delicate, similar to salmon.
Now I really had to have that fish if for no other reason than to prove that it had nothing in common with swordfish. I can’t help being Miss Smarty Pants of Fish. When I brought my catch home, I gave it a sprinkle of salt and pepper, a light coat of oil, and then grilled it the
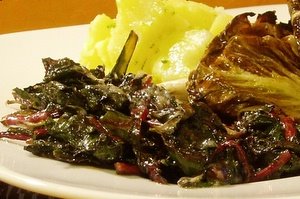
usual way. The results? Simply fantastic! This fish had the silkiness of sable (a.k.a. black cod), but with a more savory rather than sweet flavor. It’s too bad my picture doesn’t do it justice. I took one in a rush thinking that if it turns out to be a good fish, I’ll buy it again and will have plenty of chances for more pictures. Little did I know that I might never see my dear Kampachi again.
The next morning, I googled for “Kampachi.” Turns out this Hawaiian fish has been delighting sushi and restaurant chefs since its arrival on the food scene in 2005. It’s a descendent of a wild fish called kahala. Kampachi’s flavor and texture is often compared to Hamachi (yellowtail in English). I believe that
Kona Blue, the company that breeds this fish, came up with the marketing name Kampachi by combining Kahala with Hamachi. The reason you haven’t seen kahala (the wild fish) in your local fish market is that it’s prone to ciguatera toxin harmful to humans, so don't go fishing for it. But the controlled diet fed to the farm-raised version of this fish makes it not only perfectly safe but fatty and outrageously good. Maybe that’s why Marden’s was emphasizing the “farm-raised” part. And did I mention that it passes mercury and PCB testing with flying colors? That’s the maximum Omega-3 fatty acids with the minimum of mercury!
Most chefs prefer to serve Kampachi raw or rare; unfortunately, I didn’t know that when I first bought it, and sashimi is not something I do on my first date with fish. I try to give us a chance to get to know each other before getting serious. But by now, I was madly in love and couldn’t wait to taste Kampachi’s cool, creamy flesh over a bowl of rice, or better yet – seared quickly to crisp the skin while leaving the inside rare. Without further ado, I called Marden’s to place an order for Friday.
Can you believe my devastation when they told me they had no further plans to carry Kampachi. They said the distributor raised the prices and that they had a hard time selling it due to people’s unfamiliarity with the fish. The sad truth of the fishing industry... There are always new fish to discover, but you can’t get attached to any of them as the cruel fate of supply and demand might separate you forever. As long as everyone is paying $20/Lb for wild king salmon with no questions asked, what fishmonger will want to bother with an expensive fish that might not sell! Handing out samples might have been a better marketing strategy than a “New! FARM-RAISED” sign, but what do I know about fish marketing. All I know is that there is nowhere to buy Kampachi in Boston. At least not right now.
Here is the recipe for the dish I never got to make. How do I know it works? Trust me. I know. If you ever see Kampachi, give it a try.
Seared KampachiServe 4 as an appetizer1 Lb Kampachi fillet with skin
1 Tbsp butter
Salt and pepper
Optional Accompaniments:1 Tbsp Lime vinaigrette (1 part lime juice to 3 parts olive oil) or
Chive oil6 radishes cut into fine julienne
2 tsp finely chopped chives
- Prepare 4 serving plates by drizzling them with a little lime vinaigrette, chive oil, or a cold sauce of your choice. Pretty much anything herbal and/or citrusy will work.
- In a small bowl, toss the radishes with a splash of lime juice and a pinch of salt.
- Dry the fish fillets well with paper towels and cut into 4 pieces.
- Set a non-stick or well seasoned cast iron skillet over high heat and wait for it to get hot. Add the butter and wait for it to melt.
- Sprinkle Kampachi with salt and pepper on both sides and place in the skillet skin side down. As soon as the skin browns, 2-3 minutes, remove the fish to serving plates with the skin facing up. No need to check for doneness as the fish should be rare.
- Sprinkle with radishes and chives. Then open a good bottle of Riesling and have a wonderful meal. Just don't forget to e-mail me with the details of your feast.
Fish substitutions: none of the other fish will taste quite like Kampachi, but this recipe will work with arctic char, salmon, sable, striped bass, red snapper, and many other fish that are either delicate or can be eaten raw like tuna. If using a substitute fish, cook it on both sides (starting with the skin side). Salmon, arctic char, and tuna will taste best if left rare in the center. The other fish should be
cooked through.

 My recent posts would have you believe that I am a carnivore with expensive tastes chugging
 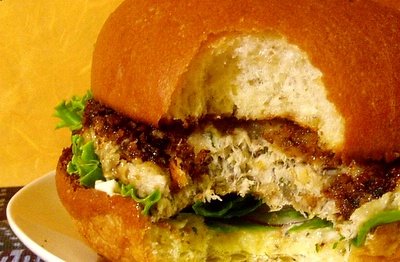 Since I’ve been on the topic of
  “So, what are we having for dinner tonight?” asked my Mom as we drove home from the airport. During my parents’ annual visits to Boston, I try to cram all my latest gastronomical discoveries into those short 3-4 days. They came to expect the menu to include some fish they’ve never heard of, interesting cuts of meat, and unusual vegetables that my Dad never thought he’d like and then ends up asking for seconds. In fact, if I told them that we were having snails or frog legs for dinner, they would be less surprised than when I said “Burgers.”
 Since we already bought ground beef,
 You’ll need a sharp boning knife (see the picture) or a utility knife that has a flexible blade (no picture since I don’t own one).
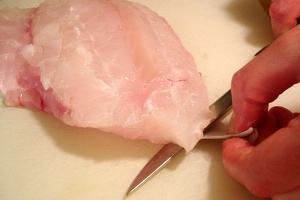 Put your fillet on the cutting board skin side down with the tail end on the left and the head end on the right (or the other way around if you are left handed). If you have a small piece of the fillet that is of equal thickness throughout (like you see in this picture, the orientation of the piece doesn’t really matter. Make a cut to separate a small flap of the skin from the fillet in the left corner that's closest to you (or right corner if you are left handed).
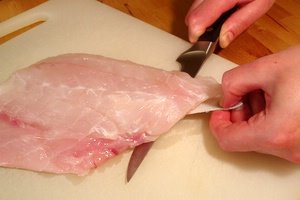 Grab onto that flap, and slide your knife between the skin and fillet pointing the blade of your knife slightly into the board (about a 20 degree angle). This way you'll leave the least amount of fish on the skin.
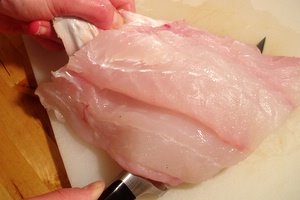 Slide the knife all the way under the fillet.
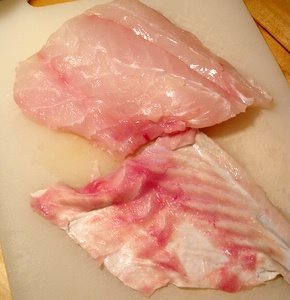 Done!
Done!