Tuesday, August 31, 2010

Alexander Benjamin Rennie is born!

Sasha (short of Alexander in Russian) was born on August 27, 2010 weighing 6 Lb 12 oz.  We are back from the hospital and everyone is doing well :)

Thanks to his Daddy, he already has a blog.

Friday, August 27, 2010

Can lobsters induce labor?

After 4 days of rain and cold, it's finally perfect weather in New England -- the kind Californians take for granted, but we tough New Englanders only see a few weeks a year.  And since so many of you might be on vacation, I thought it might be a good time to post about the ultimate New England vacation food -- lobster.

I have a confession to make -- I am a little afraid of lobsters.  They look like huge bugs, and bugs are not my thing.  Unfortunately, very few New England establishments cook lobsters to my desired doneness.  It's almost always overcooked!  So if I want it done right, I have to do it myself.

"We should have lobster rolls for dinner," I thought as I woke up yesterday.  Each morning, I try to come up with something challenging to cook to keep my mind off the fact that my due date came and went a week ago and the baby is still in my tummy.  I tried active walking (even in the rain), acupuncture, spicy food.  Nothing worked yet.  My new strategy is to buy very perishable and expensive proteins.  I figured that the baby will probably want to come out just as I bring those lobsters or a very expensive steak home.

At first, it didn't seem to work.  The lobsters got cooked, dismembered, and turned into fantastic lobster rolls without any signs of labor.  I was starting to lose hope that I'll ever go into labor at all, but this morning I finally started feeling contractions.  Since I might not have that much blogging time left, let me get to the crux of the matter.

How to cook, not overcook a lobster

The problem with shellfish cooked in the shell is that you can't just poke it, look inside, and see if it's done (like you can with fin fish). You have to rely on timing. Since I cook lobsters rarely, I used to rely on the timing I heard from the fishmongers. The formulas they gave me varied from 13 to 20 minutes per pound and since I prefer to err on the side of undercooking than overcooking, I went with 13 minutes. The claws were good, but the tails were way too tough. After reading what my seafood hero, James Peterson had to say in his Fish and Shellfish book, I realized that even 13 minutes per pound is way too long and the reason my lobsters came out tough was because of overcooking. I guess this is one time when you shouldn't listen to your fishmonger. Peterson suggested two timings.

For a lobster that's still a bit translucent in the center (the way he prefers it): 5 minutes for the first 1.25 Lbs, then 2 minutes for each additional pound. In other words, 1.75 Lb lobster would cook for 6 minutes.

For a lobster that is opaque throughout: 8 minutes for the first 1.25 Lb, then 2 minutes for each additional pound. In other words, 1.75 Lb lobster would cook for 9 minutes.

I use the second timing and the lobsters always come out perfectly tender and succulent.

How much water to use
You need a huge pot and a ton of water. Peterson suggests at least a gallon of water for the first lobster and a quart for each additional one. This works if your lobsters are about 1.5 lb each and if your stove is powerful enough to return the water to a simmer quickly after the lobsters go in the pot.  If your lobsters are larger or your stove is wimpy, I suggest increasing the amount of water.  If you go with 2 gallons for the first lobster and 1 more gallon for each additional one, you'll be safe on any stove no matter how large the lobsters are.  If you use too little water, it will cool off too much when the lobsters go in and the timing formula might not work.

No salt
You probably never thought you'd hear me say this, but hold the salt. Lobsters are naturally salty and if you add any salt to the cooking water, it ends up being too much.

Poach, don't boil
Another thing to remember is that a lobster should be poached, not boiled.  If your heat is too high, the lobsters will get tough.  Bring the water to a rolling boil before the lobsters go in. As soon as the lobsters go in, cover the pot and return the water to a simmer as quickly as possible (in other words, crank up the heat). Check it every minute, and as soon as you see the first bubbles, turn the heat off and leave the pot covered.  Don't worry, the lobster are still cooking.  Just because you turned the heat off, doesn't mean the water is not hot.  Note that the above timing is the total time the lobster spends in the water (the time it takes to return the water back to a simmer plus the time the water is off the heat).

Rest and Serve
Remove the lobsters from the cooking liquid and let rest 10 minutes before taking apart.  I probably don't need to tell you that, but lobster dunked in melted butter is heavenly.

Tips on taking your lobsters apart and making lobster rolls.

Wednesday, August 25, 2010

To marinate or not

As every home cook, I've gone through the stage when I marinated every piece of protein that crossed my kitchen threshold (chicken, beef, pork, lamb, shrimp, fish, etc).  If it had parents, it needed to soak in something.  Ah -- those good old college days full of so much enthusiasm and so little knowledge about how to cook.  A few years later, I learned that a marinade has as much impact on the tenderness and flavor of your meat as the government has on the state of the economy.  Sure they can hurt.  But can they help?  Nope.

Yes, I became a culinary and political libertarian.  My only goal in cooking proteins was to choose them wisely and not screw them up.  Salt, pepper, and heat became my only ingredients.  "But what about complexity of flavor?" might you ask.  Surprisingly, as all the rubs and marinates got dropped, flavor got more complex because I discovered the ultimate power of the Maillard reaction, or in layman terms "browning."  Browning is your friend.  When proteins brown, hundreds of different flavor compounds are created.  That's where dropping the marinades and rubs actually helps.  In order to maximize browning, the proteins need to be absolutely dry (otherwise they steam rather than brown).  They also need to make great contact with the hot cooking surface.  All the liquids in the marinades make your proteins wet, and the chunky ingredients, like garlic, prevent good contact with the cooking surface (it's the garlic that ends up browning and often burning rather than the protein itself).  I tried wiping the marinades off before cooking the protein.  That helped a lot in the browning department, but seemed like an awful lot of fuss all for nothing.  Leaving the protein completely alone and not marinating at all seemed to work just as well and was a lot easier.  Salt and pepper right before cooking, and into the hot skillet it goes.  I wrote about the searing technique before, using scallops as an example, but the same applies to all proteins.

I am still a strong believer in this minimalist approach.  That's what I teach in my classes.  If you want to be a great cook, you need to know how to take a protein, salt, pepper, and heat and turn them into a spectacular meal. If you think that Worcestershire sauce, soy sauce, mustard or some other secret ingredient will come to your rescue, keep on dreaming.  It all boils down to your ability to judge how much salt to use and how to test for doneness.

This sounds somewhat austere and implies that all your beef dishes should taste the same, all your lamb dishes should taste the same, etc.  Far from it.  That's where the sauces and garnishes come in.  Is red wine lovely with beef?  Of course!  But instead of soaking a steak in it before cooking, why not make a red wine reduction sauce to put on the steak when it's done?  Is lamb just begging for garlic?  How about topping it with garlic herb butter after it's done?  This way you get the best of both worlds -- the garlic flavor is fresh and intense and the meat is perfectly brown and complex tasting.

Salting in advance does work
Of course, as soon as you come up with any sort of strict rules, like "proteins should never be pre-treated," you start discovering exceptions.  So, never say never.  There is one ingredient that does do wonders when left on a protein for a long period of time before cooking -- salt.   Judy Rodger's from the Zuni Cafe opened my eyes to the beauty of pre-salting.  Unlike most ingredients commonly found in marinates, salt is the one that penetrates very deeply even into large pieces of meat given long enough time (like 24-48 hours).  Acid on another hand only penetrates about 1/4 inch of meat usually resulting in an outer layer that's mushy and dry rather than tender and juicy.  So, what does the deep salt penetration give you?

More evenly seasoned protein
This is true for all of them from chicken to shrimp.  Salt intensifies the flavor of a protein.  The move evenly we can distribute it, the better each bite is going to be.

Slightly better browning
This benefit is tiny, but it is a nice side effect.  When proteins are salted, their surface gets wet.  People often worry about the protein losing juiciness, which is not the right problem to worry about.  The real problem is reduced browning due to increased surface moisture.  That's why I always salt immediately before starting to cook a protein rather than 10-15 minutes in advance.  But a day in advance is even better.  This way you can dry it thoroughly before cooking and don't need to put any more salt on it, keeping the outside as dry as possible.  What about the moisture loss due to salting?  Some people think it's such a big problem that they salt their proteins AFTER cooking.  That's just silly.  The amount of liquid drawn out by salt is tiny compared to how much protein loses due to the heat of cooking.  Some moisture lose is unavoidable, but it's much better controlled by not overcooking than by avoiding salt.

Increased tenderness and juiciness
It's very easy to get over confident here and assume that if a protein is pre-salted for a day or two, it will be tender and juicy.  I am still a firm believer that most of tenderness and juiciness is controlled through getting doneness just right.  Below 120F, the moisture is still trapped within the cell walls, and you can't easily access it by chewing.  120F-140F, the proteins coagulate, forcing liquid out of the muscle cells, which then collects within the protein sheath. That's when your protein is the juiciest but still tender. After 140F, it's all downhill from there. The proteins get tougher and the liquid gets squeezed out.  That's where salting in advance can really help.  It gives you an additional 20 degrees or so before the protein gets seriously tough and squeezes all the moisture out of itself.

So for all practical purposes, salting a day or two ahead gives you the most benefit with poultry and pork since they are usually cooked to higher than 140F.  I haven't noticed a big improvement in tenderness or juiciness of my beef and lamb when I salt far in advance because I cook them to 130F (internal temp after resting).  I do cook most fish to as high as 135F (internal temp after resting), but it's such a tender protein that toughness is usually not an issue and as long as you don't go over 140F, it will still be juicy.  This is not to say that salting in advance can ever hurt.  It's always beneficial particularly when it comes to outer layers that reach higher temperature than the center.  But for chicken and pork, it's a tremendous difference that is worth planning in advance.

Other in advance ingredients
After further reading, I found that there are other ingredients that can be helpful when put on a protein way in advance.  Lactic acid helps with tenderizing the outer layers of chicken without turning them mushy the way wine or vinegar does.  This explains the tradition of many cuisines to soak chicken in yogurt or buttermilk before cooking.  Sodium glutamates can penetrate to the center of even very large pieces of protein given enough time (just like salt does).  The most glutamate rich product is MSG (health risks of which, by the way, have been blown completely out of proportion), but there are plenty of others that are less controversial: miso paste, tomato paste, soy sauce, etc.

The important thing is to figure out what does an ingredient do for you before dumping it on an unsuspecting protein.  It's also good to know the trade offs.  Sure, the soy sauce will make salmon more flavorful, but will it make it stick to the grill?  The brine might make your chicken really juicy, but will it prevent its skin from getting crisp?  Salt is the only ingredient I know of that always helps and never hurts when put on any protein before cooking and allowed time to penetrate.  The other ones are a bit tricky.

This is just some food for thought.  As all advice on my blog it mostly applies to Western European cooking where proteins are cooked in large pieces and meats are either cooked to medium-rare or braised.  There are many cuisines where proteins are cut very small and cooked all the way through.  Different cooking principles apply there.

In cooking, just like in everything else in life, rules are only there to be broken.  But basic principles like "less is more" can often be helpful.

Monday, August 23, 2010

Home made "canned" tuna

Who makes their own tuna in a can?  I mean, it's the kind of food snobbery on par with making your own ricotta, granola, and creme fraiche.  But since I've done all of those, I am allowed to make fun of my fellow food snobs.  You see, I was in a desperate need of a cooking project and thought that making canned tuna would be just the thing to distract me from the fact that my due date was last friday and this baby seems to have no intention of getting out of me.  Jason and I are joking that maybe I am feeding him too well.

So, back to canned tuna...  First, let's talk about what you can buy in the store and for how much.
  • Tuna packed in water -- that's not even worth talking about.  This stuff is inedible in my opinion.
  • Cheap tuna (such as albacore) packed in oil.  Some of this stuff is fine in a typical tuna salad where it's mixed with mayo or vinaigrette type dressing.  It's still relatively dry and crumbly, but not bad.
  • Expensive tuna (such as yellowfin) packed in oil.  This stuff is often imported and does taste good enough to eat out of a jar with no dressing.  The problem is the price.  8 oz jar can cost $11.  That's like paying $22/Lb for tuna, which is even more than upscale fish mongers charge for raw yellowfin tuna.  For that price, I'd rather be eating tuna raw or seared medium-rare.
Of course, there is the wonderful convenience of just opening a jar.  You can always have it on hand.  It's not perishable, and so easy to take with you to the airport, picnic, etc.  Yet, I was wondering if I can beat the taste and the price of the most expensive imported yellowfin tuna in a jar.  Unlike roasted chicken and a perfect pie dough, this is not a question that kept me awake at night for many months.  I only started wondering about oil poached tuna this weekend, when Jason and I were looking at packages of yellowfin tuna at Costco.  It's rare that Costco carries tuna, but when they do, it's lovely and a bargain ($12/Lb compared to $19 at a good fishmonger).  Just check that the "pack on" date is the day you are buying it or at least the day before.

"What do you think of this package?" I asked Jason.  "It's ok," he said hesitantly, "but what about this connective tissue?"  Most tuna steaks butchered the European way have some chewy parts where connective tissue is thick.  When tuna is butchered the Japanese way, the loin is divided into sections to provide consistency of texture, but that's hard to come by even at upscale fishmonger shops, let alone at Costco.  "Don't worry," I told Jason.  "I'll sear the good part medium rare and will poach the rest in oil for sandwiches and salad."  "You mean like canned tuna?" he asked.  "Yes, only sous-vide."

Jason has learned that if I mention "sous-vide," it's going to be good.  And truth be told, I am yet to have a sous-vide disaster.  The texture almost always surpasses conventional cooking methods.  If you are new to sous-vide, here is the summary -- put food in a vacuum sealed bag and hold in a water bath at a precise doneness temperature (140F for tuna) for about 2 hours per inch of thickness (more about sous-vide).

For all practical purposes, poaching tuna in oil is kind of like making duck confit.  Normally, you need enough fat in the pot to submerge the meat.  I always found it kind of wasteful, especially when it comes to fish because that oil is not reusable.  But using sous-vide method, I could get away with a very small amount of oil (about 1/4 cup) since I was sealing it in a bag with tuna.  The problem is how do you seal a liquid without breaking your vacuum sealer?  You freeze it first.  The day before I was going to cook the tuna, I poured the oil into a vacuum bag and carefully placed it in the freezer trying to keep the oil relatively flat, but tilting the opening of the bag up so that the oil doesn't spill.  Next day, I had a nice sheet of frozen oil.

I also decided to salt my tuna about 4 hours before cooking to make sure it's flavored throughout (like you would with duck, but for a shorter period of time).  Then I put the tuna in a bag with frozen oil, vacuum sealed it, and put into my humongous beer cooler filled with 143F water.  It dropped to 140F in about 15-20 minutes after the cold tuna went in.  I kept it there for 2 hours making sure the temperature never dipped below 135F.  And ta-da!  I made my own canned tuna.  Only way better.  This stuff is not crumbly or dry.  It's luscious!  Just melts in your mouth.  Not even the expensive imported canned tuna from Italy can compare to my home-made version.  The only thing I'd do differently next time is use a light olive oil.  Extra virgin is a bit too strong and overshadows tuna's flavor.  Unfortunately, this stuff is perishable, but it should last for a week in the fridge as long as you keep it covered in oil.  Maybe even longer, but a week is definitely safe.

Tuesday, August 17, 2010

Food shopping guide to Metro Boston area

Last updated June 26, 2015

"Guide" is a strong word for this listing, but it's where I like to shop. Since I was in the process of updating the list of stores I attach to all my class handouts, I thought I'll post it here for all my Metro Boston readers.

All-purpose

Russo's - most of my shopping happens here except for fish and meat. They carry the best quality and variety of produce (besides farmers' markets), dairy, eggs, cheese, deli (the best prosciutto prices in Boston), Iggy's bread, and many great Asian products. I was never impressed with the quality of their meats, but poultry variety and quality is excellent.
560 Pleasant Street / Watertown MA 02472 / 617-923-1500

Whole Foods – great for one stop shopping including fish and meat, but way more expensive than Russo's.

Stop and Shop, Roche Bros, or Shaw's - that's where I buy Diamond Crystal Kosher salt that I use for everything from cooking to baking. For some reason, Whole Foods doesn't carry it.

Costco - my shopping list here usually includes King Arthur flour, Cabot Cheddar, Buffalo Mozzarella, campari tomatoes, onions, haricot verts, fish, prime steaks, and boneless short ribs. Quality is consistently high, prices are exceptionally low, but the packages are very large, and you'll need to pay for a membership.

Fish

New Deal Fish Market – the best fish selection and quality in Boston, particularly for whole fish. They carry sushi grade salmon, tuna, branzino, hamachi, fluke, etc. Carl Fantasia (the owner) is a walking encyclopedia of fish and a fabulous cook always willing to share his knowledge and recipes. The fact that this little gem survived the Whole Foods invasion and consumers' drive to have everything fast and cheap is a joy and a miracle. Just be patient. Every customer has her turn, and as Miracle Max said in Princess Bride, "You can't rush a miracle, sonny."
622 Cambridge St., Cambridge, MA, 617-876-8227

Captain Marden's – this is where the restaurants get their fish, so the quality is consistently high. The retail store only has fillets, but they can get you whole fish and all kinds of interesting species if you call a few days in advance.
279 Linden St, Wellesley, MA 02482, (781) 235-0860

Costco - very good quality (often comparable to high end fish markets) for much lower prices. Unlike other Costco products, fish packages are reasonably sized (1-3 Lb). Selection is very limited.

A more extensive fish market list

Meat

Costco - unbeatable for prime rib-eye and NY strip steaks. The quality is as high as it gets in Boston and the prices are unbelievably reasonable.

Whole Foods – sometimes local, sometimes prime, sometimes dry-aged, always expensive.  I do like their pork products (rib chops and boston butt) -- good quality and reasonably priced compared to other meats.

Savenor's - They carry it all: rabbit, foie gras, goat, interesting cuts of beef, several types of duck. The tastiest chickens you can buy in Boston (Giannone). Prices are generally high.
92 Kirkland Street / Cambridge, MA 02138 / 617-576-6328
160 Charles Street / Boston, MA 02114 / 617.723.6328

Bread

Iggy's – excellent breads (particularly if you like sourdough).  Not the best baguette in the city, but cranberry nut loaves, Francese, multi-grain, country sourdough, and brioche burger buns are outstanding.  You can get some of their breads at Whole Foods and Russo's.
130 Fawcett St, Cambridge, MA 02138, (617) 491-7600

Clear Flour – excellent breads, croissants, and brioche. We rarely make it to Brookline, but often buy their baquette (the best in Boston) and focaccia at Whole Foods, John Dewar's, Formaggio's, and Fresh Pond Market.
178 Thorndike St, Brookline, MA 02446, (617) 739-0060


Japanese Ingredients
H-Mart – huge and not particularly easy to navigate, but offers a good selection of Japanese products
Has locations in Burlington and Cambridge

Farmers' Markets

In the summer, I buy as much of my produce as possible in the farmers' markets.  Here is how to find one near you.

Thursday, August 12, 2010

Tomato Fennel Tart Tatin

I have the good news and the bad news for you, my friends.  The good news is that this tart is probably the yummiest summer tart ever, even when compared to my other favorite Cherry Tomato and Caramelized Onion tart.  The bad news is that it's not for the faint of heart.  Labor intensive recipes requiring an oven are a hard sell in the summer; and it's a shame.  I find baked goods with tomatoes, apricots, plums, and peaches to be absolutely irresistible.  The results are more than worth the sweat, if you ask me.  But then again, I live to eat.

I do have a few tips for how to make this project more manageable.

Tomatoes: If you are going to turn on the oven to roast tomatoes for this tart, you might as well roast as many tomatoes as can fit in your oven.  They taste great on anything and last for a couple of weeks in the fridge covered with oil.  You can either use the long and slow "tomatoes confit" method, or crank up the heat to speed things up.  The important thing is that your tomatoes need to be slightly caramelized and no longer watery.

The dough: before the summer is in full swing, I stock my freezer with a ton of pie dough.  I mean a ton!  It never goes bad, and it's much easier to get it done when the kitchen is not 90 degrees.  Although I wrote about pie dough previously on this blog, it's no longer the recipe I use.  I use the vodka pie dough from Cook's Illustrated developed by Kenji Alt.  Yes, I know it sounds like a gimmick, but it makes the best dough I've ever made or tasted and trust me I've tried them all.  It also happens to be the easiest pie dough on this planet.  The only difference between Kenji's version and mine is that I use all butter (no shortening) and chill longer before rolling out.  If you don't have a food processor, you can always work the butter into flour by hand with a pastry blender tool or if your food processor is not big enough to fit the full batch (mine isn't), you can always do step 2 in a food processor and then move it to a bowl for the remaining steps.

Vodka Pie Dough

Vodka Pie Dough Video

For one 9-inch Double-Crust Pie( or two 10- inch tarts)

Vodka is essential to the texture of the crust and imparts no flavor—do not substitute. This dough will be moister and more supple than most standard pie doughs and will require more flour to roll out (up to 1/4 cup).

Precision is extremely important when you measure the flour. If you end up with too much flour, your dough will be tough and hard to roll out. Measuring flour by weight (using a scale) is the only accurate way. If you don’t have a scale, here is how to approximate 5oz per cup of flour this recipe uses. Move the flour to a container without filling it to the brim (you need room to stir and scoop). Stir the flour thoroughly with a spoon to fluff it, scoop it with a dry measuring cup without shaking the cup, level off excess with a knife. Do not measure flour directly out of the package. It’s too compressed.

12.5 oz unbleached all-purpose flour (2 1/2 cups)
1 tsp table salt (or 2 tsp Diamond Cristal Kosher salt)
2 Tbsp sugar
2.5 sticks unsalted butter cold, cut into 1/4 inch slices
1/4 cup vodka, cold
1/4 cup water, cold
  1. Chill the butter in the fridge at least for 5 minutes after slicing.
  2. Process 7.5 oz flour (1 ½ cups), salt, and sugar in food processor until combined, about 2 one-second pulses. Add butter and process until homogenous dough just starts to collect in uneven clumps, about 15 seconds (dough will resemble cottage cheese curds and there should be no uncoated flour). Scrape bowl with rubber spatula and redistribute dough evenly around processor blade.
  3. Add the remaining 5 oz flour (1 cup) and pulse until mixture is evenly distributed around bowl and mass of dough has been broken up, 4 to 6 quick pulses. Empty mixture into medium bowl.
  4. Sprinkle vodka and water over mixture. With rubber spatula, use folding motion to mix, pressing down on dough until dough is slightly tacky and sticks together.
  5. Divide dough into two even balls and flatten each into 4-inch disk. Wrap each in plastic wrap and refrigerate at least 2 hours or up to 4 days. The dough can also be frozen for several months (wrapped tightly in plastic and placed in a freezer bag).
1/3 of this batch will be enough for a tart tatin made in a 10 inch skillet, but if it's more convenience, use 1/2 of the batch and make something out of leftover dough.

Tomato Fennel Tart Tatin

Pie dough of your choice (you'll need enough for a 9-10 inch tart)
5 large tomatoes, cooked using the confit method or roasted at higher temperature
2 Tbsp olive oil, plus more as needed
2 large fennel bulbs, sliced
1/4 cup dry white wine
Salt to taste

Braising Fennel
Set a large skillet over high heat. Add 2 Tbsp olive oil and wait for it to get hot. Add the fennel and cook until most of the slices are golden brown, stirring not more often than once a minute, and adding more oil as it gets absorbed(you'll probably need about 4 Tbsp of oil total). This will take 4-5 minutes. Don't be tempted to stir fennel too often -- really let it brown. Those caramelized pieces are the best part.

Turn down the heat to low, season generously with salt, and add the wine. Cover immediately and steam until all the wine is absorbed and fennel is tender, 7-10 minutes. Taste and correct seasoning.

Assembling and baking the tart
Preheat oven to 425°F.

Line a heavy bottomed 10 inch skillet with a piece of parchment paper (just the bottom), arrange the tomatoes domed side down and top with fennel.

Roll out the dough to 11-inch round (about 1/8 inch thick) and arrange over vegetables. Here are the rolling instructions.  For this Tatin recipe, you don't need to fit the dough into a tart pan or blind bake, so in some respects it's a lot easier than most tarts.  Tuck edges around the vegetables into the skillet. Bake tart in middle of the oven until pastry is golden brown, 30 to 35 minutes.  Cool 5 minutes.

Have ready a rimmed serving plate slightly larger than skillet.  Invert plate over skillet and, wearing oven mitts and keeping plate and skillet firmly pressed together, invert tart onto plate. Do this over the sink in case some juices spill. This is a bit scary, but it works! The trick is to do it in one very fast motion. Peel off the parchment paper.

Let cool at least 15 minutes and serve.

Monday, August 9, 2010

Chilled tomato yogurt soup

This post is part of the Loving Local: Celebrating the Flavors of Massachusetts blogathon hosted by In Our Grandmothers' Kitchens during Mass Farmer's Market week, August 22-28.  I am posting a little early, but I have a good excuse -- I am having a baby that week.  Besides, I couldn't wait to tell you about my new favorite find in the world of chilled soups.  All the produce for this dish was purchased at our wonderful Natick Farmer's Market.  It happens on Saturdays in the Natick center starting at 9am.  If you haven't yet stopped by your local farmer's market, please do.  The produce is outstanding this year!  You can also make a donation to the The Federation of Mass Farmers Markets.

*   *   *

I already told Jason what I want for my first meal after I give birth -- a stuffed flatbread and a soup from Sofra.  Sofra is my usual lunch spot after the ob check ups since they offer the best food within 5 minutes from the hospital.  Last Friday, I had a fabulous yogurt soup there.  Whenever I think yogurt soup, I think cucumber, but the version at Sofra was showing off heirloom tomatoes and knocked my socks off with its punchy sweetness and velvety tomato texture.  It had other stuff too -- paper thin cucumber slices, and a hint of mint, garlic, and olive oil.  I loved this soup so much I recreated it at home this weekend and wrote up a recipe for you.

My first kiddo, Sammy, was born right after 8pm, just as MtAuburn hospital cafeteria was closing.  As I was struggling to push her out with the last bit of energy I had left after hours of labor, I remember the nurse telling poor stressed out Jason to ask me what I want to eat after I give birth (since that was his last chance to order food for me).  I was semi-conscious by that point, but remember my reply being something like this: "I think I am gonna die, and you want me to figure out what I want to eat!!!"  or maybe it was something like this: "If this baby ever comes out of me, I am willing to give up eating for the rest of my life."  But eventually, Sammy did come out and we were all insanely happy, and surprisingly hungry.

Since ordering cafeteria food was the path of least resistance, that's what we did for the next 24 hours or so and it was some of the worst food I've ever had in my life.  Thank God for our dear friends Gaia and Jerome who brought us all sorts of lovely food on the second day.  Why did we never think of getting food from somewhere else?  I have no idea.  Giving birth does something strange to your brain function.  Well, at least we're now older and wiser.  This time, we are not going to suffer through 2 days of disintegrating pasta, chemically flavored yogurt, and rubber textured chicken breasts.  I just hope Sofra keeps that lovely yogurt soup on the menu for another couple of weeks, so that I can have it after giving birth, but whatever their soup of the day will be, I am sure it will be a hundred times better than anything from the hospital menu.

Chilled Tomato Yogurt Soup

Summer is the perfect time for this soup.  Please don't try to make it if you can't get your hands on the ripest seasonal tomatoes and strained full fat yogurt.  Fage Total Greek yogurt is a good brand widely available, but whatever yogurt you use should be as thick as sour cream and sinfully rich.  If you can't find baby or Armenian cucumbers, use any cucumbers you want, but you might want to peel and seed larger cucumbers before slicing.

Serves 4 as the first course

3 large tomatoes
2 cups very thick full fat plain yogurt
1 mashed garlic clove
2 Tbsp minced fresh herbs (such as mint, dill, cilantro, or basil)
4 tsp olive oil
1 baby cucumber, sliced paper thin on a mandoline
Salt to taste

Slice tomatoes in half through the equator and dig out the seeds with your fingers.  Discard seeds.  Grate tomatoes on a box grater (start with the cut side and you'll get all the flesh out of them).  Discard the skins.  Generously salt the tomato flesh and let sit for 10 minutes.

Put the tomatoes in a fine mesh strainer set over a bowl.  Force the liquid through with a ladle into a bowl (make sure to save both the liquid and the pulp!).  Puree the tomato liquid with yogurt, garlic and herbs in a blender.  Taste and season with salt as needed.  Divide the tomato pulp among 4 bowl and top with 4 tsp olive oil (1 tsp per bowl).  Mix to combine.  Divide cucumber slices and soup among the bowls.  Garnish with additional cucumber slices, herbs and a drizzle of olive oil.

Tuesday, August 3, 2010

Summer pudding

I grew up in a household with no chef's knife, no stainless steel skillet, no spatula (my Mom could flip anything with a butter knife), no food processor, and no Kitchen Aid mixer, but we always had a cherry pitter.  As much as I hate single task kitchen tools, particularly ones that are used rarely, I love my cherry pitter.  If you don't have one, I suggest you get one now.  Who knows when you'll see sour cherries next -- maybe next week or maybe in 3 years, but you need to be ready because they are too perishable to give you time for cherry pitter shopping, and unlike the sturdy eating cherries, they can only be pitted with a pitter.

This is the third time this summer I had to get the cherry pitter from the back of my bottom drawer, which means it's been one cherrilicious summer.  This time I spotted them at Russo's, right next to wild blueberries and black currants.  This trio had "summer pudding" written all over it.  Summer pudding is something you need to taste at least once in your life.  It doesn't look very appetizing, and it sounds even worse -- soft sandwich bread layered with cooked berries and given time to absorb their juices (in other words, it's soggy bread) -- but it tastes so unbelievably good that it's impossible not to fall in love with this strange concoction after your first bite.

If only I could send a piece of this pudding to my Mom.  She is the one who introduced me to it, but I don't think she ever had it with sour cherries.  

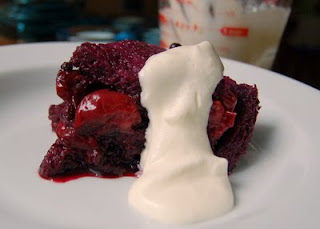
Summer pudding is a cook's dessert.  It relies more on your ability to taste and adjust than measure and follow the recipe.  Here are some pointers for success.
  • You need a high quality white sandwich bread.  For some strange reason, it's hard to find.  In French, it's called "pain de mie".  Good pain de mie has a closed crumb (no large holes), is neutral tasting, and is soft, but not mushy.  I found an excellent loaf at Russo's that they call "peasant bread."  Don't use the mushy Wonder Bread, or some other mediocre supermarket variety.  Don't use anything rustic with a crisp crust and open crumb (in other words holes are no good here).  Don't use anything sour-dough.
  • When choosing your berries, try to get some variety (at least 2 types).  Raspberries, blackberries, blueberries, sour cherries, black and red currants are all excellent.  Avoid strawberries -- they are not the right texture for this dish.  In my opinion, sour cherries make the best summer pudding because they are not as seedy as raspberries and blackberries and have the most fabulous flavor.  Black and red currants are great in small amounts, but don't get carried away with them or your pudding will be too seedy.  The pudding in the picture had 4 cups sour cherries, 2 cups wild blueberries, and 1 cup black currants.  It was probably the most wonderful summer pudding I've ever tasted.
  • Adjust sugar to taste.  There is no way for this recipe to tell you exactly how much sugar to use.  It all depends on how sweet or sour your berries are.  You want the juices to taste intensely sweet and sour, but  they shouldn't be so sweet that they thicken into something the consistency of maple syrup.  If you are missing acidity, add some lemon juice until the flavors really pop.
  • Use a mold with straight sides that is at least 3 inches deep.  This way you can comfortably fit 3 layers of bread and two very thick layers of berries.>
  • If you forget to line the mold with plastic, don't panic.  I forgot last time I made it, and nothing terrible happened.  In this case, don't invert the pudding.  Slice and serve it right out of the mold.
Summer Pudding

For a 1.5 - 2 quart mold

7-8 cups berries (see the tips above for selecting them)
2/3 - 1 cup sugar
a squirt of lemon to taste (if most of the berries have low acidity)
1 lb white sandwich bread, sliced 1/2 inch thick, crusts removed
Heavy cream for serving

In a non-reactive (not aluminum) saucepan, cook berries with sugar on med-low heat stirring occasionally until berries break down and release their juices. This will take 20-30 minutes. Taste and adjust sugar and acidity.  Take off heat. Let cool 30-45 minutes. The berries should be warm, but not hot.

Line a 1.5-2 quart soufflé dish (or any other round dish that is 7-8" in diameter and 3" deep) with plastic wrap.

Line the sides and bottom with bread. You'll have to trim the bread slices to fit as snuggly as possible. Pour half of the berries into the bread-lined dish. Spread them over the bottom layer of bread. Make another layer of bread slices over the berries, trimming the bread as necessary to fit snuggly. Add the remaining berries and cover with a final layer of bread.

Place a sheet of plastic wrap on top. Cover with a plate with a slightly smaller diameter than the dish, and place a heavy object (a large can of tomatoes or olive oil) on the plate to weigh the pudding down. Refrigerate overnight.

To serve, remove the plastic wrap, and invert pudding onto a plate. Remove the rest of the plastic wrap. Slice and serve with cream (straight or lightly whipped).

Monday, August 2, 2010

Cooking in plastic -- how safe is it?

When I wrote about using zip-lock bags for the sous-vide cooking method, one of my wonderful readers warned me about the possible danger of cooking in plastic.  The responsible person that I am, I decided to investigate the issue.  I called SC Johnson, the company that makes Ziploc® bags and asked them if their products are safe to use for sous-vide cooking. I explained that this involves heating the food in a bag in a 140F water bath for about 2 hours. They said they'll investigate and get back to me.  Here is the reply that I got:
Our official position is that our Ziploc® bags are not recommended for cooking, only for reheating and defrosting.
But let's be realistic.  Heat is heat whether you are "reheating" or "cooking".  With further prodding I was able to find out that Ziploc® bags start to melt at 230F and no, they don't contain BPA (the chemical that made us all throw out our water and baby bottles).  So, what does all this mean?  Are they officially safe?  No, because they were never tested at low temperatures for long periods of time like the vacuum seal bags -- those are officially safe for sous-vide cooking.  However, I don't see any big red flags here telling me bad things might happen if you occasionally use Ziploc® bags to cook something sous-vide.  That's my personal conclusion and you need to use your own judgement when making this decision.

This closer look at cooking in plastic made me take a loser look at cooking WITH plastic too.  When I looked at my plastic spatula, I didn't like what I saw.  It was easy to see with a naked eye that it was melted.  After inspecting it carefully, I found tiny little letters on the back of its handle (black on black) that read "Safe up to 400 degrees."  That's like making a car that is safe to drive up to 30 miles an hour.  What if you ever want to get on a highway?  Any time you are cooking in a skillet, you are likely to get way above 400F.  Saying that you shouldn't use it on "high" heat is way too vague.  Even on the same stove, medium of one burner is not the same as medium of another burner.  A lot also depends on how long the pan was sitting on the burner, what was in the pan and how the food was positioned.

What makes us question Ziplock bags more than the spatula?  I am guessing it's the novelty of it.  Very few households cook anything sous-vide, yet I can't think of any household that don't have a spatula. It's just like driving vs. flying.  I haven't met many people afraid of driving, but many that are afraid of flying.  Statistically, you are way more likely to die while driving than while flying, but the fact that you drive every day takes all the fear out of it.

The plastic spatula is now safely residing in my trash.  I replaced it with metal.  Technically, you shouldn't use it on non-stick pans, but I'll take my chances with that.  I found that if I am gentle and don't scrape the pan with a spatula, nothing terrible happens.